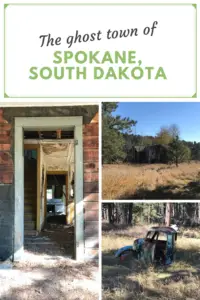
I discuss our discovery of the ghost town of Spokane, SD near Custer State Park.
There is a really cool, hidden site in the central Black Hills, the ghost town of Spokane, South Dakota! I was surprised how long we lived in the Black Hills before we heard about this location! 😳 (This is likely due to it not being well-publicized, even though it’s very near a major tourist attraction in the local area…)
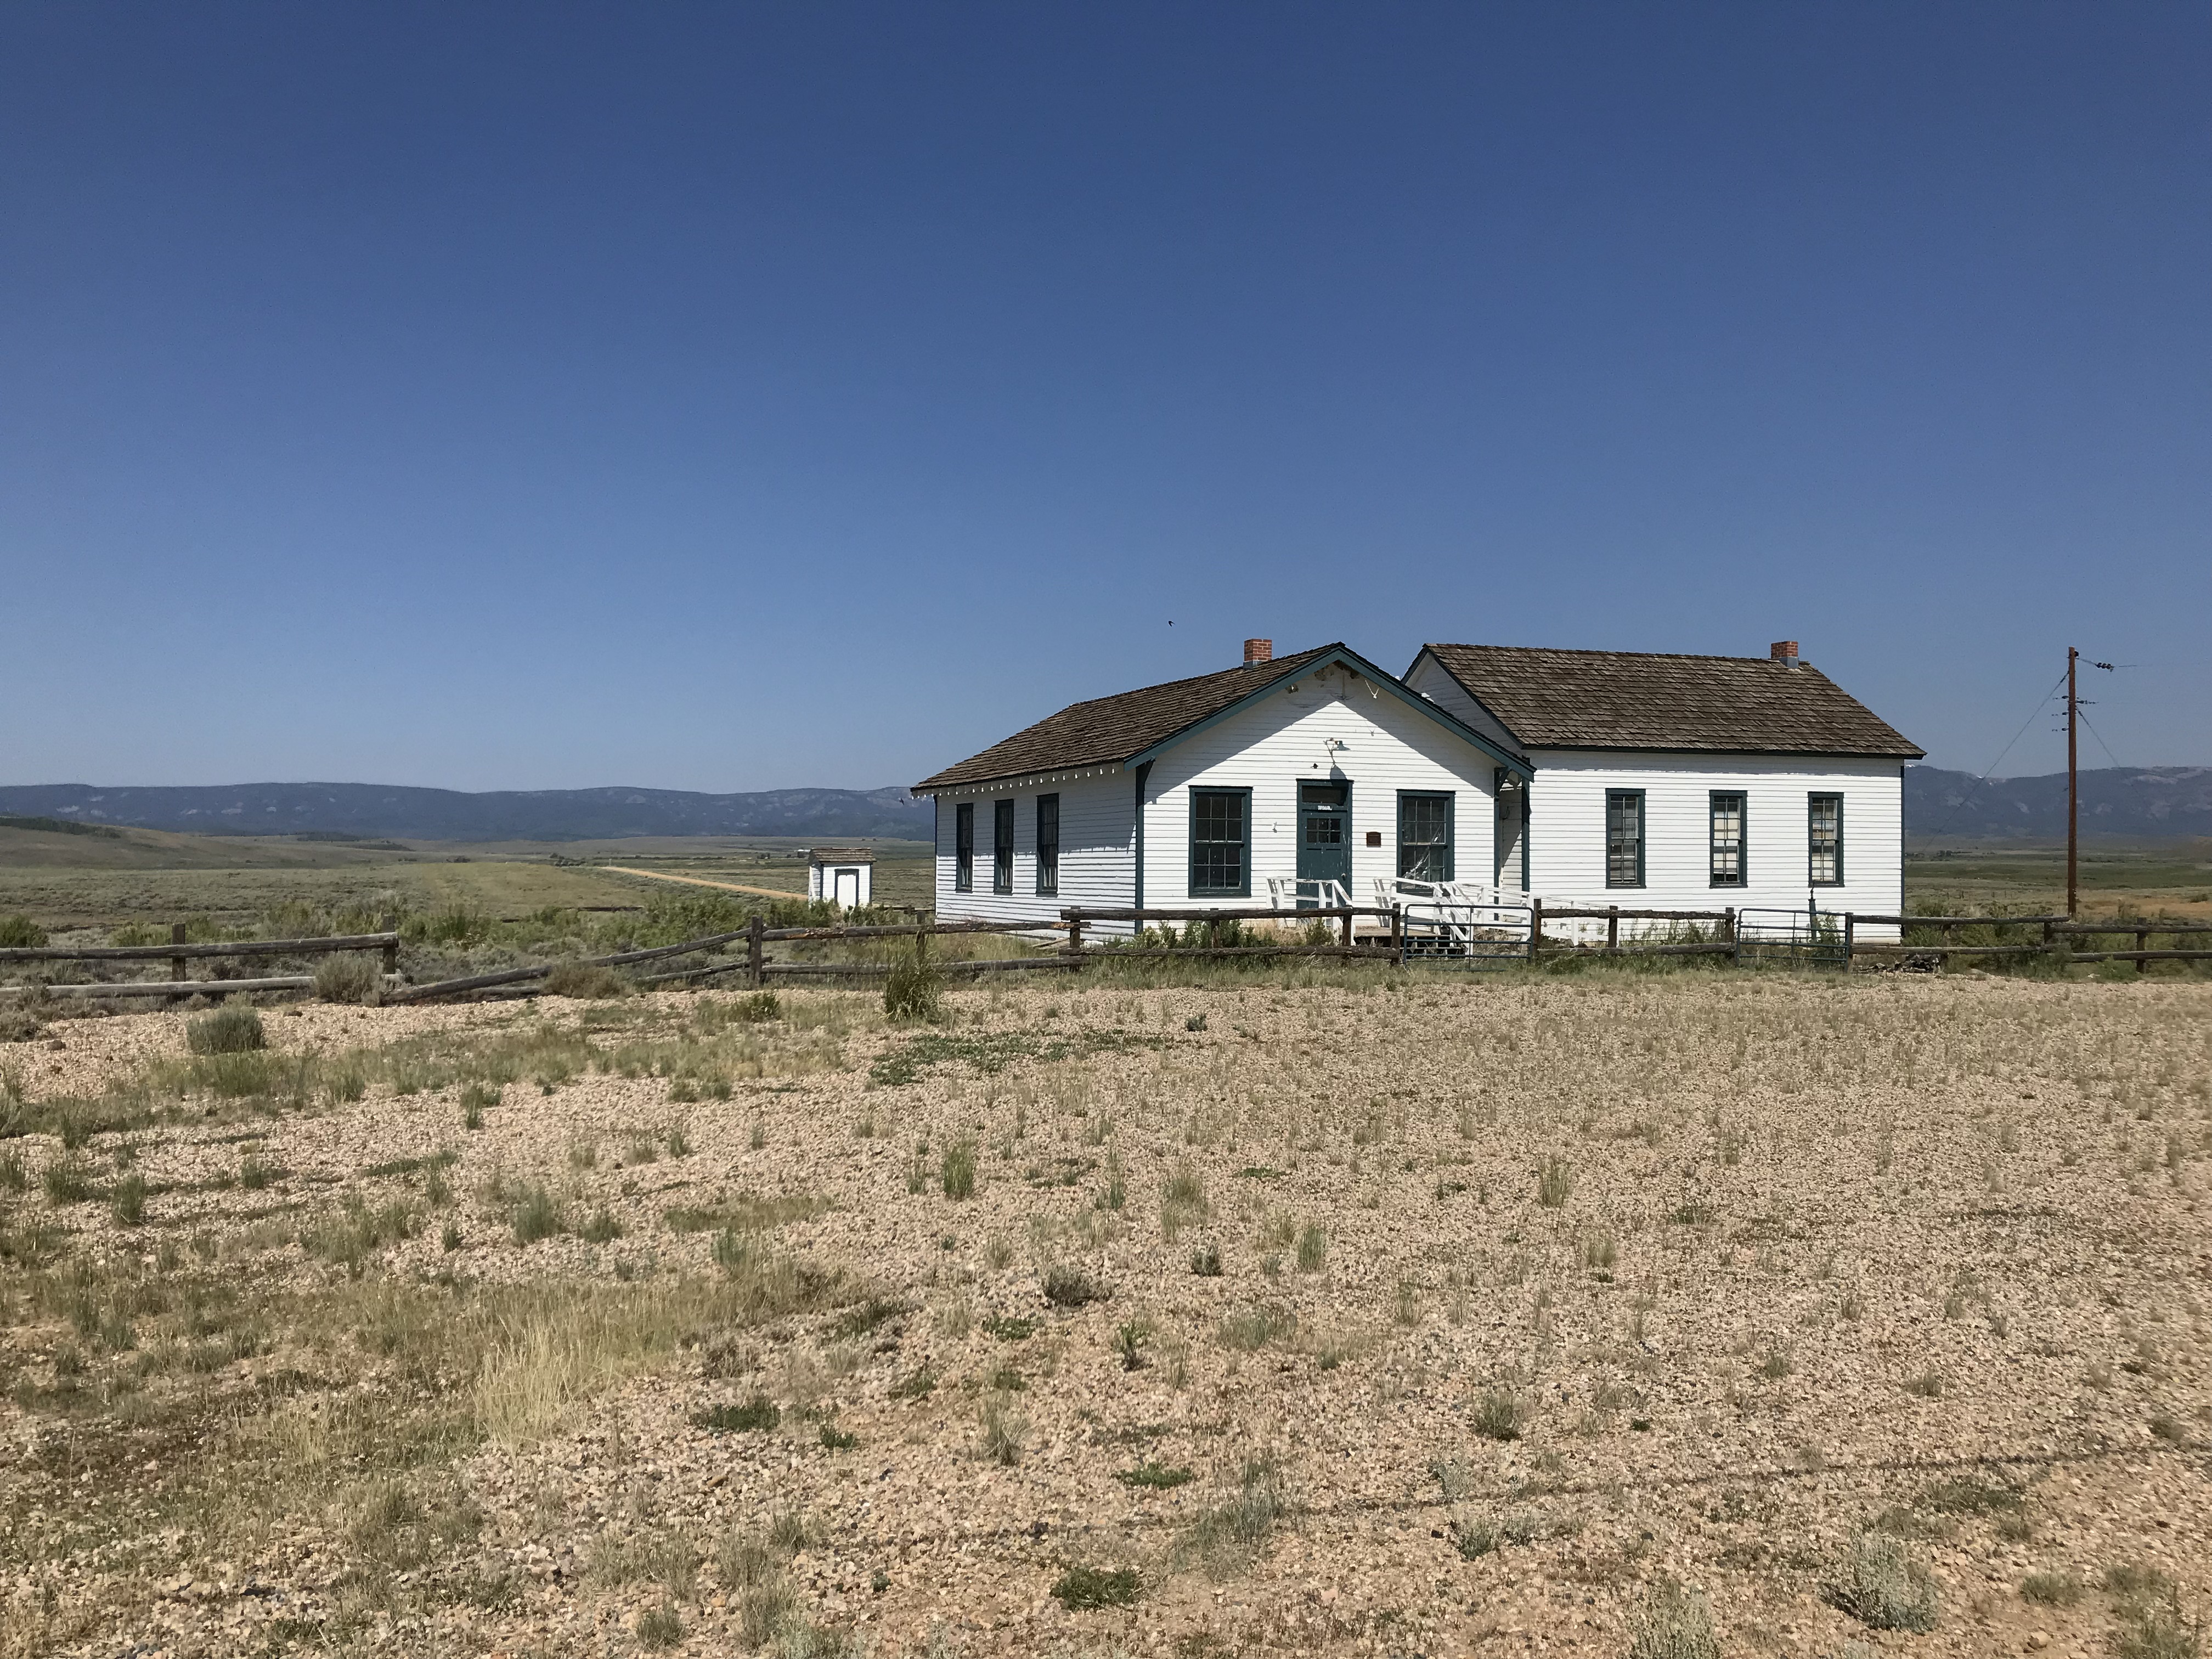
The site was pretty amazing (it didn’t hurt that the day we visited was GORGEOUS!) I’d encourage you to research the town’s history as it’s pretty interesting. Spokane was an actual town at one point (rather than just a simple mining camp) complete with a schoolhouse and a general store.
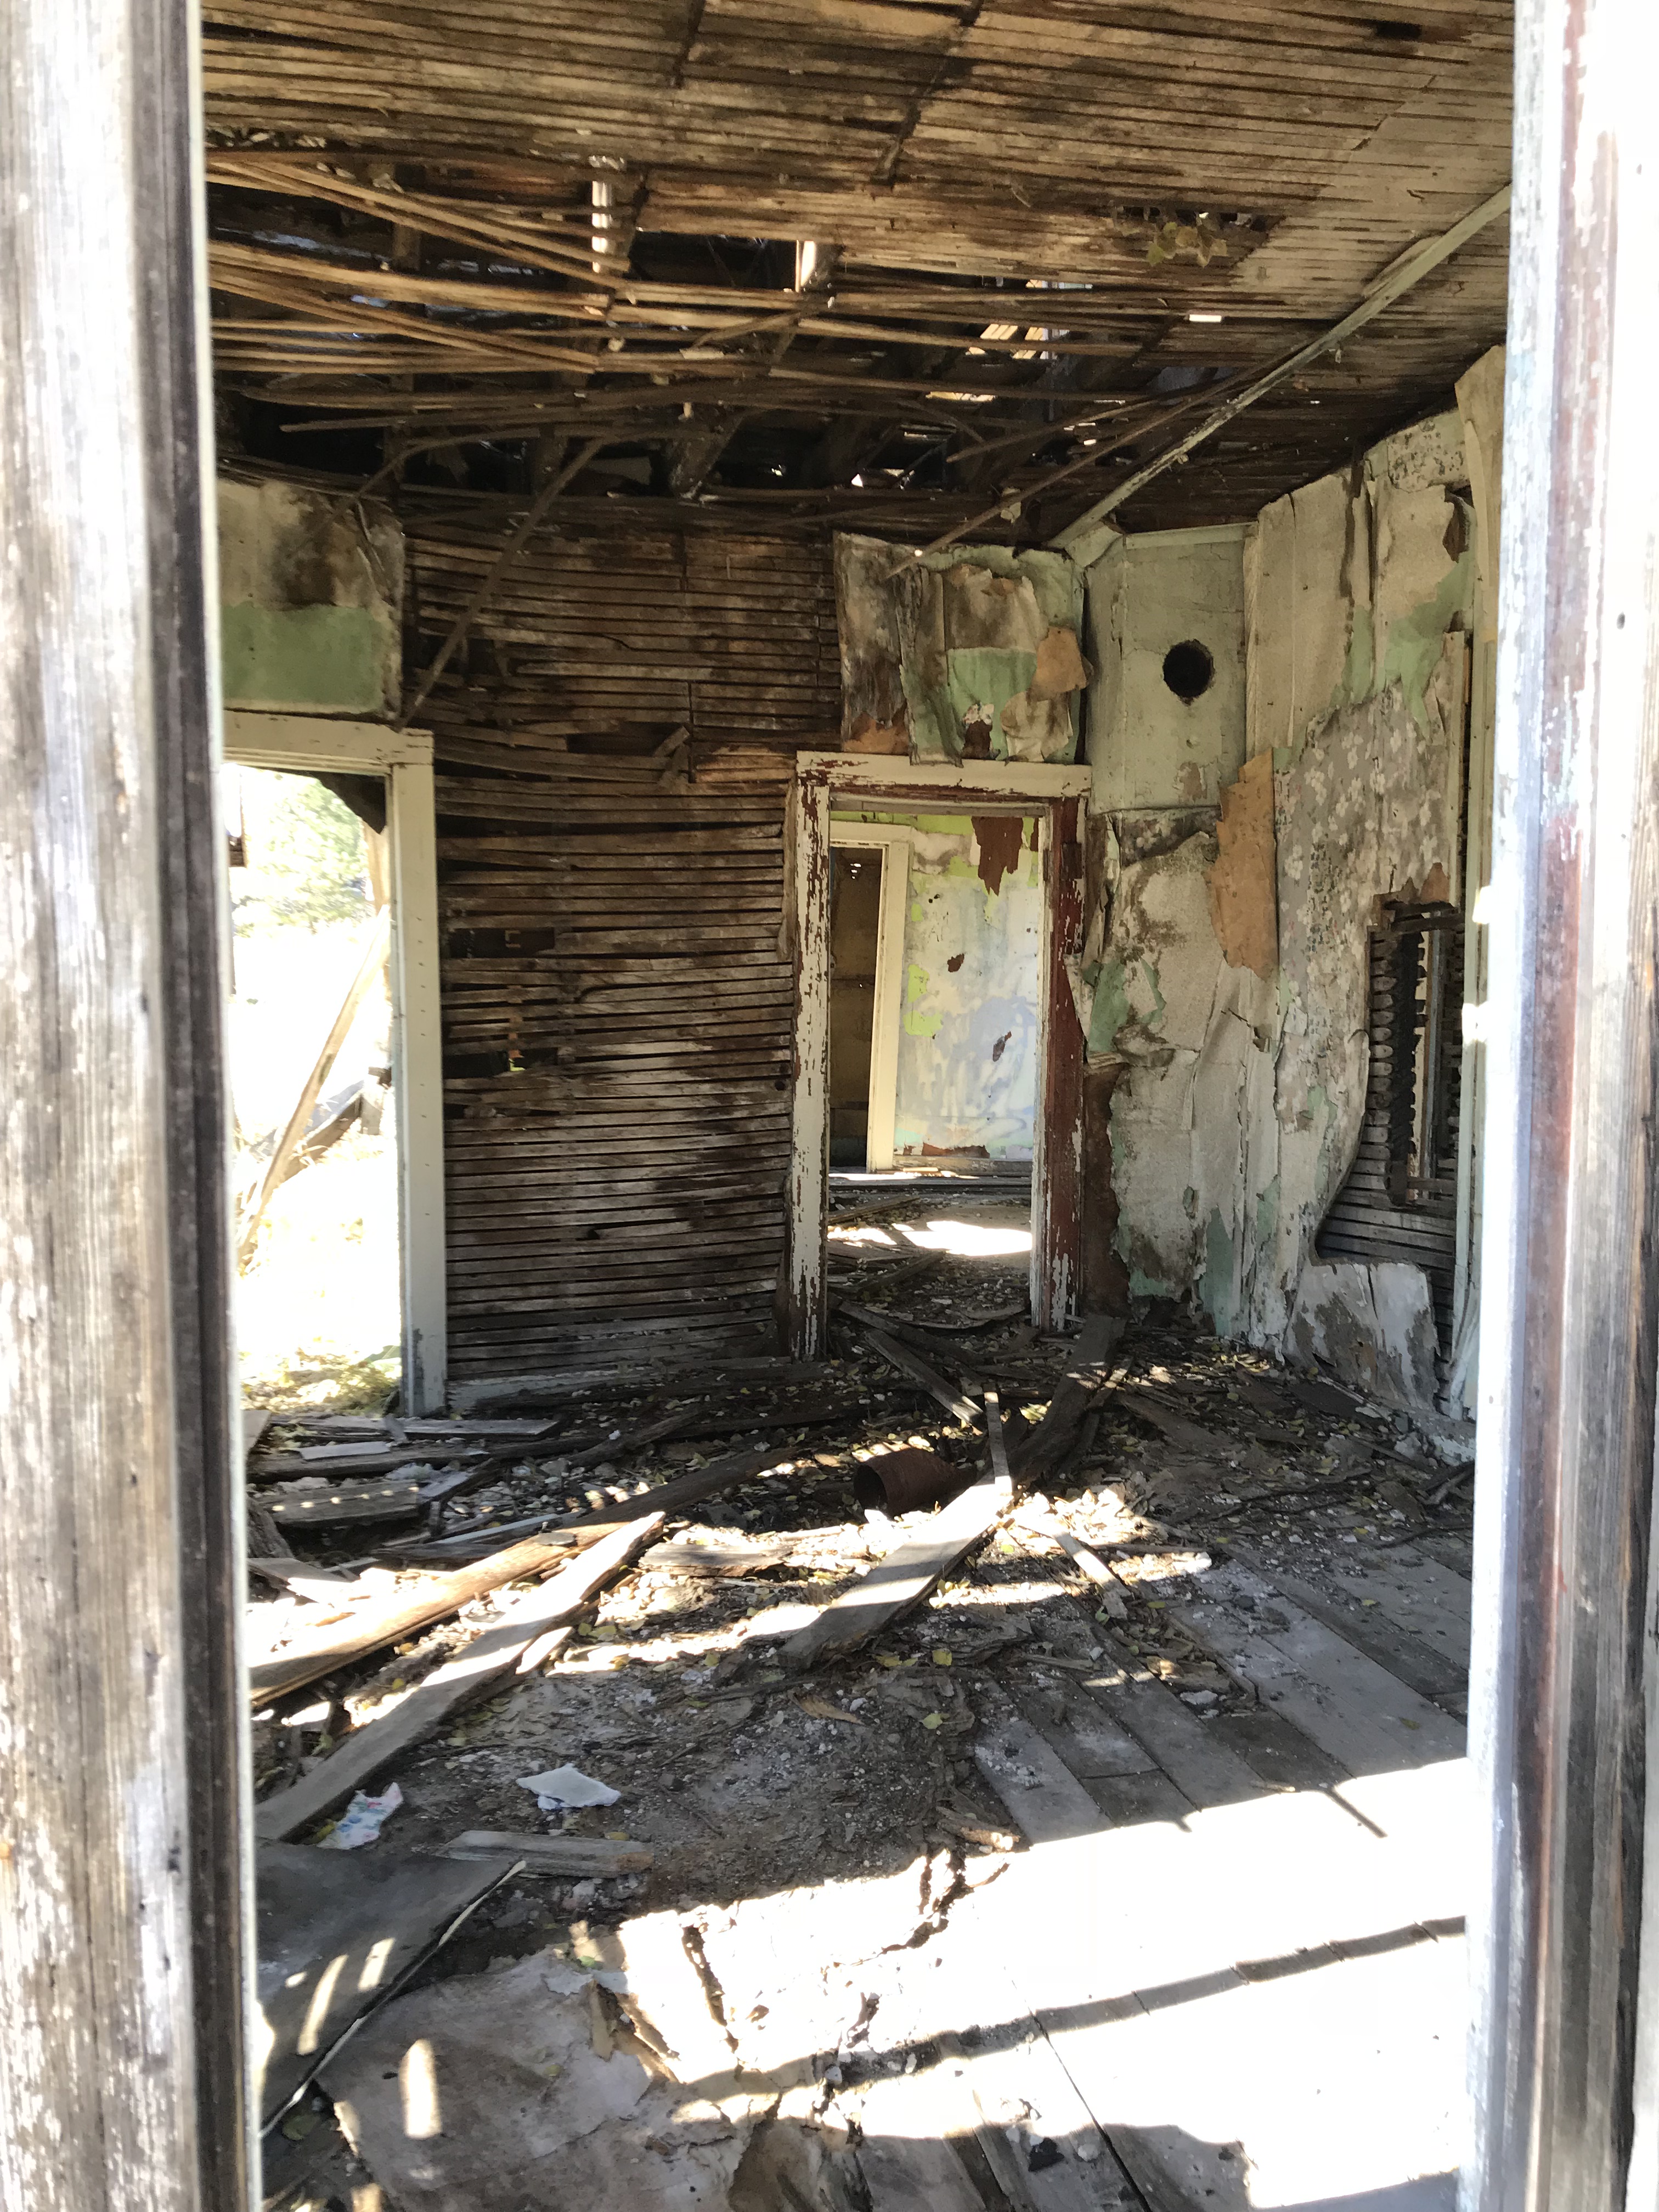
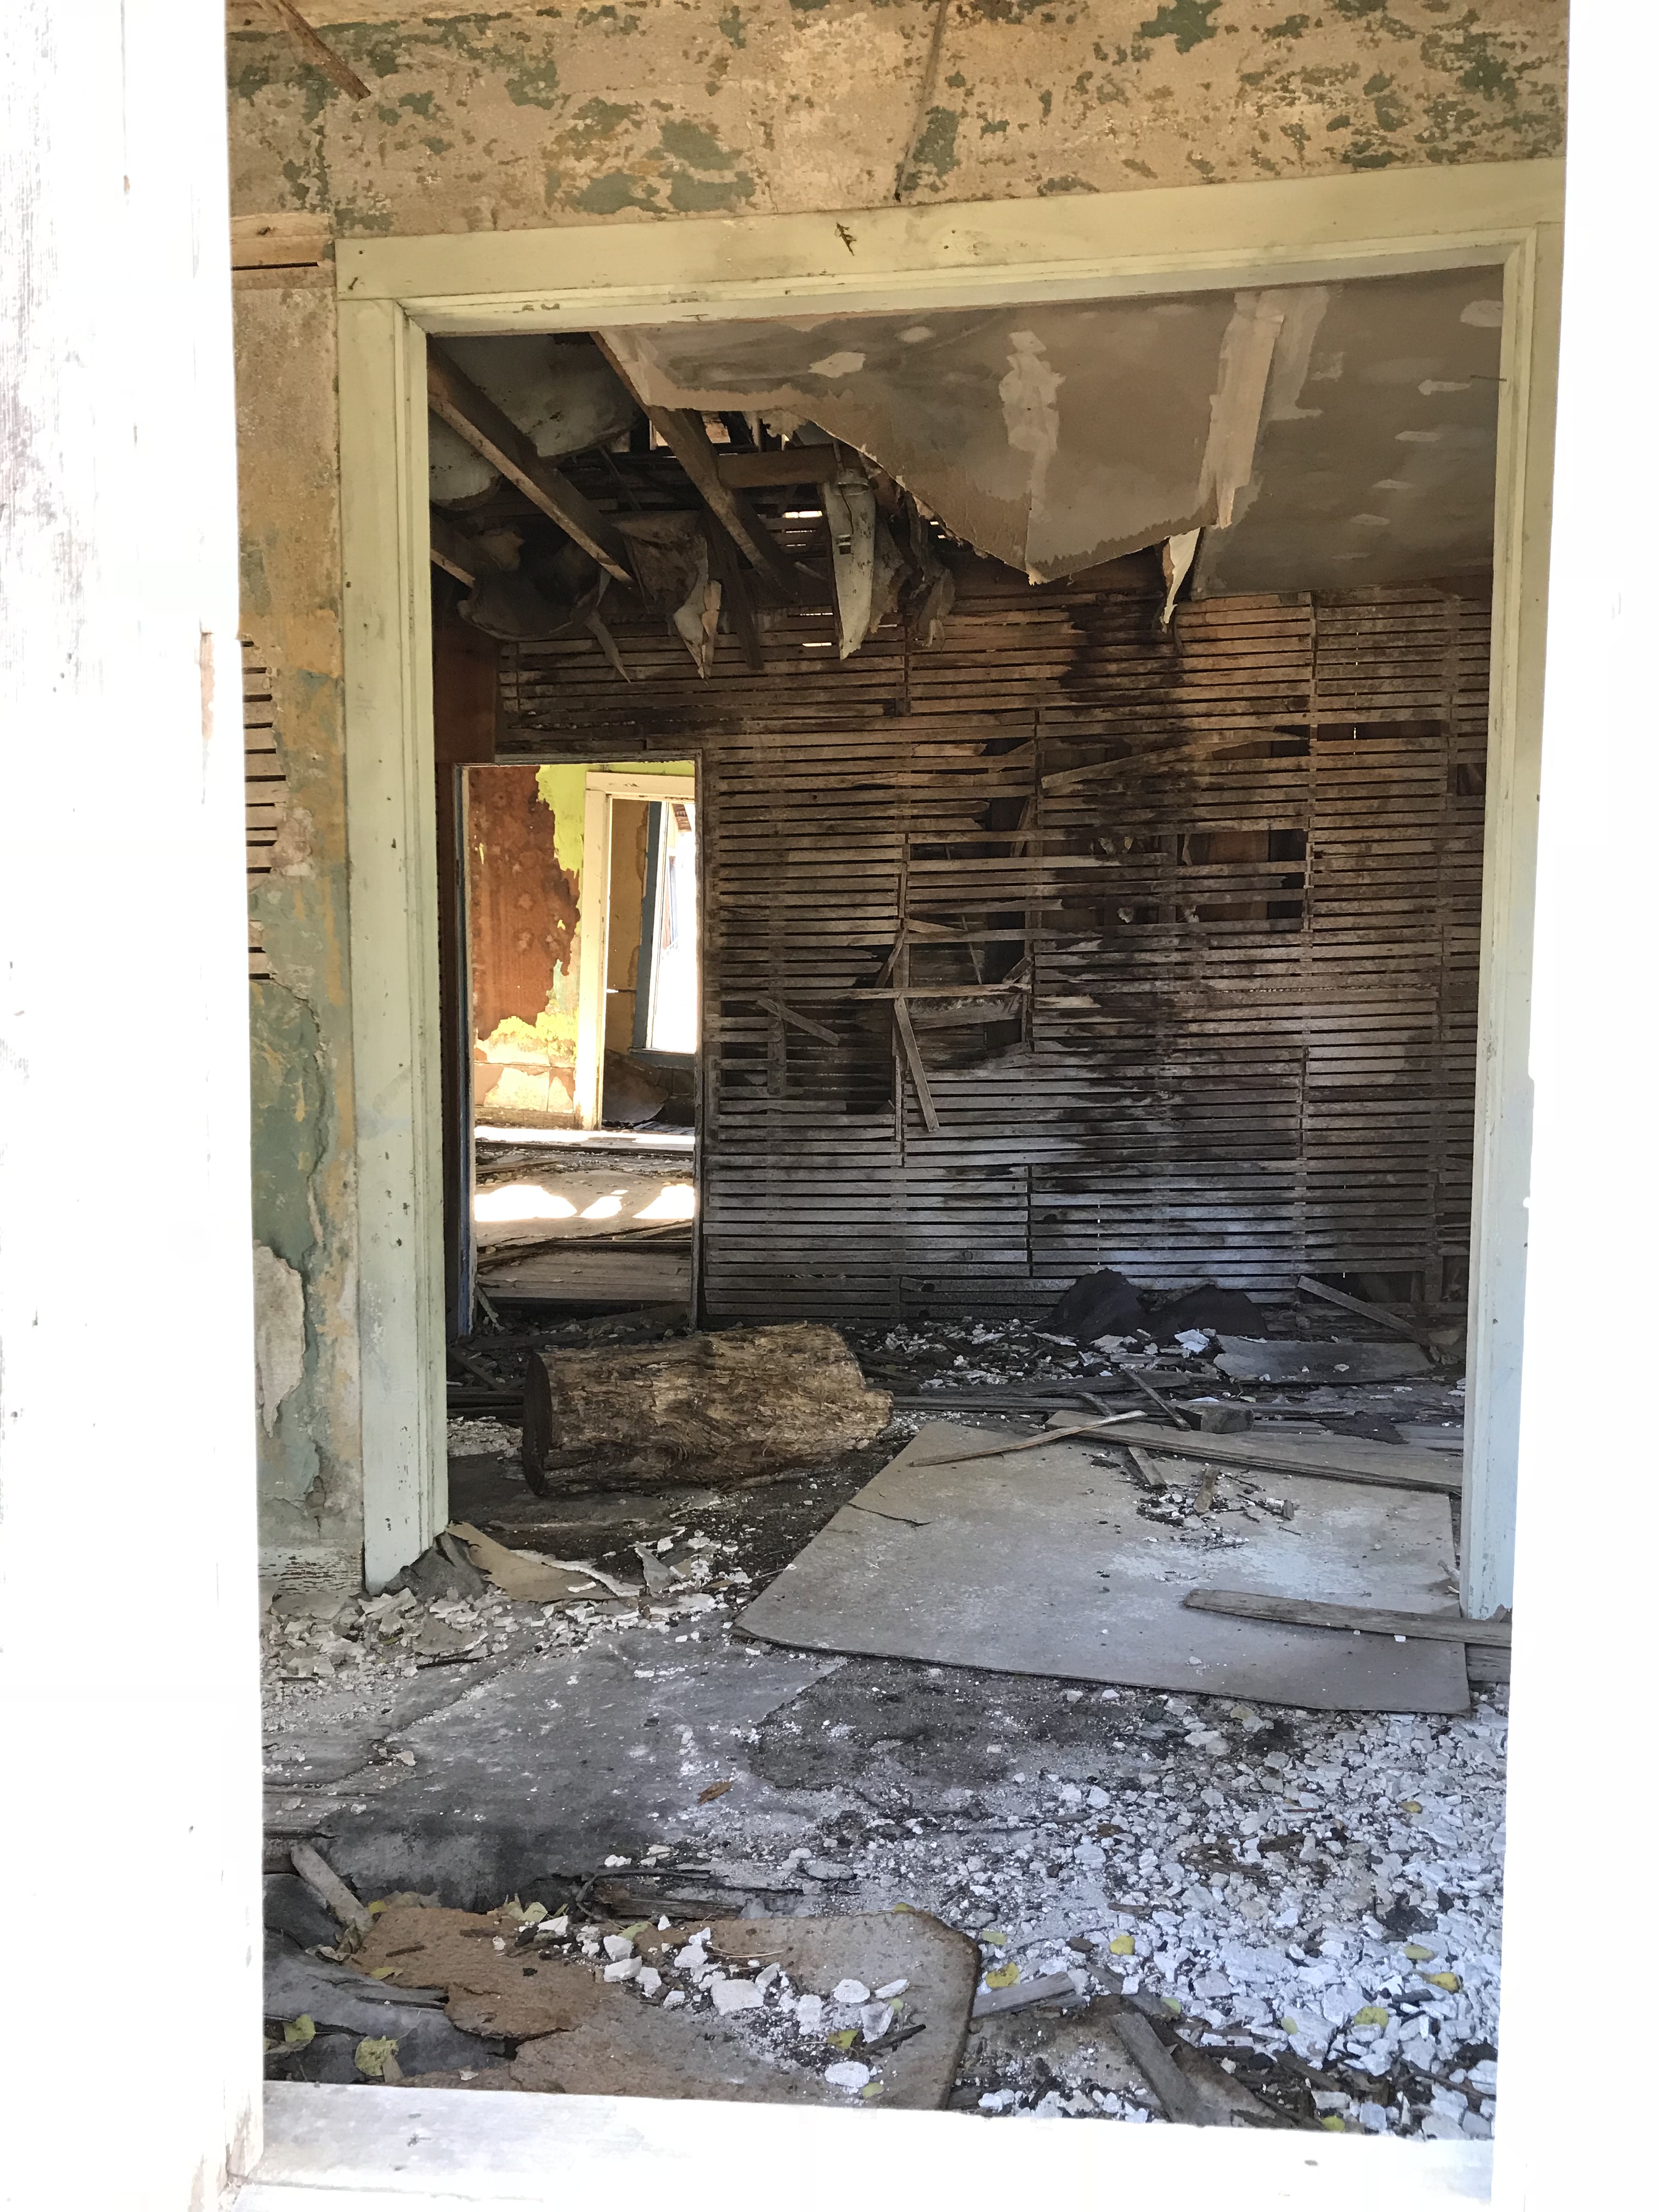
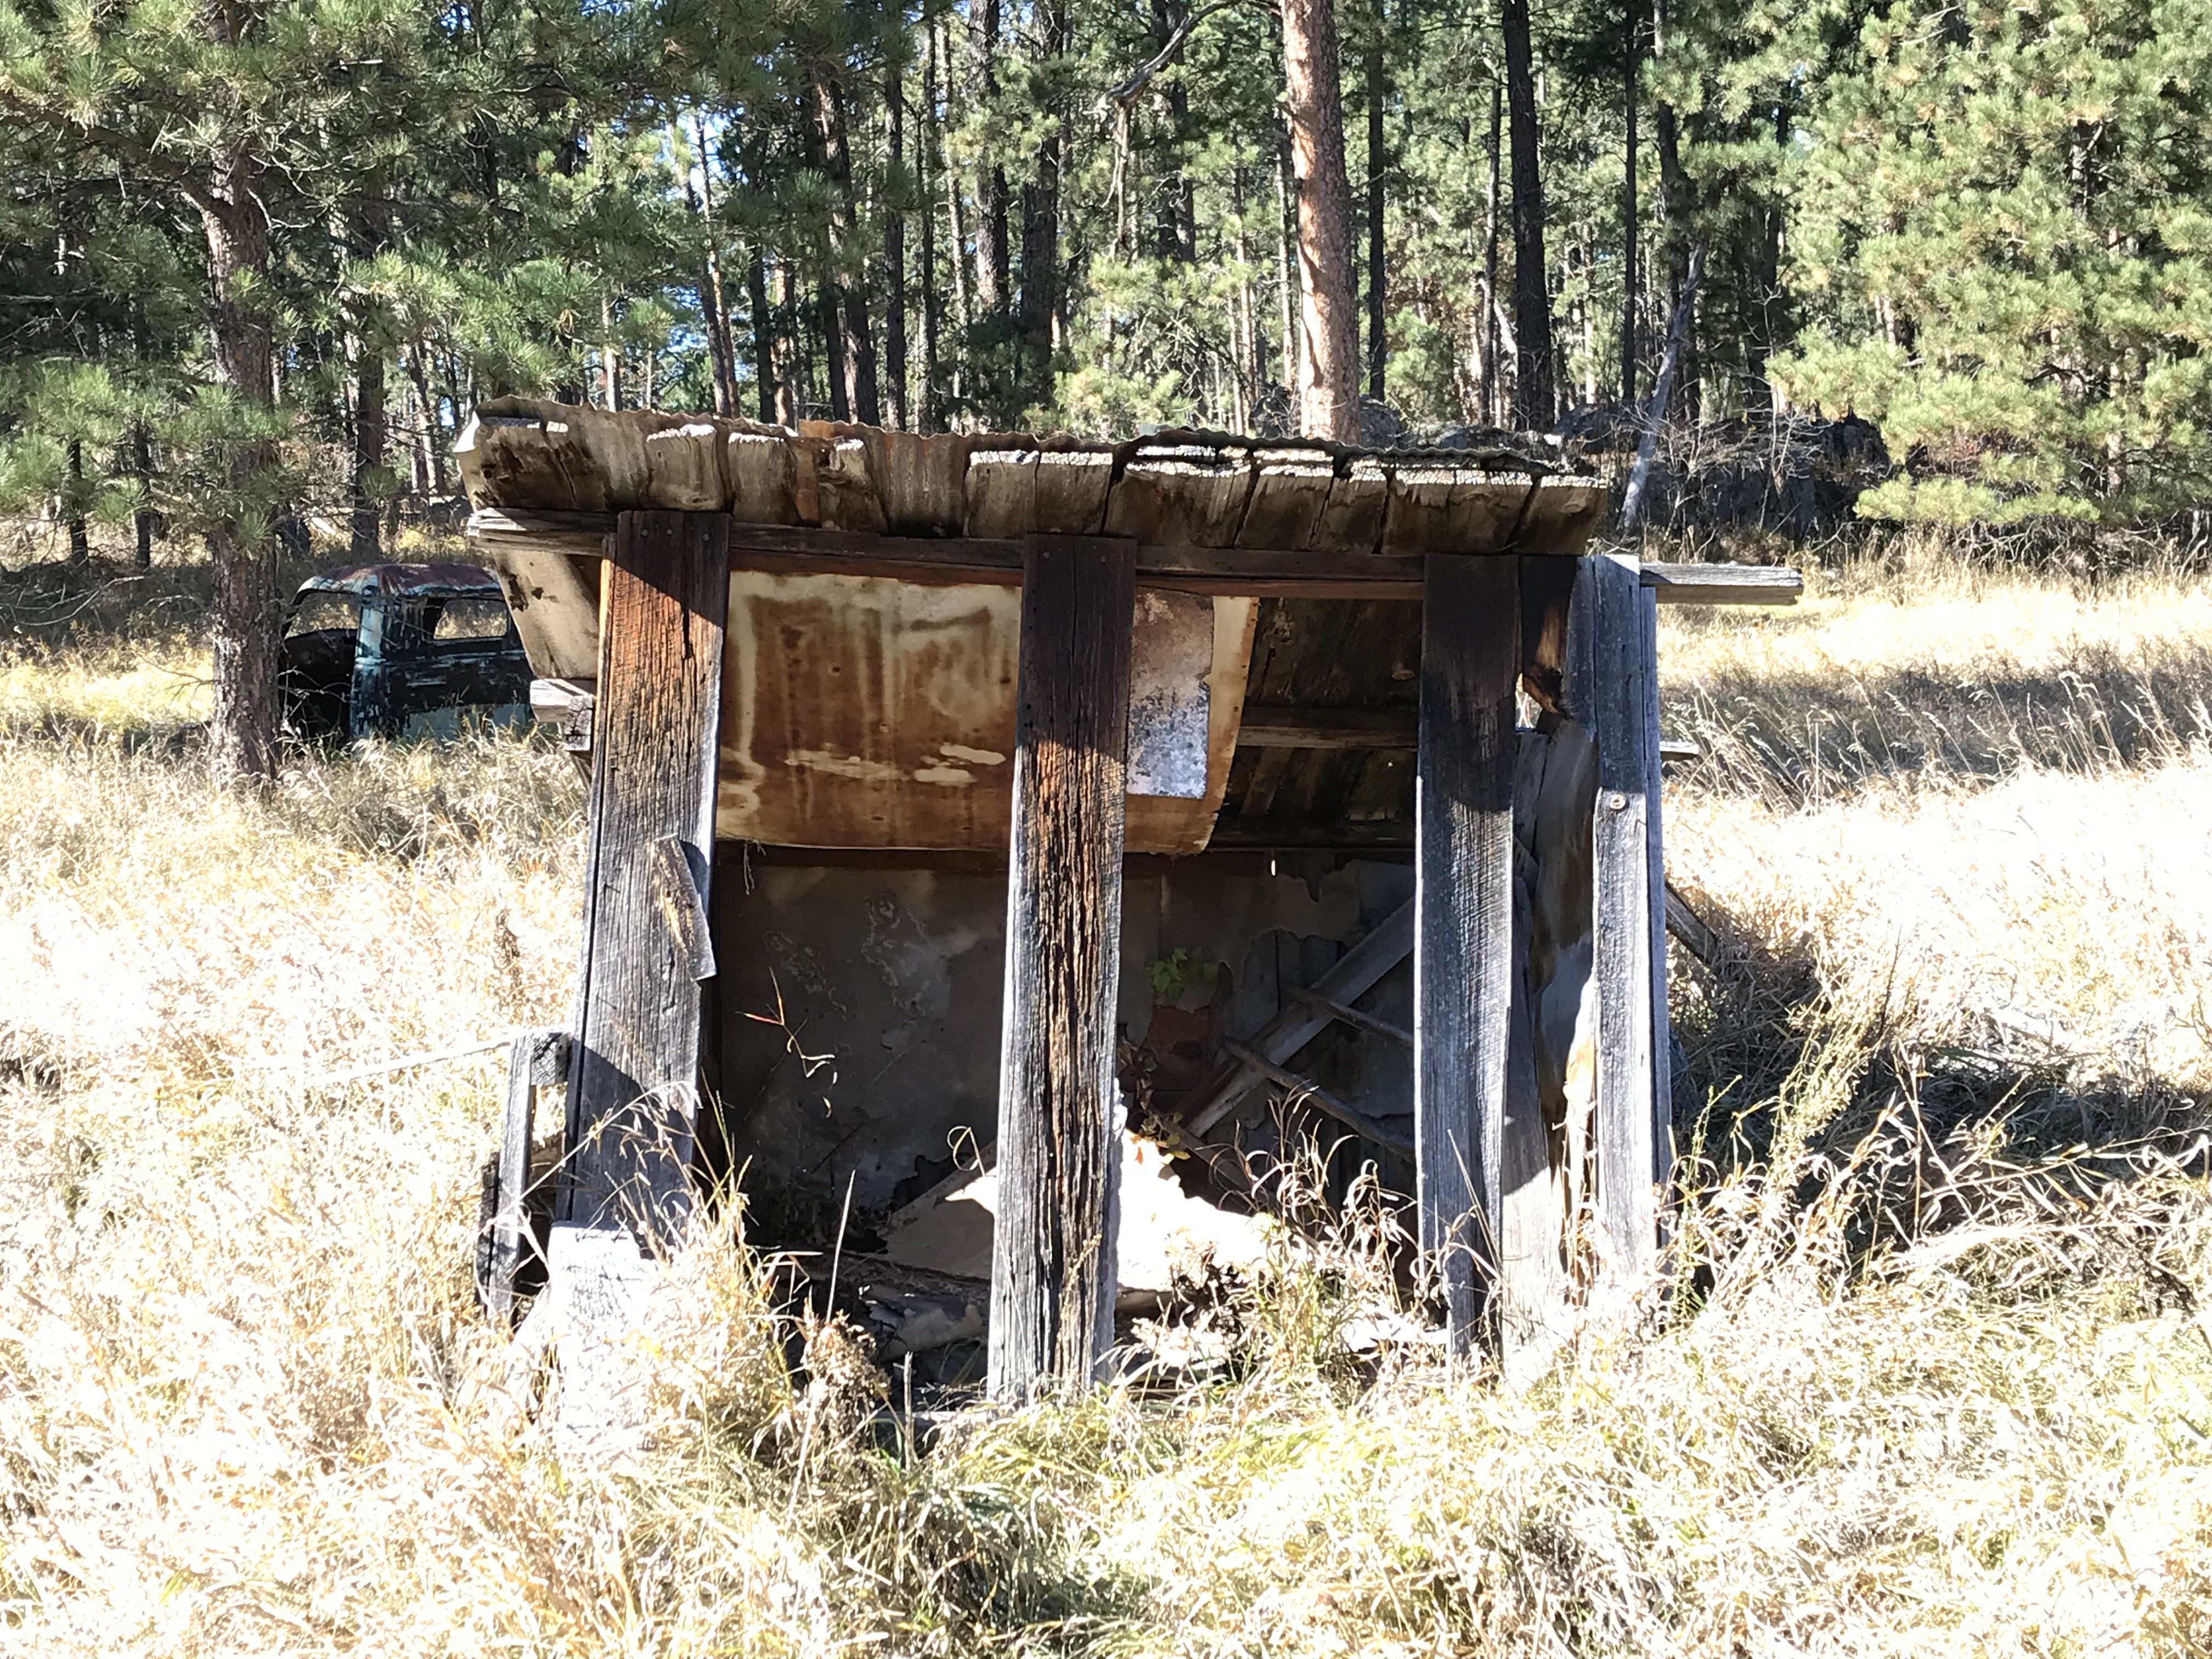
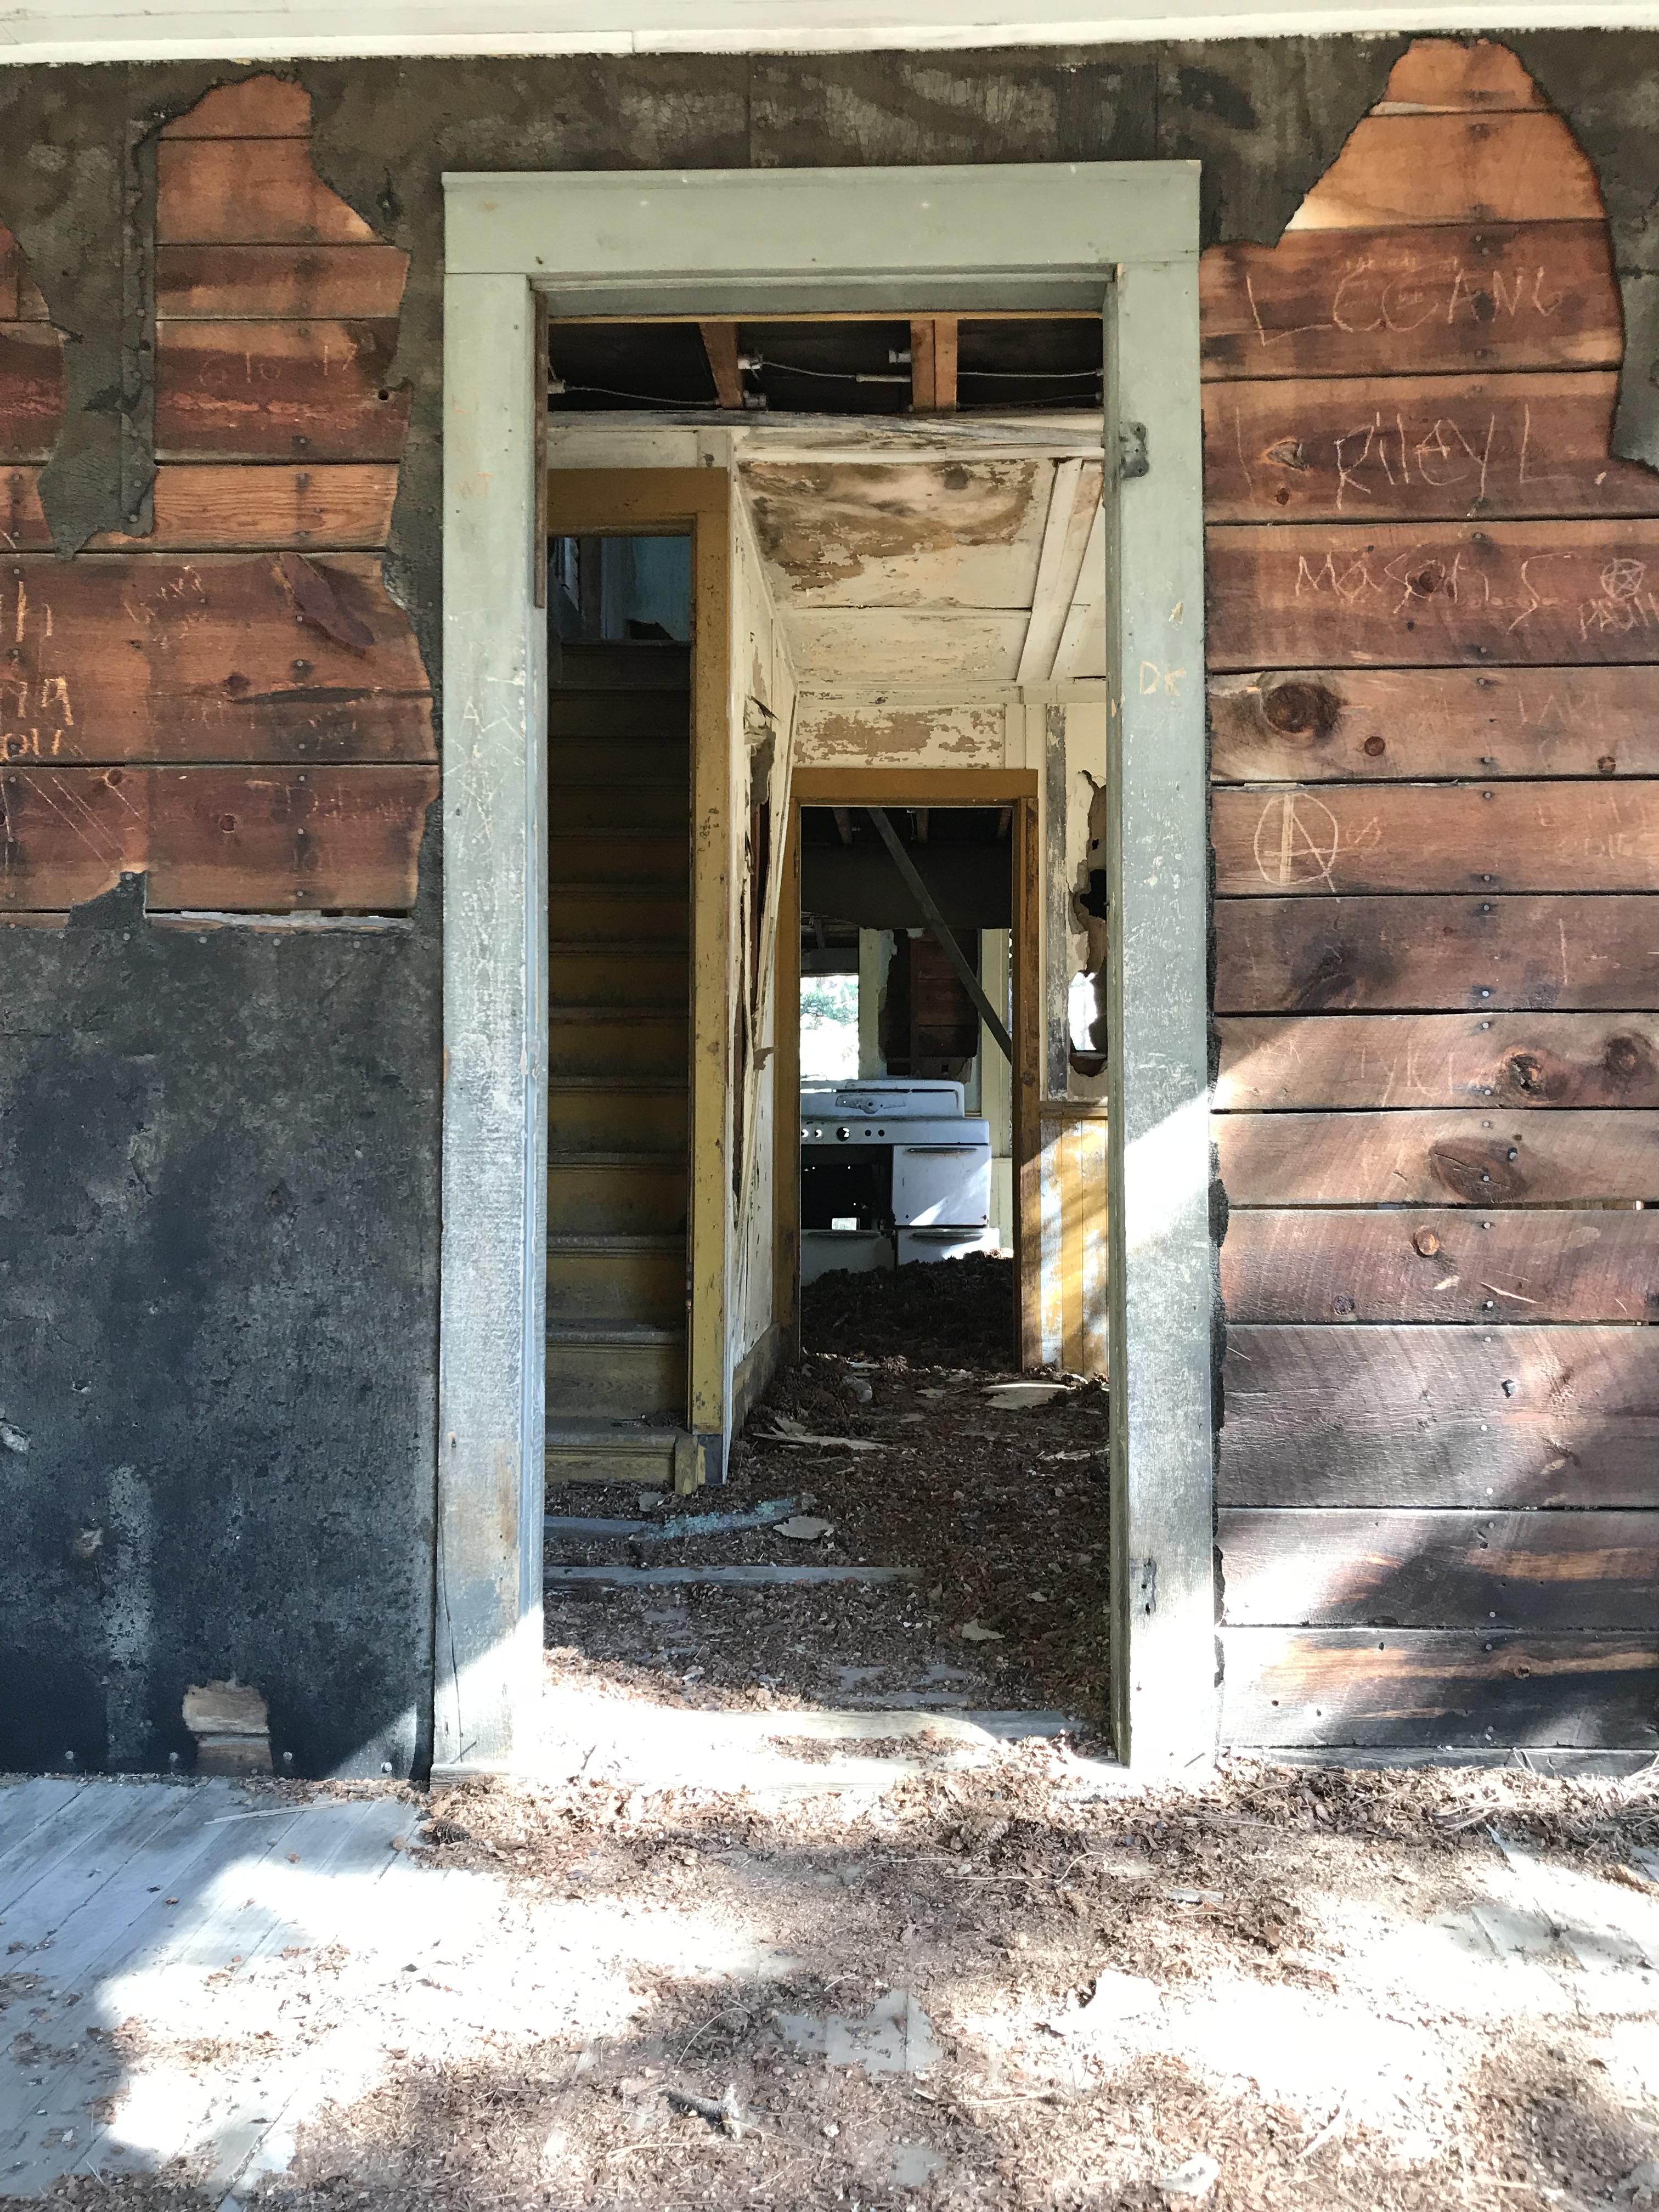
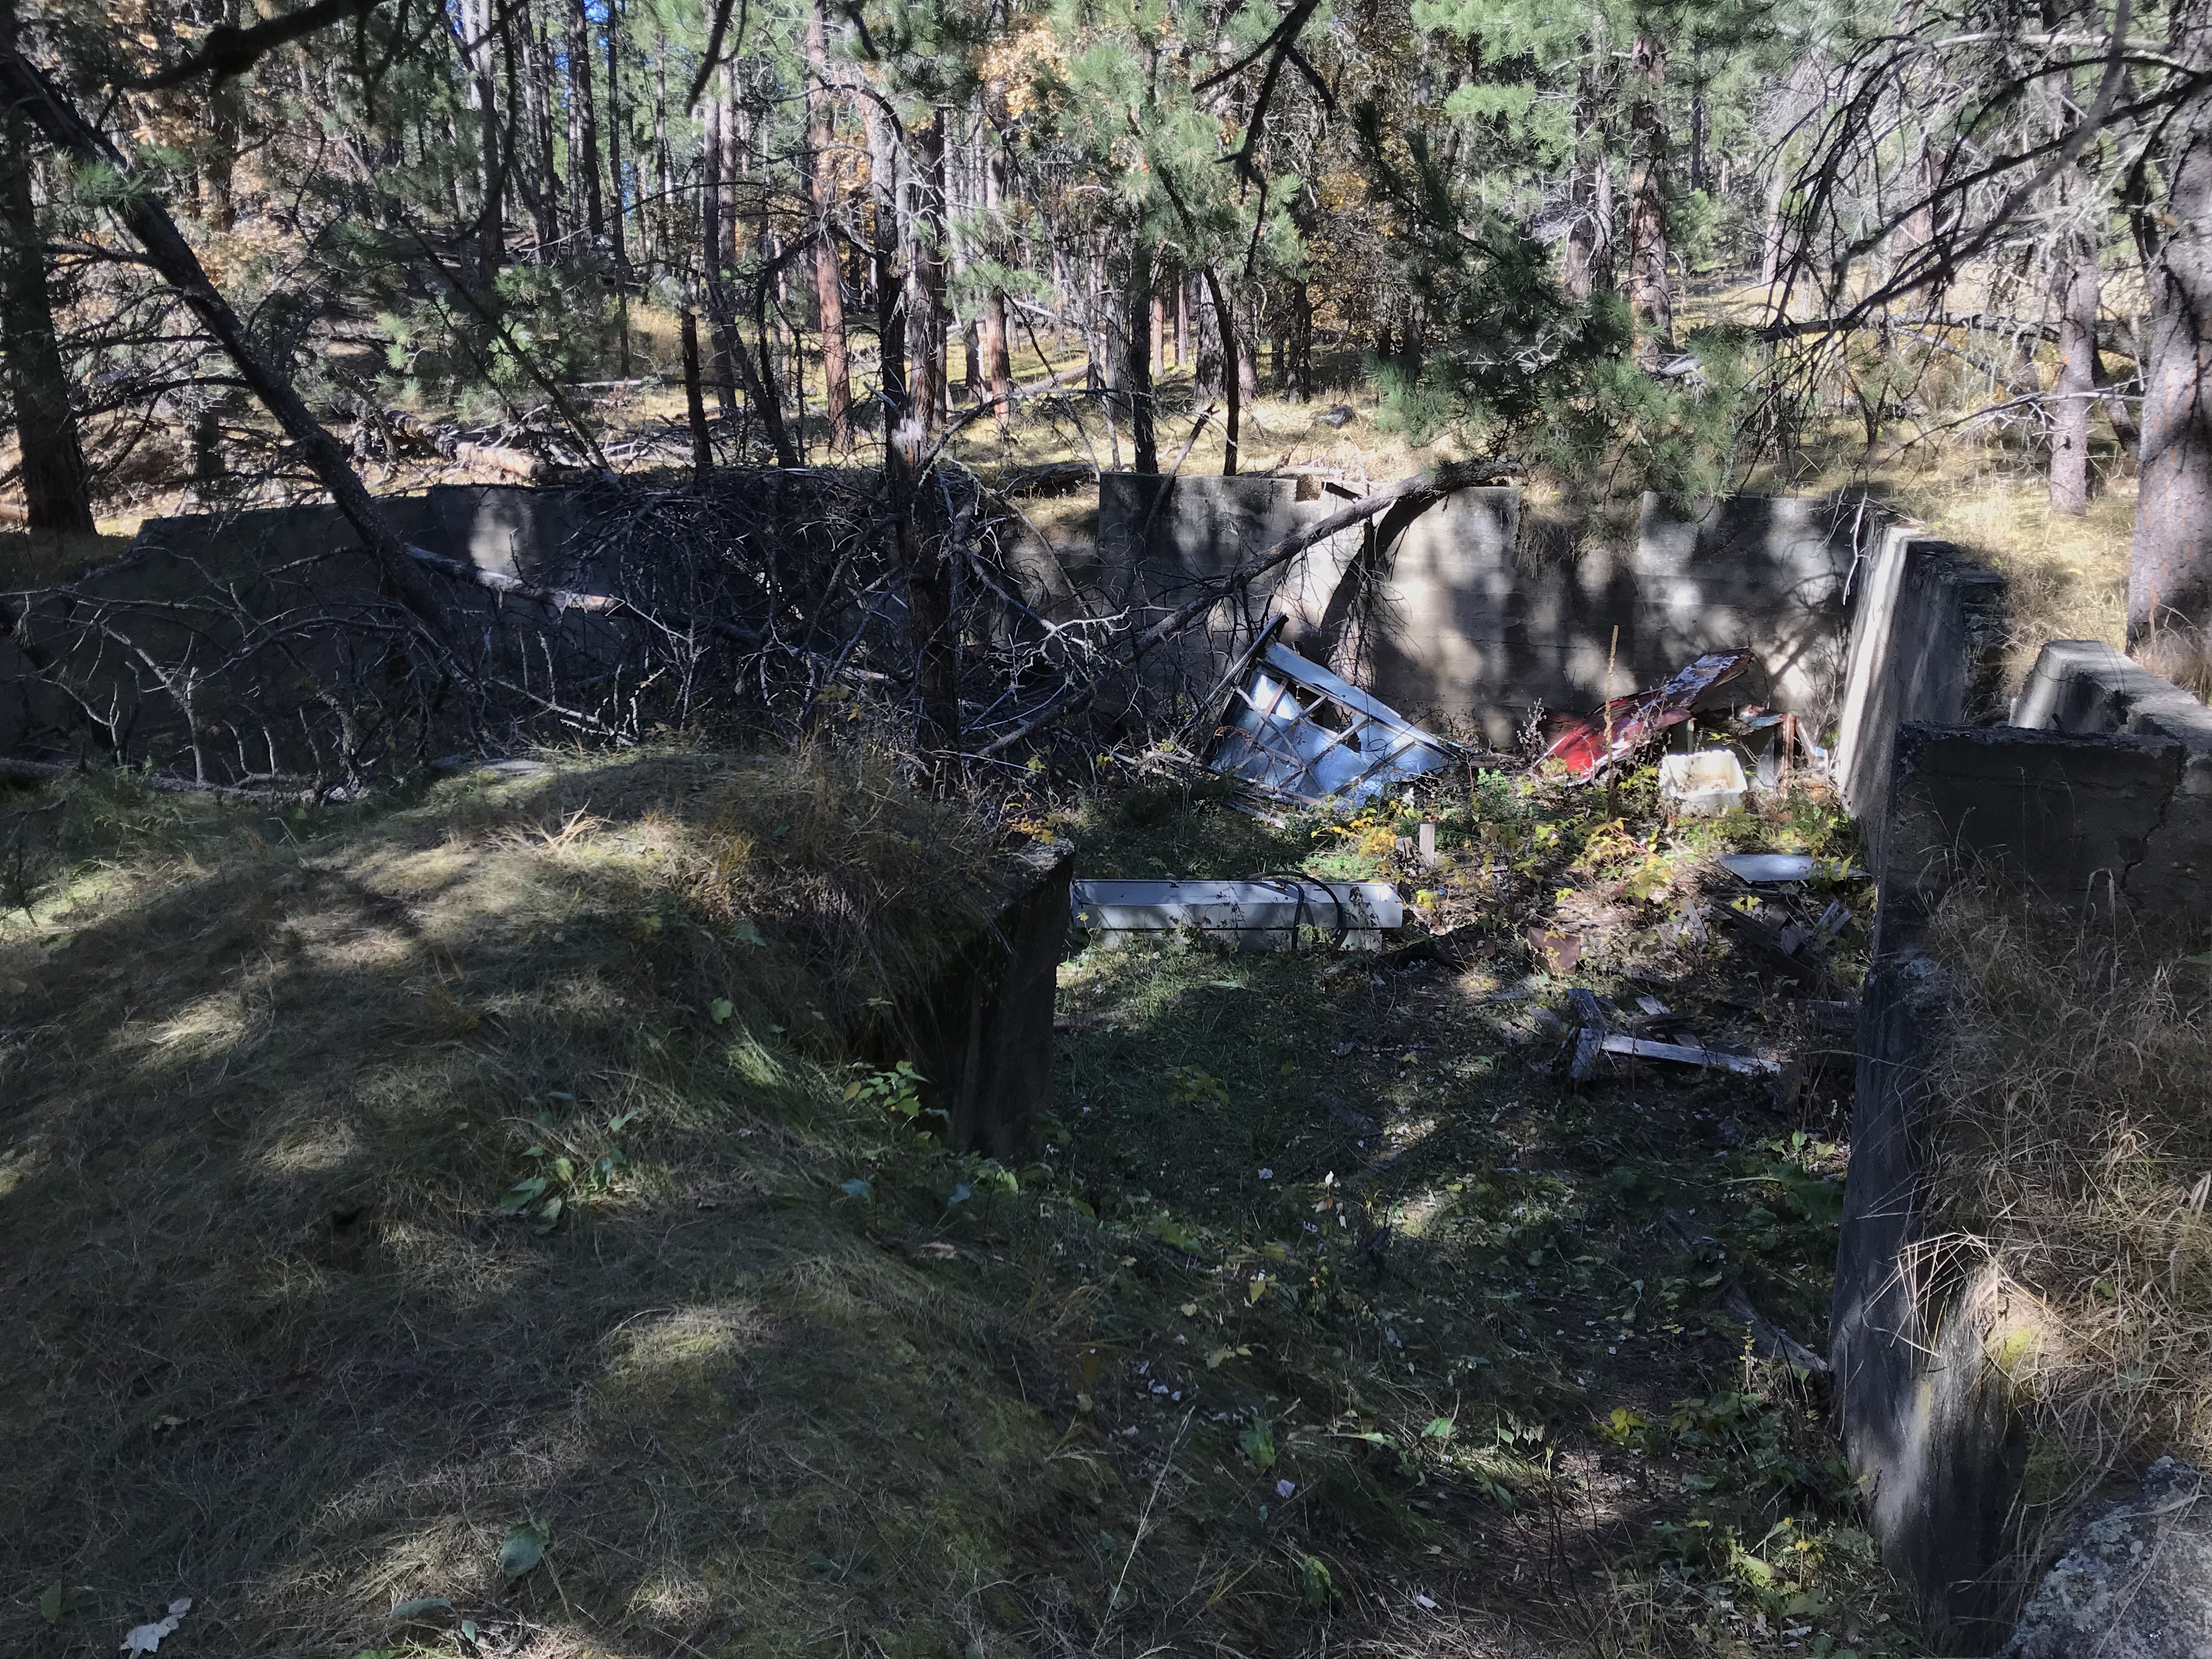
While the majority of the buildings have been destroyed by fire and Mother Nature, we think we found the foundation of the old schoolhouse. The only structures still completely standing were a house with some outlying buildings. There is also a root cellar in the main valley and the mine manager’s home still sits on a hill, overlooking the former town that was nestled in the meadow below (or it would overlook the town if there weren’t trees in the way, now. 😉)
The mine manager’s house
Hazards in a Ghost Town
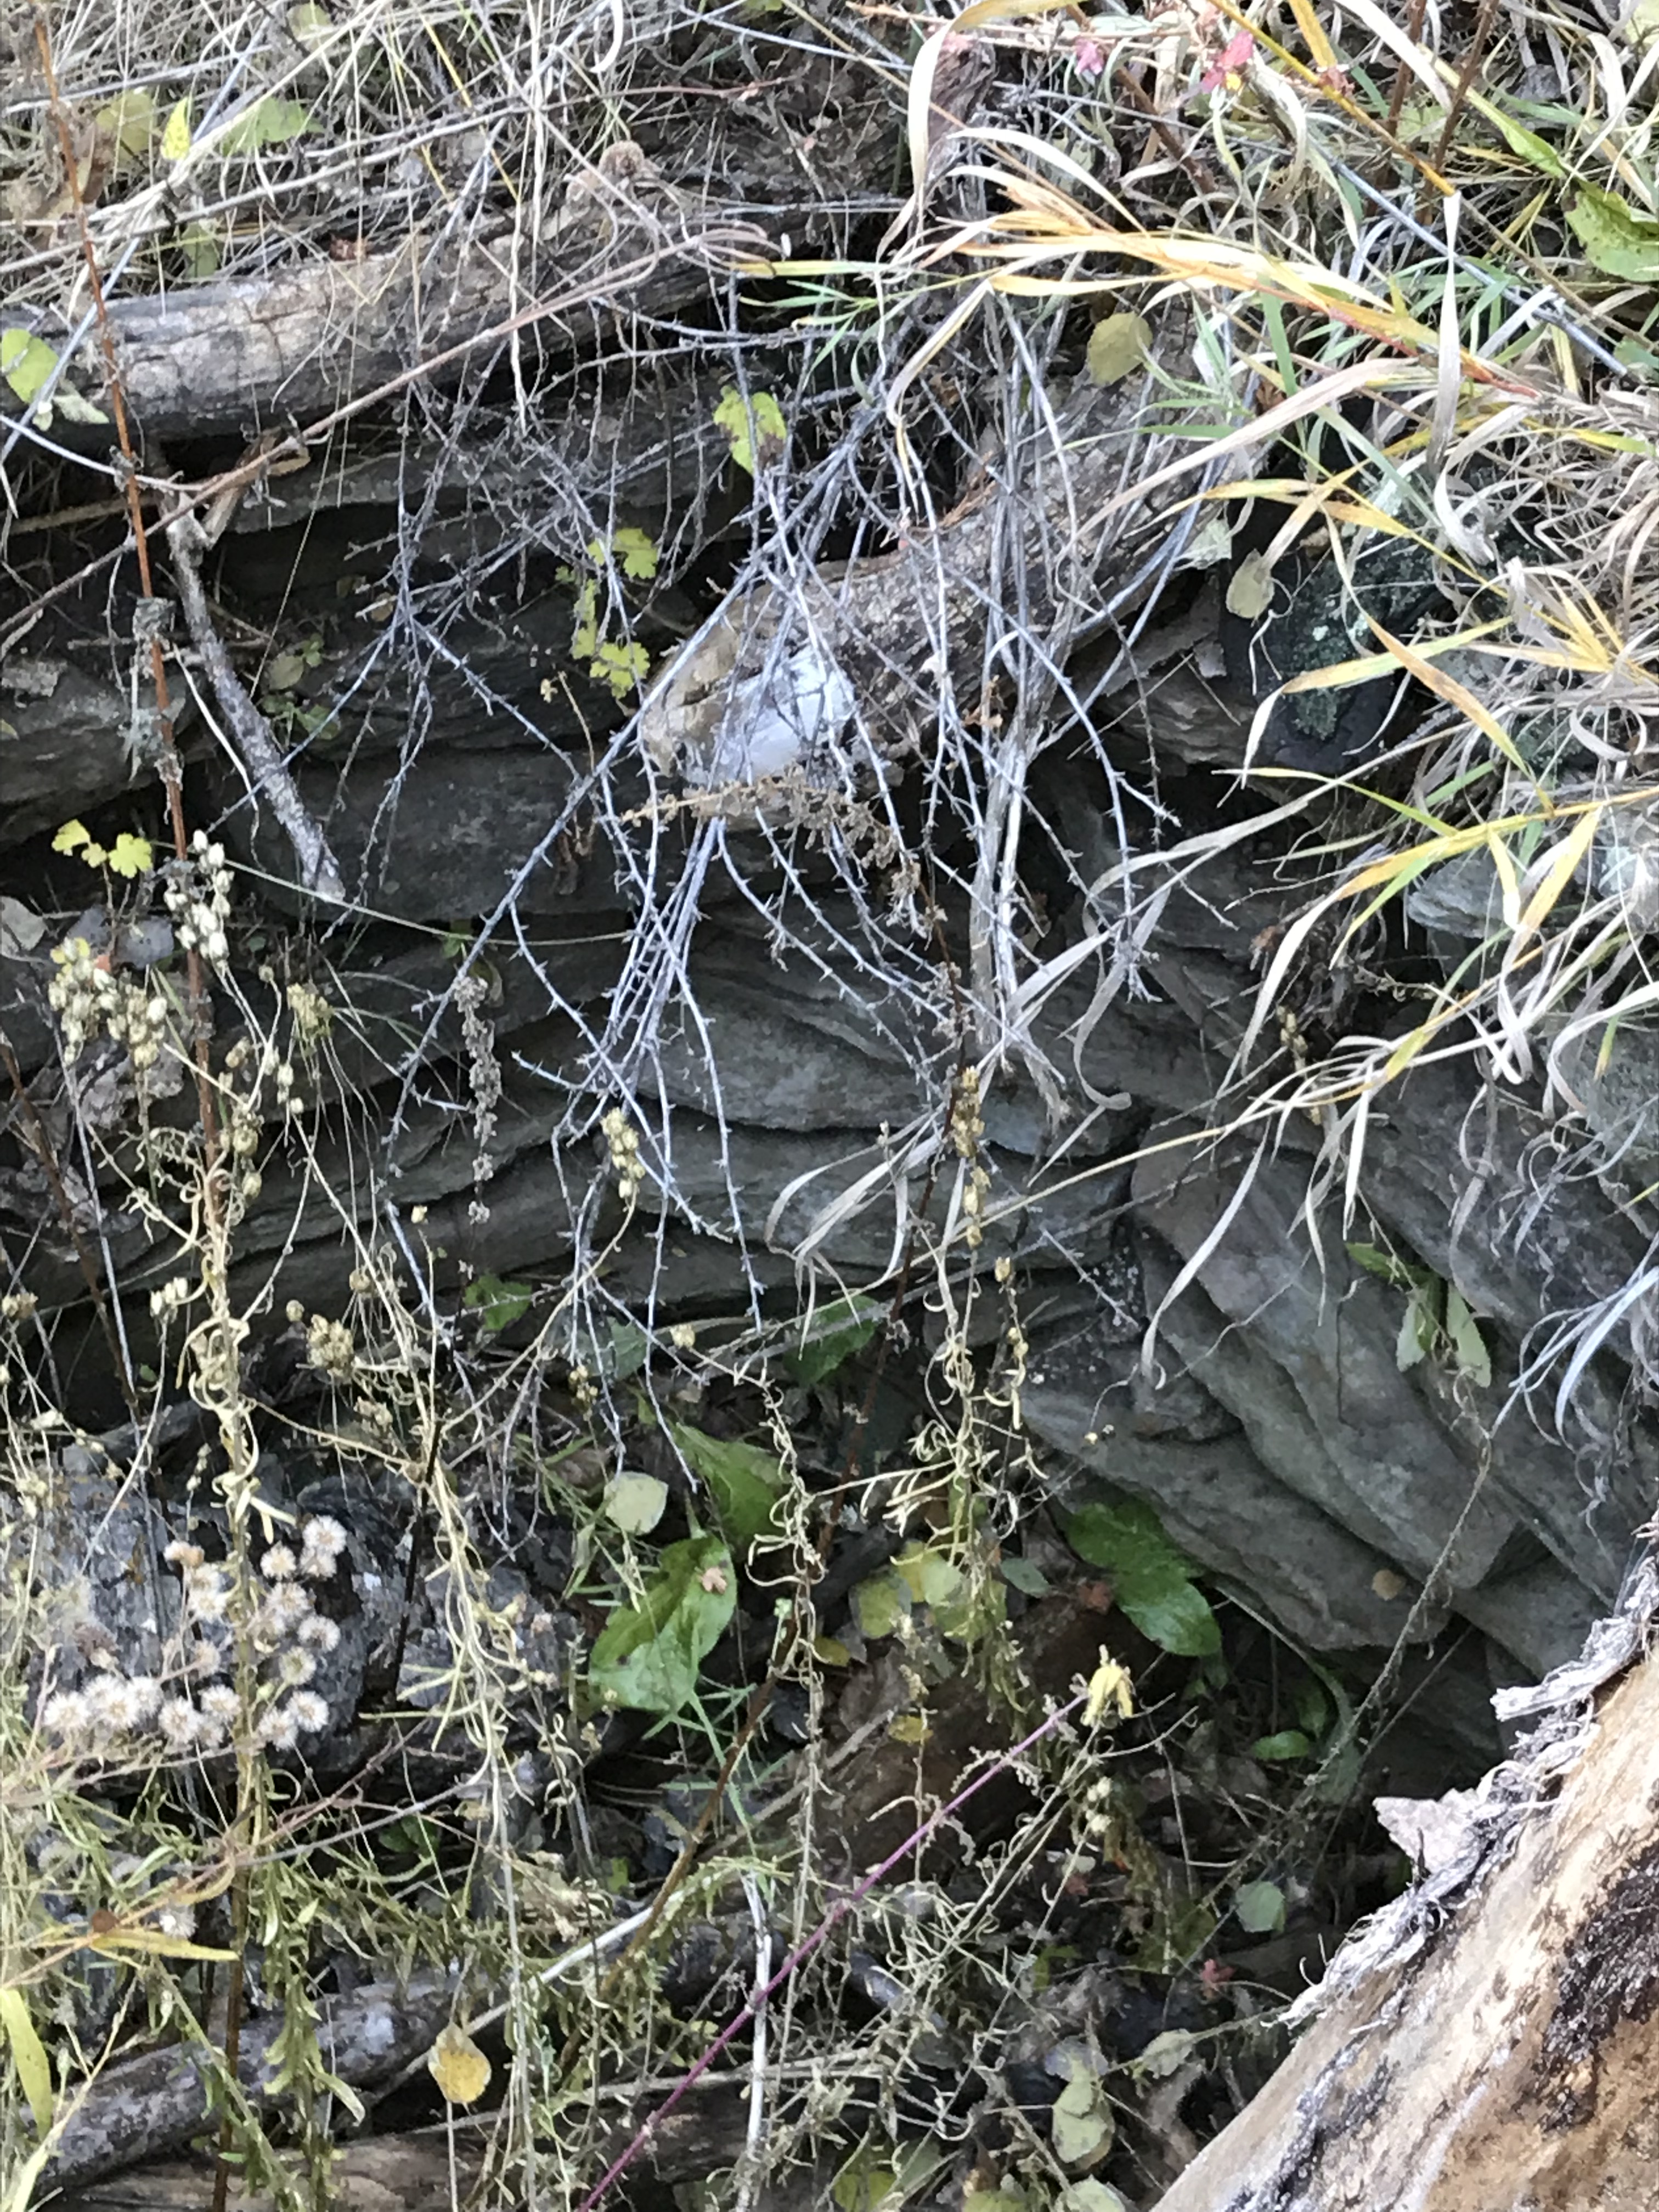
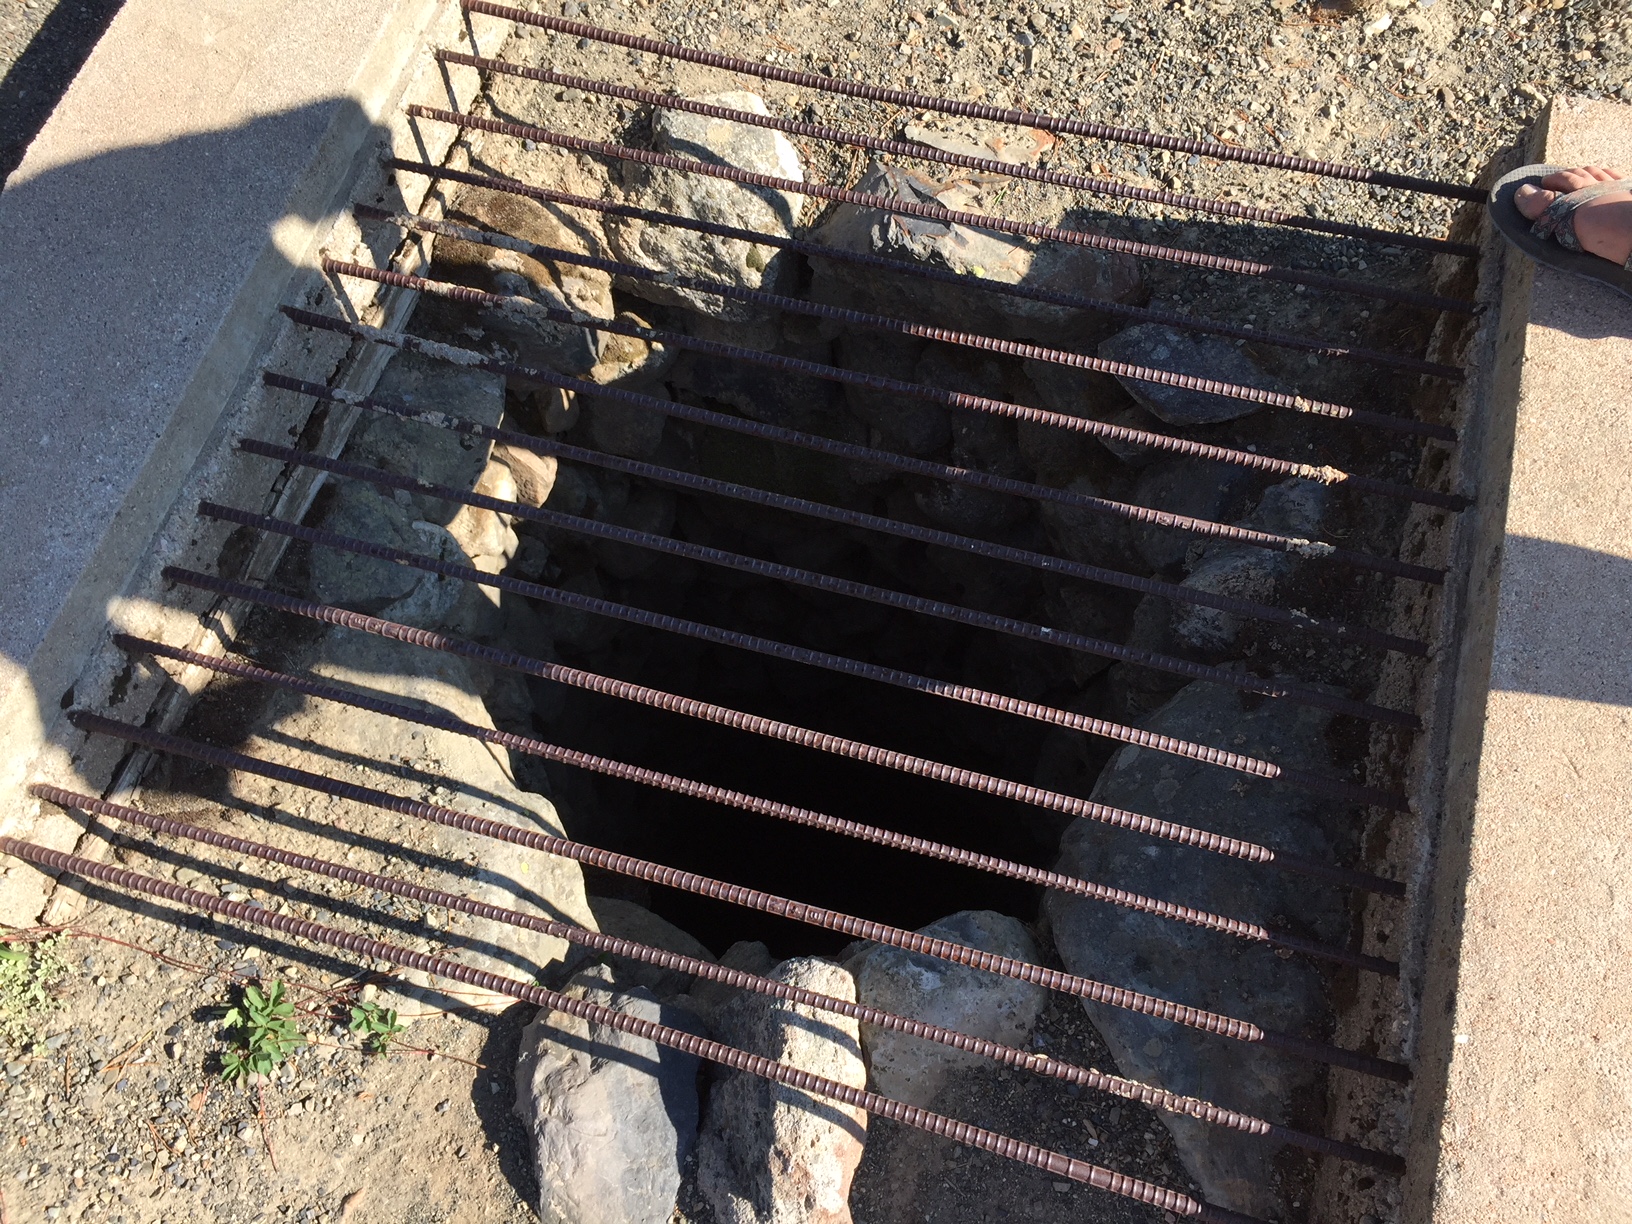
There are always numerous hazards to be VERY cautious of at these sites. Among a few other foundations, metal remnants, and ancient mining equipment, there was also an old well that had been sealed with a cement cover, but this has since been dislodged. While you could see the bottom, a fall of 20 – 50 feet could be deadly, and either way, the rescue operation would be difficult for all involved. (This is another time it’s important to remember you can NOT rely on cell service when in the mountains).
*Let’s talk safety for a bit, shall we? When you visit ruins of old towns, mines, natural caves, etc. safety should be your #1 priority (respect for the site should be a VERY close #2). These buildings can be dangerous. The wood is rotting, most are in the process of falling down. Many have basements/root cellars (that you may not even be aware of). If you fall through the wood into these, you could be seriously injured.
Many of these buildings are also havens for rattlesnakes and other critters who may not appreciate you barging in (a mountain lion could be using a cool, abandoned root cellar as a place to nap.)
Old mines can collapse or cave-ins–even in natural caves–can occur at any time and with little to no warning. I cringe whenever I see pictures of people venturing into abandoned mines. 🤦♀️ So, adventure at your own risk, but, the Trekkers NEVER encourage people to actually venture into any of these structures. They can be enjoyed perfectly well and safely from outside. (You should be watchful even in the outside areas around these old sites. You never know when old holes, sharp metal pieces, or even disgruntled snakes may be camouflaged by the tall grass that often surround the structures.)
This hole in the ground appeared to be constructed, not sure if it was an old well, or what. This is what I’m talking about with safety, though. This hole was in the middle of what used to be the yard, without a cover or barrier around it.
Unique sites in Spokane, South Dakota
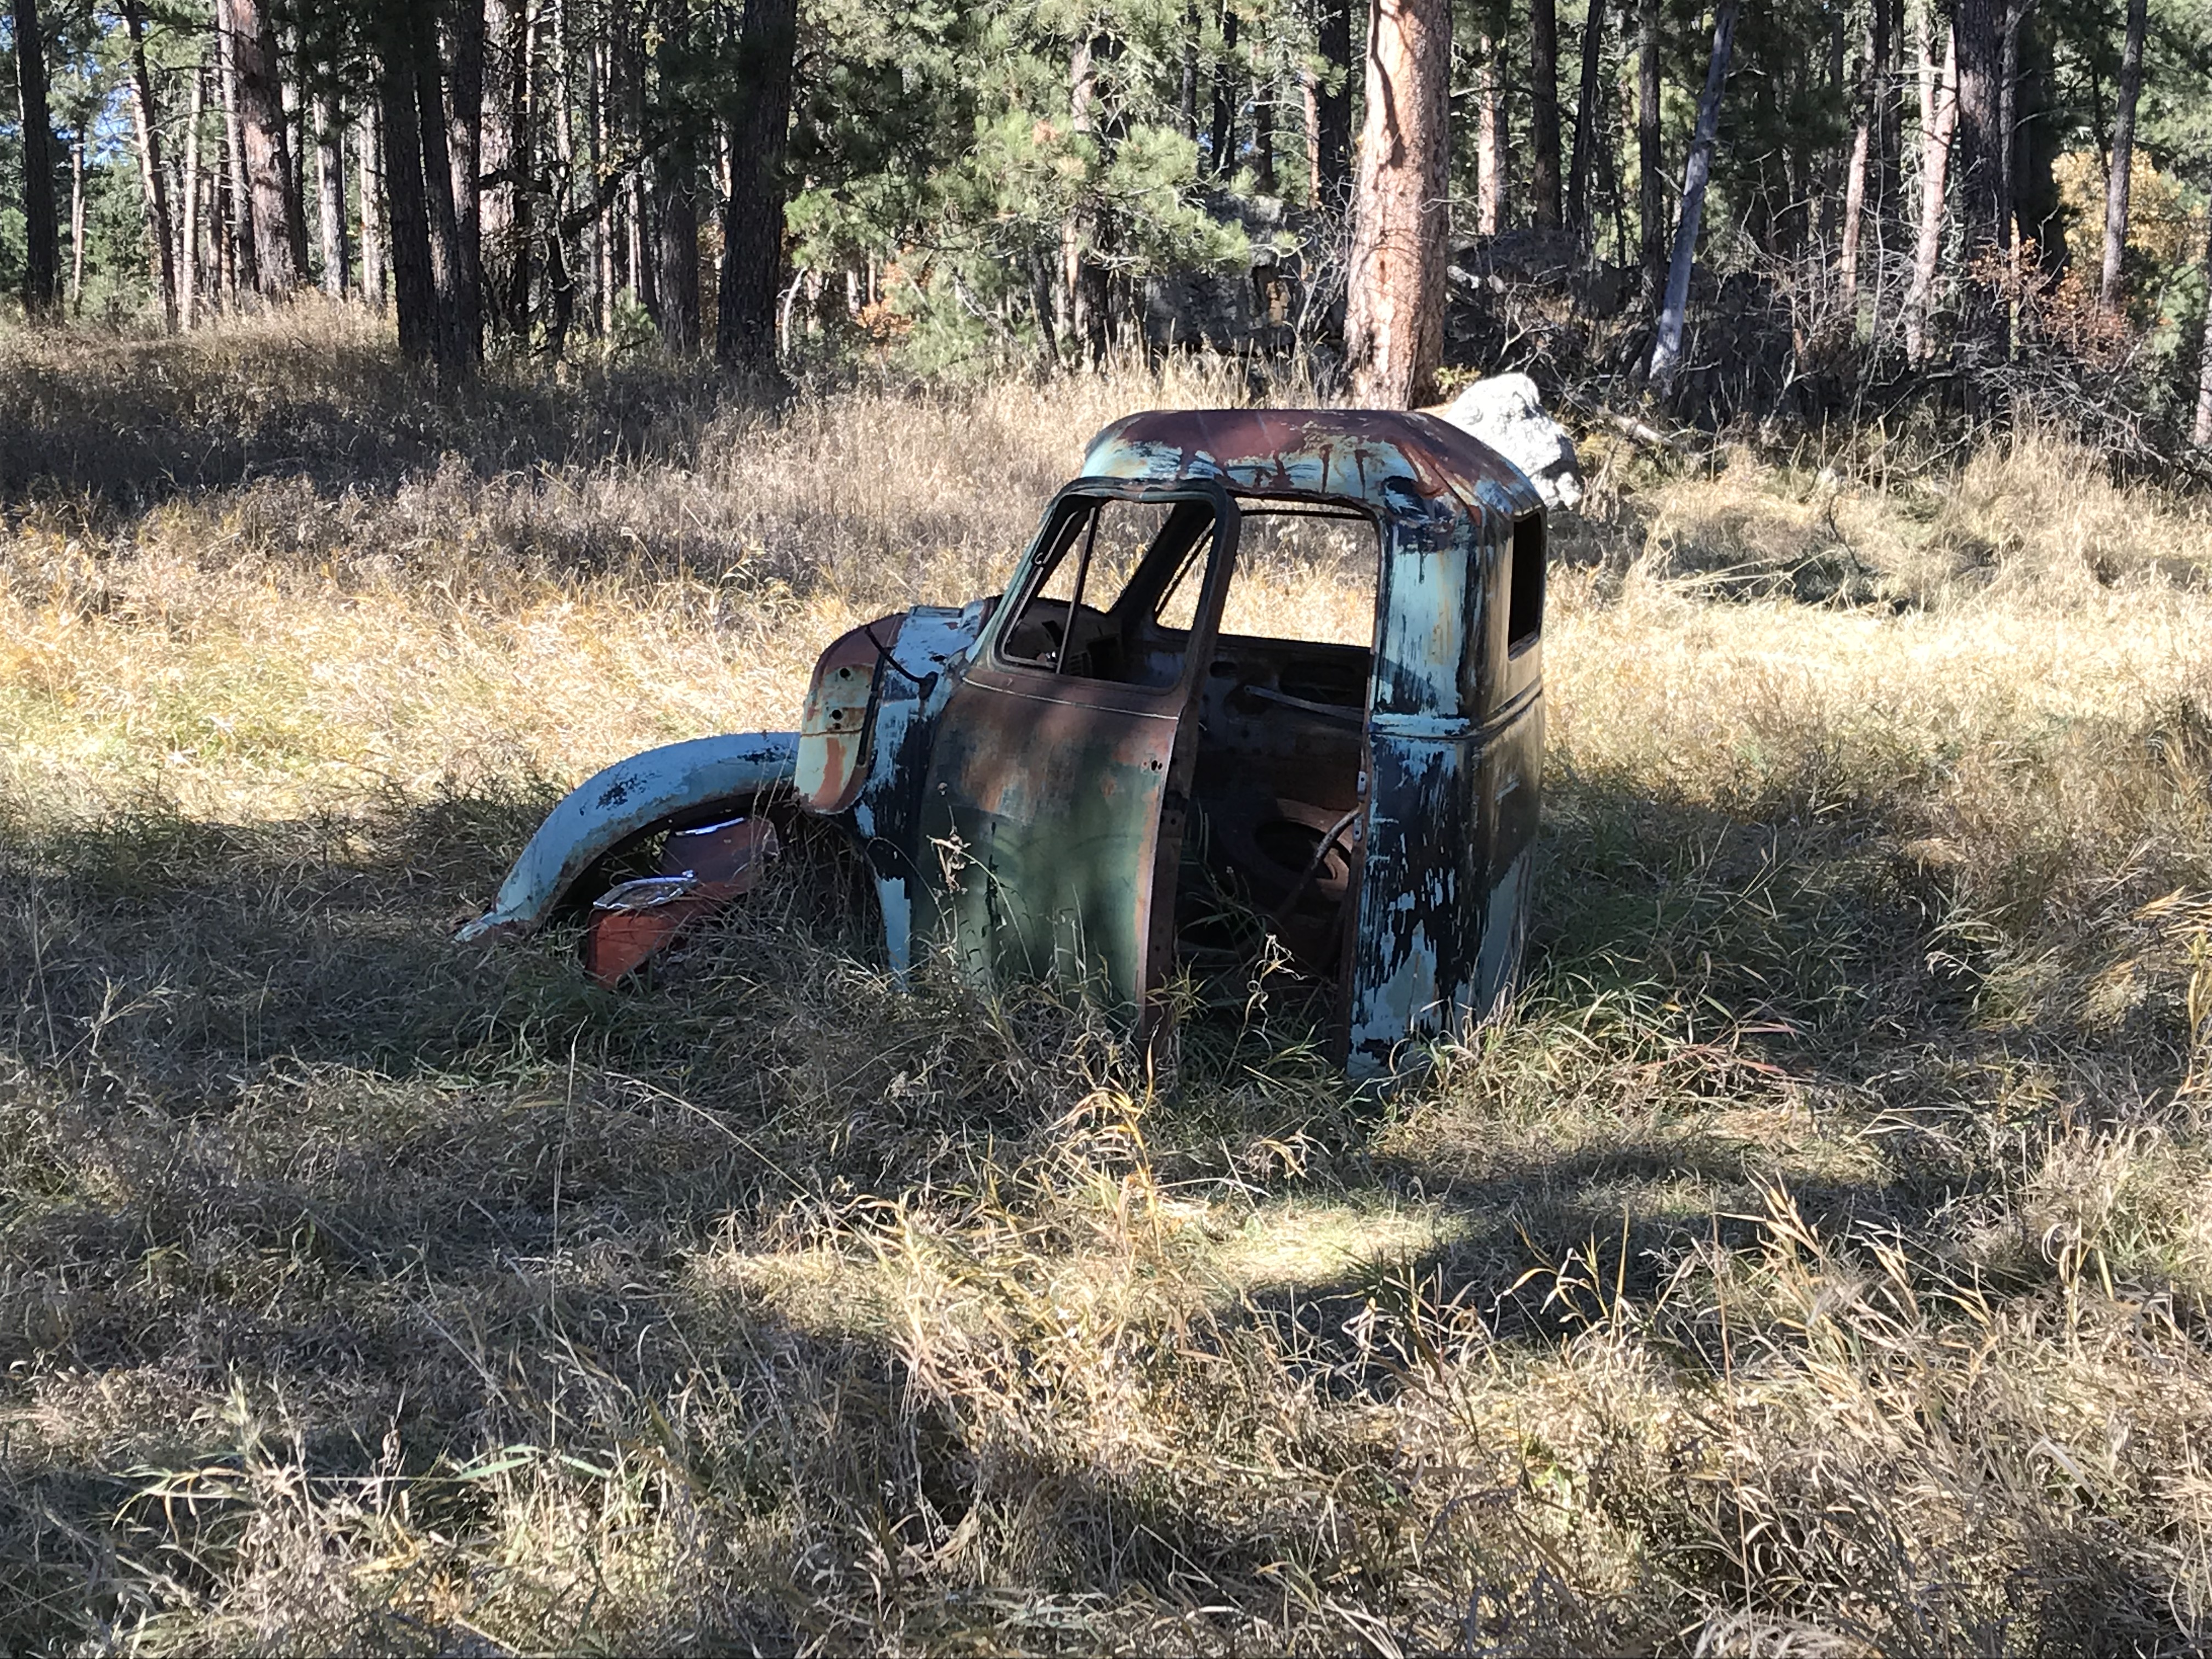
One unique aspect of this ghost town (at least compared to others the Trekkers have visited) is the presence of old cars! Most of the towns we’ve toured had heydays in the late 1800s when horse and cart were the primary source of travel. This town hit it’s prime in the 1920s (and wasn’t abandoned until the 1940s) so the unusual site of motor vehicles and evidence of electrical wiring on the buildings felt out of place.
I LOVE this old truck!
Where is the Spokane ghost town?
In order to help preserve the integrity of the site, I’m not going to give the exact directions to this location–other than what is already available with a simple Google search. I will give a few hints though:
It’s near Custer State Park (VERY, near). You can reach the site using Playhouse Road and/or Iron Mountain Road.
There are two entrances to the site. The main entrance, described in Google, requires a half-mile (or so) walk up a steep, rocky, abandoned forest road to reach the valley. We–somewhat accidentally–stumbled on the back entrance with an easy walk of only about 1/8th of a mile to reach the meadow.
The rest of the discovery is up to you (as I said, Google is your friend!)Author’s Note: In recent years the site has become more popular. Unfortunately, that means it’s also been vandalized–it’s too bad there are a few jerks out there who insist on ruining the fun for everyone–Some barriers have been erected in recent years to help keep people away from the buildings to hopefully help mitigate the damage. If you want clearer instructions on how to reach the site, you may contact me via social media as indicated below, or by using my contact form, and I may be able to help you a little more. (I won’t give precise instructions–that ruins the fun!–but I can give a few more helpful hints. 😇)
The mood this site created was pretty cool. The sun-dappled trees and forest floor make shadows flit on the ruins. You can almost smell the musky scent of horse, and hear the horses, wagons–and cars?! 😳–that trundled down the rutted, dirt road, as the wind rattles the dry leaves of the aspen trees that border the ramshackle houses.
While visiting the ghost town, why not check out Iron Mountain Road found nearby, as well?
This location would also make for a creepy adventure during the Halloween season! 👻 The site was pretty haunting, between the dilapidated old cars and buildings, you got a sense that this is what a post-apocalyptic society would look like (I may have been watching too much Walking Dead lately.) 😜
Below are some more pics of our adventure (thanks, as usual, to Mr. Trekker for many of these)!
To be clear, the house is leaning, not the photographer! 😉
Dishwasher or a washing machine?
I’m loving the old stove! (FYI, those are YEARS of pine cones, left by squirrels, layering the floor in front of it!) 😳
Have you ever visited this unique place? Tell me about it in the comments!
Did you enjoy this post? Pin it!
Like what you read here today? Please feel free to leave a comment, like or share this post! Add your email at the bottom of the page, or the sidebar to the right, to be notified when a new post is published. By signing up for the email list, you will also receive a free copy of the Tranquil Trekker’s Top 10 Tips of Trekking Do’s and Don’ts!
You can also follow the blog on social media by clicking the links below!
I review a light, therapy lamp and an app I use to decrease symptoms of anxiety and seasonal depression.
I’ve mentioned before that I struggle with general anxiety as well as SAD (Seasonal Affective Disorder), and that I prefer behavioral treatment methods over psychotropic medications. Below are two, non-medication, products that I use regularly and that I find help greatly, a therapy lamp and the Calm app:
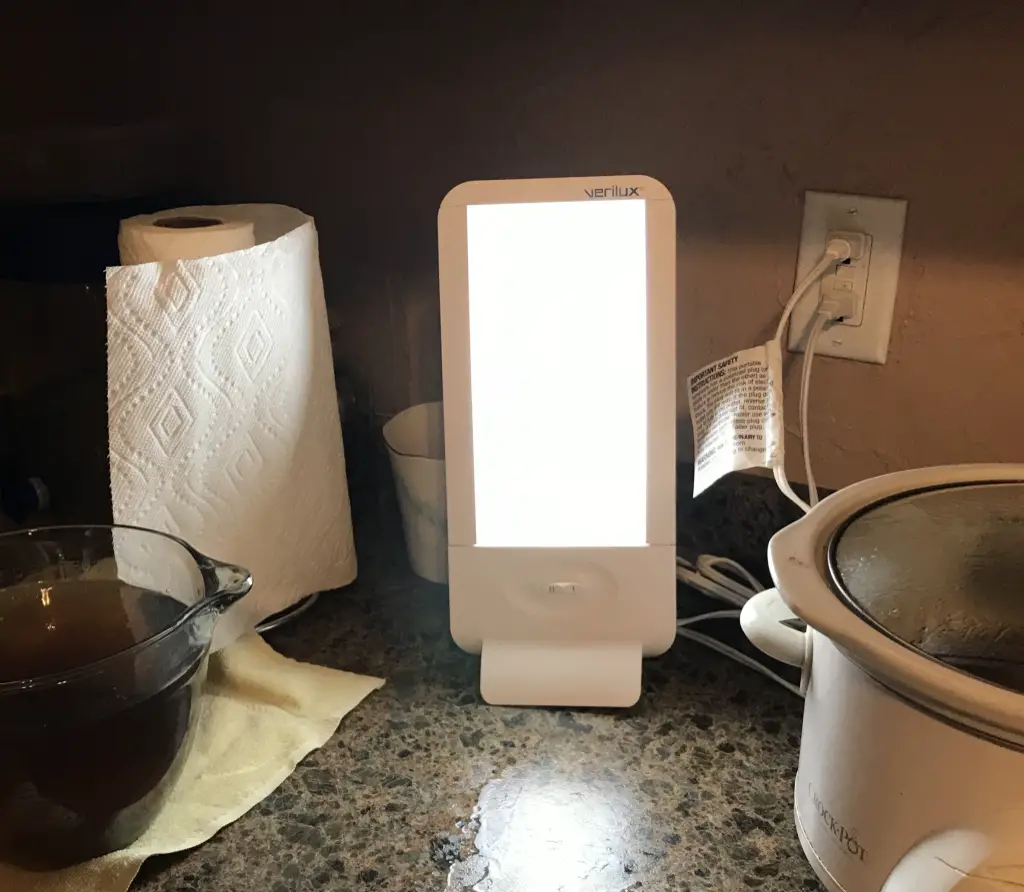
Light Therapy Lamp
During the fall and winter, as the daylight wanes, this tool is a must for me (these have been documented to help decrease the symptoms of SAD.) There are several versions of this device, but this is the specific, light therapy lamp I use several months out of the year.
You have to be careful which ones you buy as they need to provide at least 10,000 lux of light, the minimum wavelength required to stimulate your brain correctly. Unfortunately, the good ones aren’t cheap. The old adage is true, however, “you get what you pay for”. When you’re experiencing several dark, cloudy days in a row, I find this helps, significantly, so it’s worth the cost.
This is not a perfect replacement for true sunlight, and it offers no source of Vitamin D3 (I mentioned previously that I enhance my levels with supplementsin the winter months). But, when you’re struggling amid a string of several gray days–and especially when you’re driving both to work and home in the dark 😝–this device helps to brighten up your world a little bit.
A word of warning, because of the way it stimulates your brain, it can cause sleep disturbances if it’s used too closely to bedtime. I use it in the morning and evenings, in the kitchen, when I’m preparing meals or doing dishes. Those are the times I notice the lack of daylight the most and these timeframes don’t affect my sleep habits. You’re supposed to sit within a certain distance of the lamp, though I find just having it in the same room I’m in and being able to see the light provides relief.
Another tool I LOVE (and use throughout the year) is the Calm app, available for Android and IOS. Several versions of the app exist, including a free, limited version–this is the one I use.
The app showcases multiple relaxing sounds (including heavy rain, a thunderstorm, waves, and a sunny lake), and white noise options (such as floating clouds or deep space). These are complemented by animated scenes that are incredibly beautiful to watch.
The paid versions also offer spoken meditation podcasts and sleep stories. You can visit the app’s website here or search for it on the App Store. I cannot recommend this product enough (I’ve gotten Mr. Trekker using it as well! 😁)
If you find yourself struggling with the ever-increasing darkness of the winter season, or just need help calming your mind, check out these products!
Have you ever used these tools? Tell me about your experiences in the comments!
Did you enjoy reading this post? Pin it!
Like what you read here today? Please feel free to leave a comment, like or share this post! Add your email at the bottom of the page, or the sidebar to the right, to be notified when a new post is published. By signing up for the email list, you will also receive a free copy of the Tranquil Trekker’s Top 10 Tips of Trekking Do’s and Don’ts!
You can also follow the blog on social media by clicking the links below!
In this post, I review a trip we took to the Corn Palace in Mitchell, South Dakota.
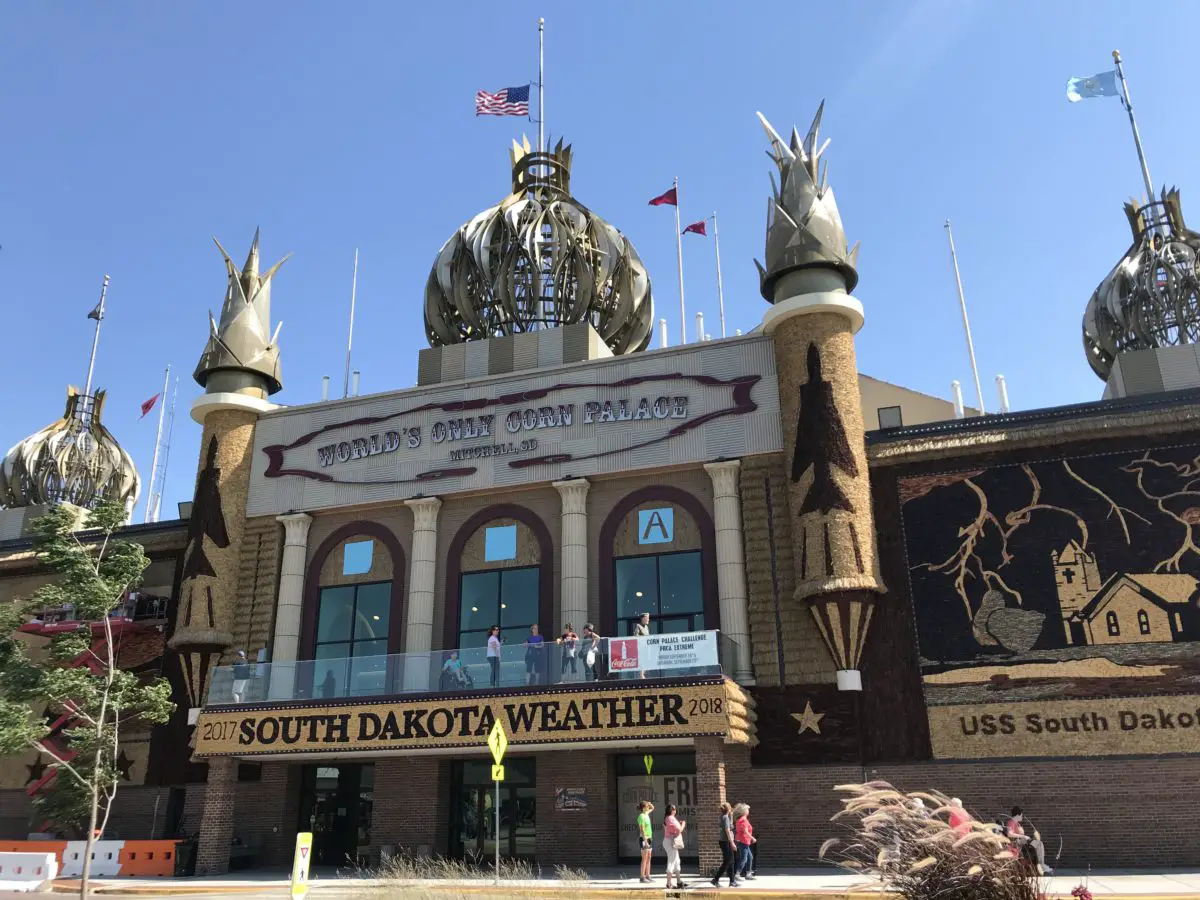
On a quick trip to the east side of our large state, to enjoy a Metallica concert (the pyrotechnics weren’t tranquil but they were VERY cool!*) we were able to knock another item off my South Dakota bucket list. We visited the Corn Palace in Mitchell, South Dakota! I have to say, while I was expecting something a bit campy and hickish, it was actually pretty cool. 😁
*A note on heavy metal concerts, they wouldn’t appear to be “tranquil” at first glance. However, I find them to be almost meditative…in a sense…
As long as you aren’t being jostled too much by the screaming throngs 😳, the blaring music envelops you and blocks out your other senses. If you close your eyes and let the music take you, it’s almost like being underwater. I find the sensation of sensory deprivation to be calming. It’s like you’re floating, in a sea of sound, gently drifting on the sonic waves. 🎶
Is the Corn Palace really made of corn?
The Corn Palace was originally constructed in the 1890s to help draw people to the tiny town of Mitchell, South Dakota. It was built in response to other, similar sites that were cropping up (no pun intended) around the Midwest. It has showcased stars ranging from Arlo Guthrie to Brittany Spears!
To clear up any confusion, it’s not actually constructed entirely of corn. Apparently, the original palace was fabricated with more corn but was also a haven to rats and not very warm during the–many–cold months on the northern prairie.
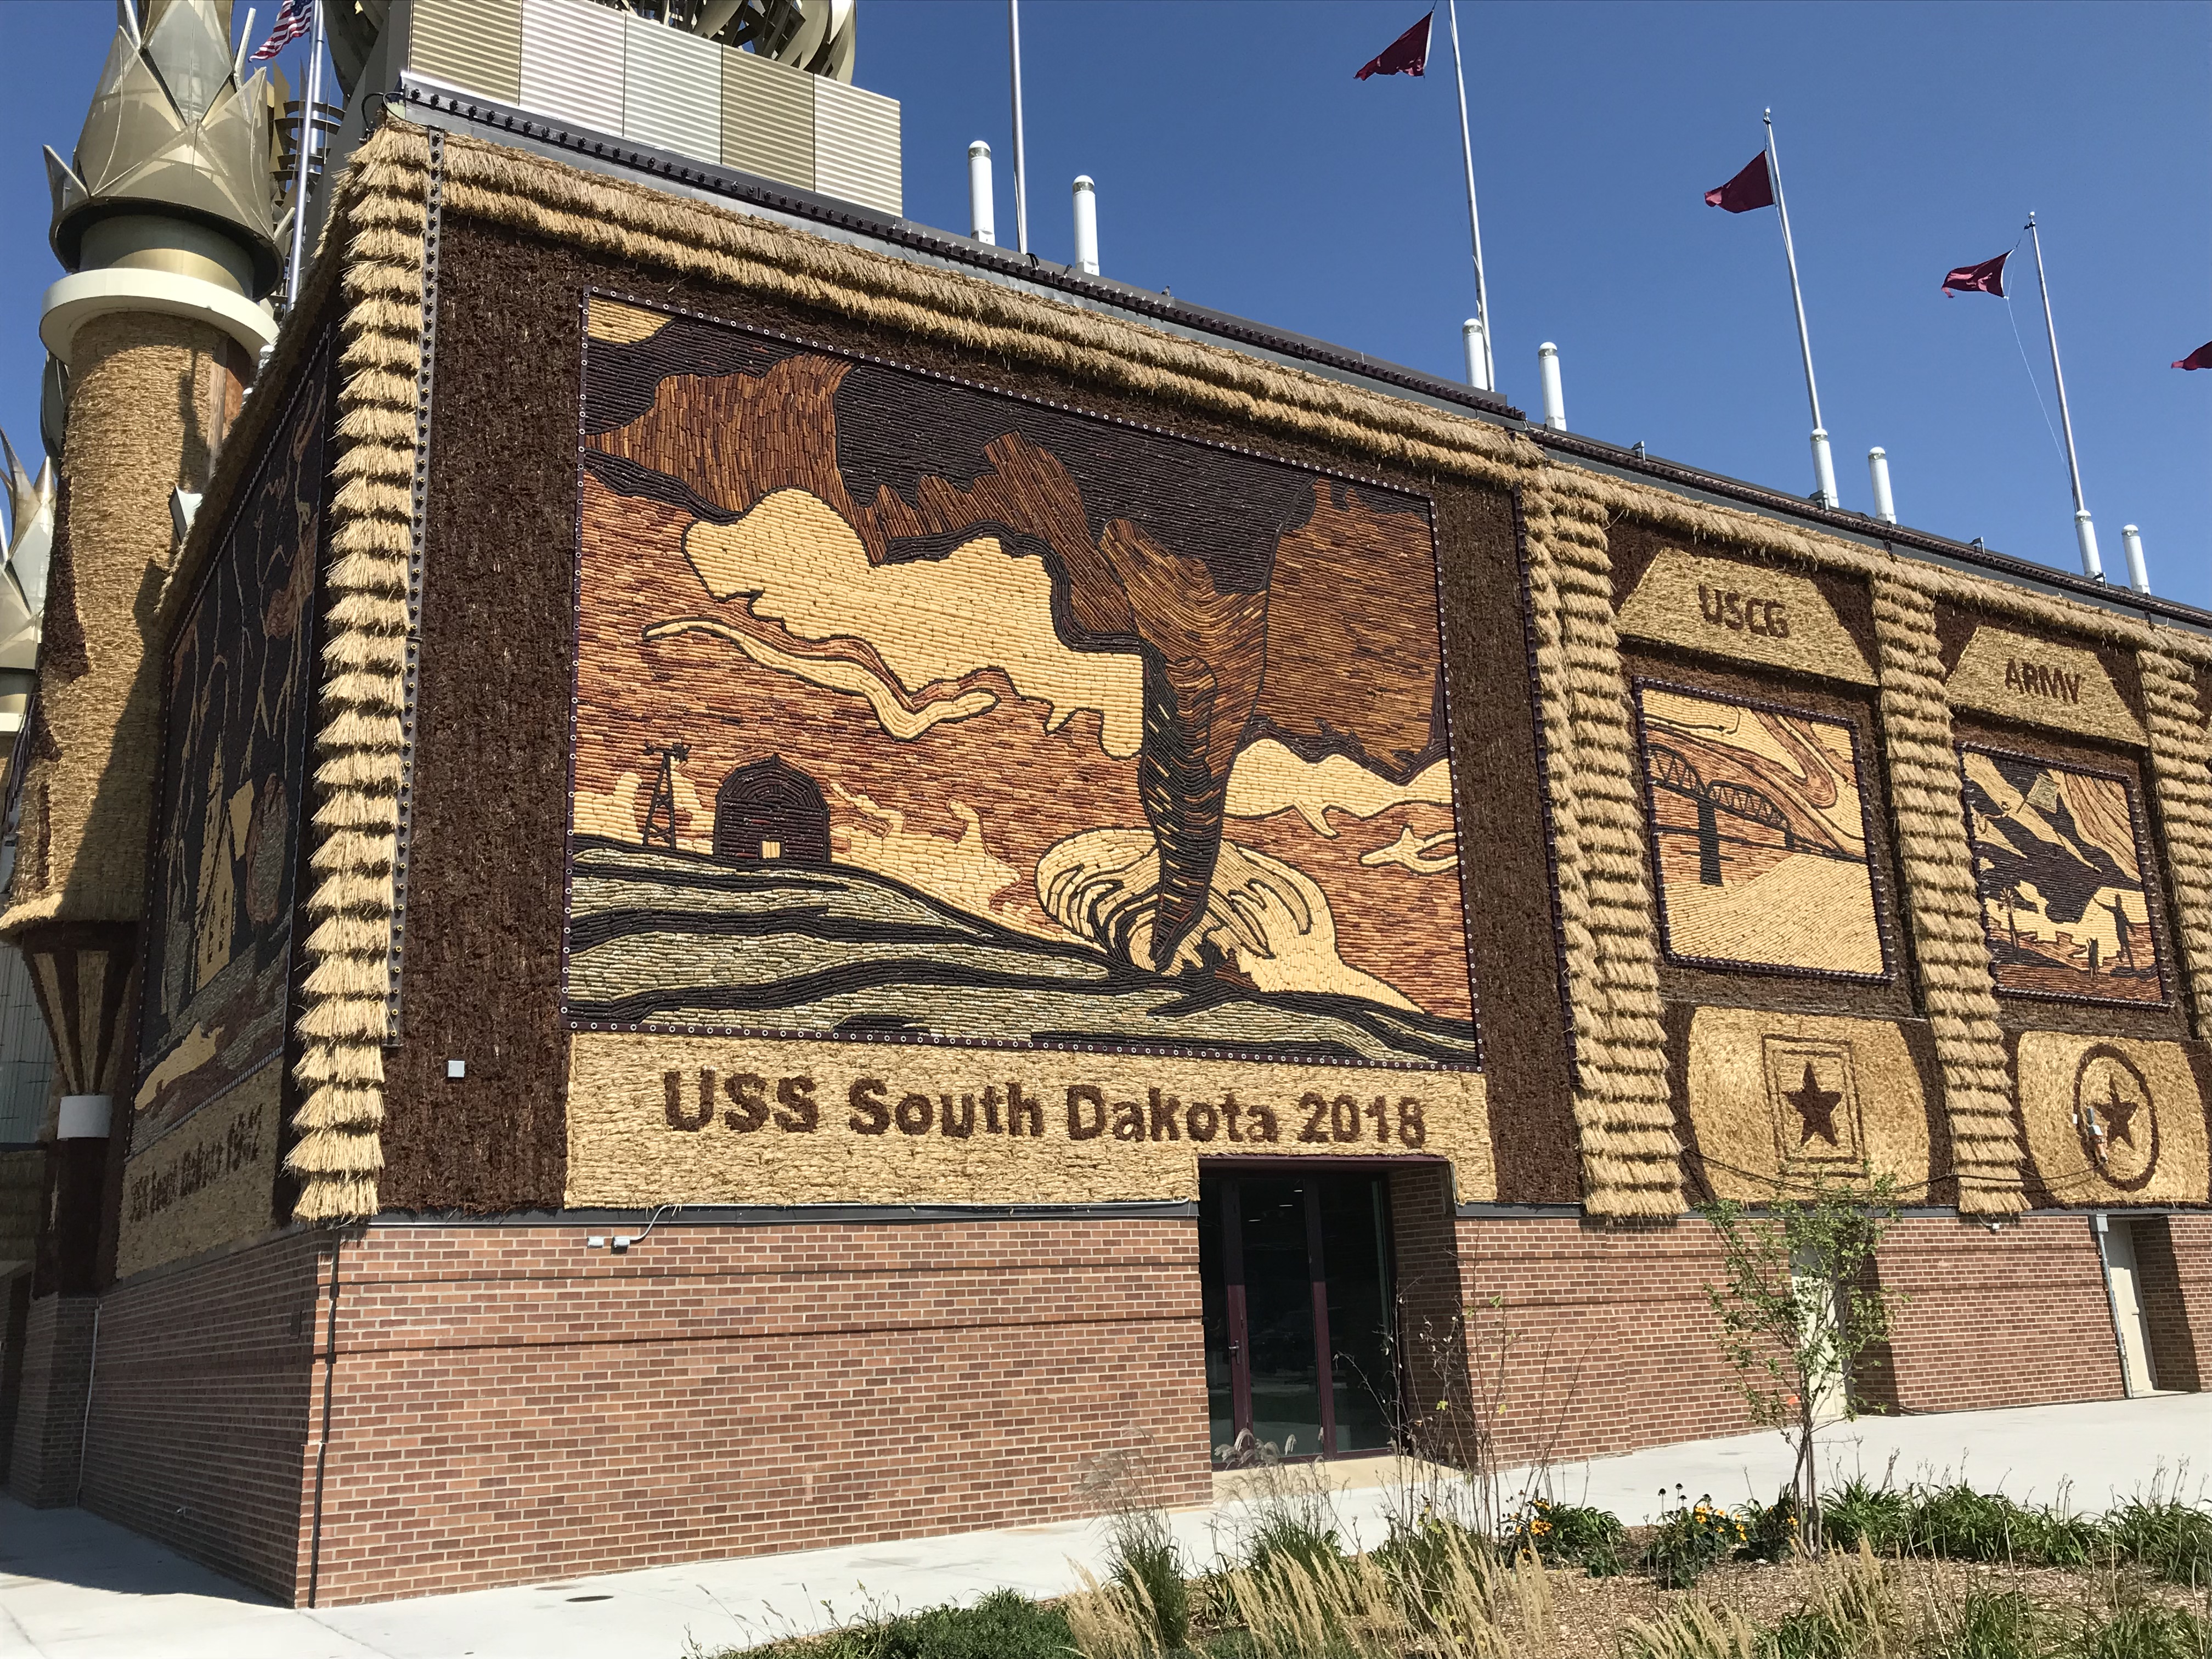
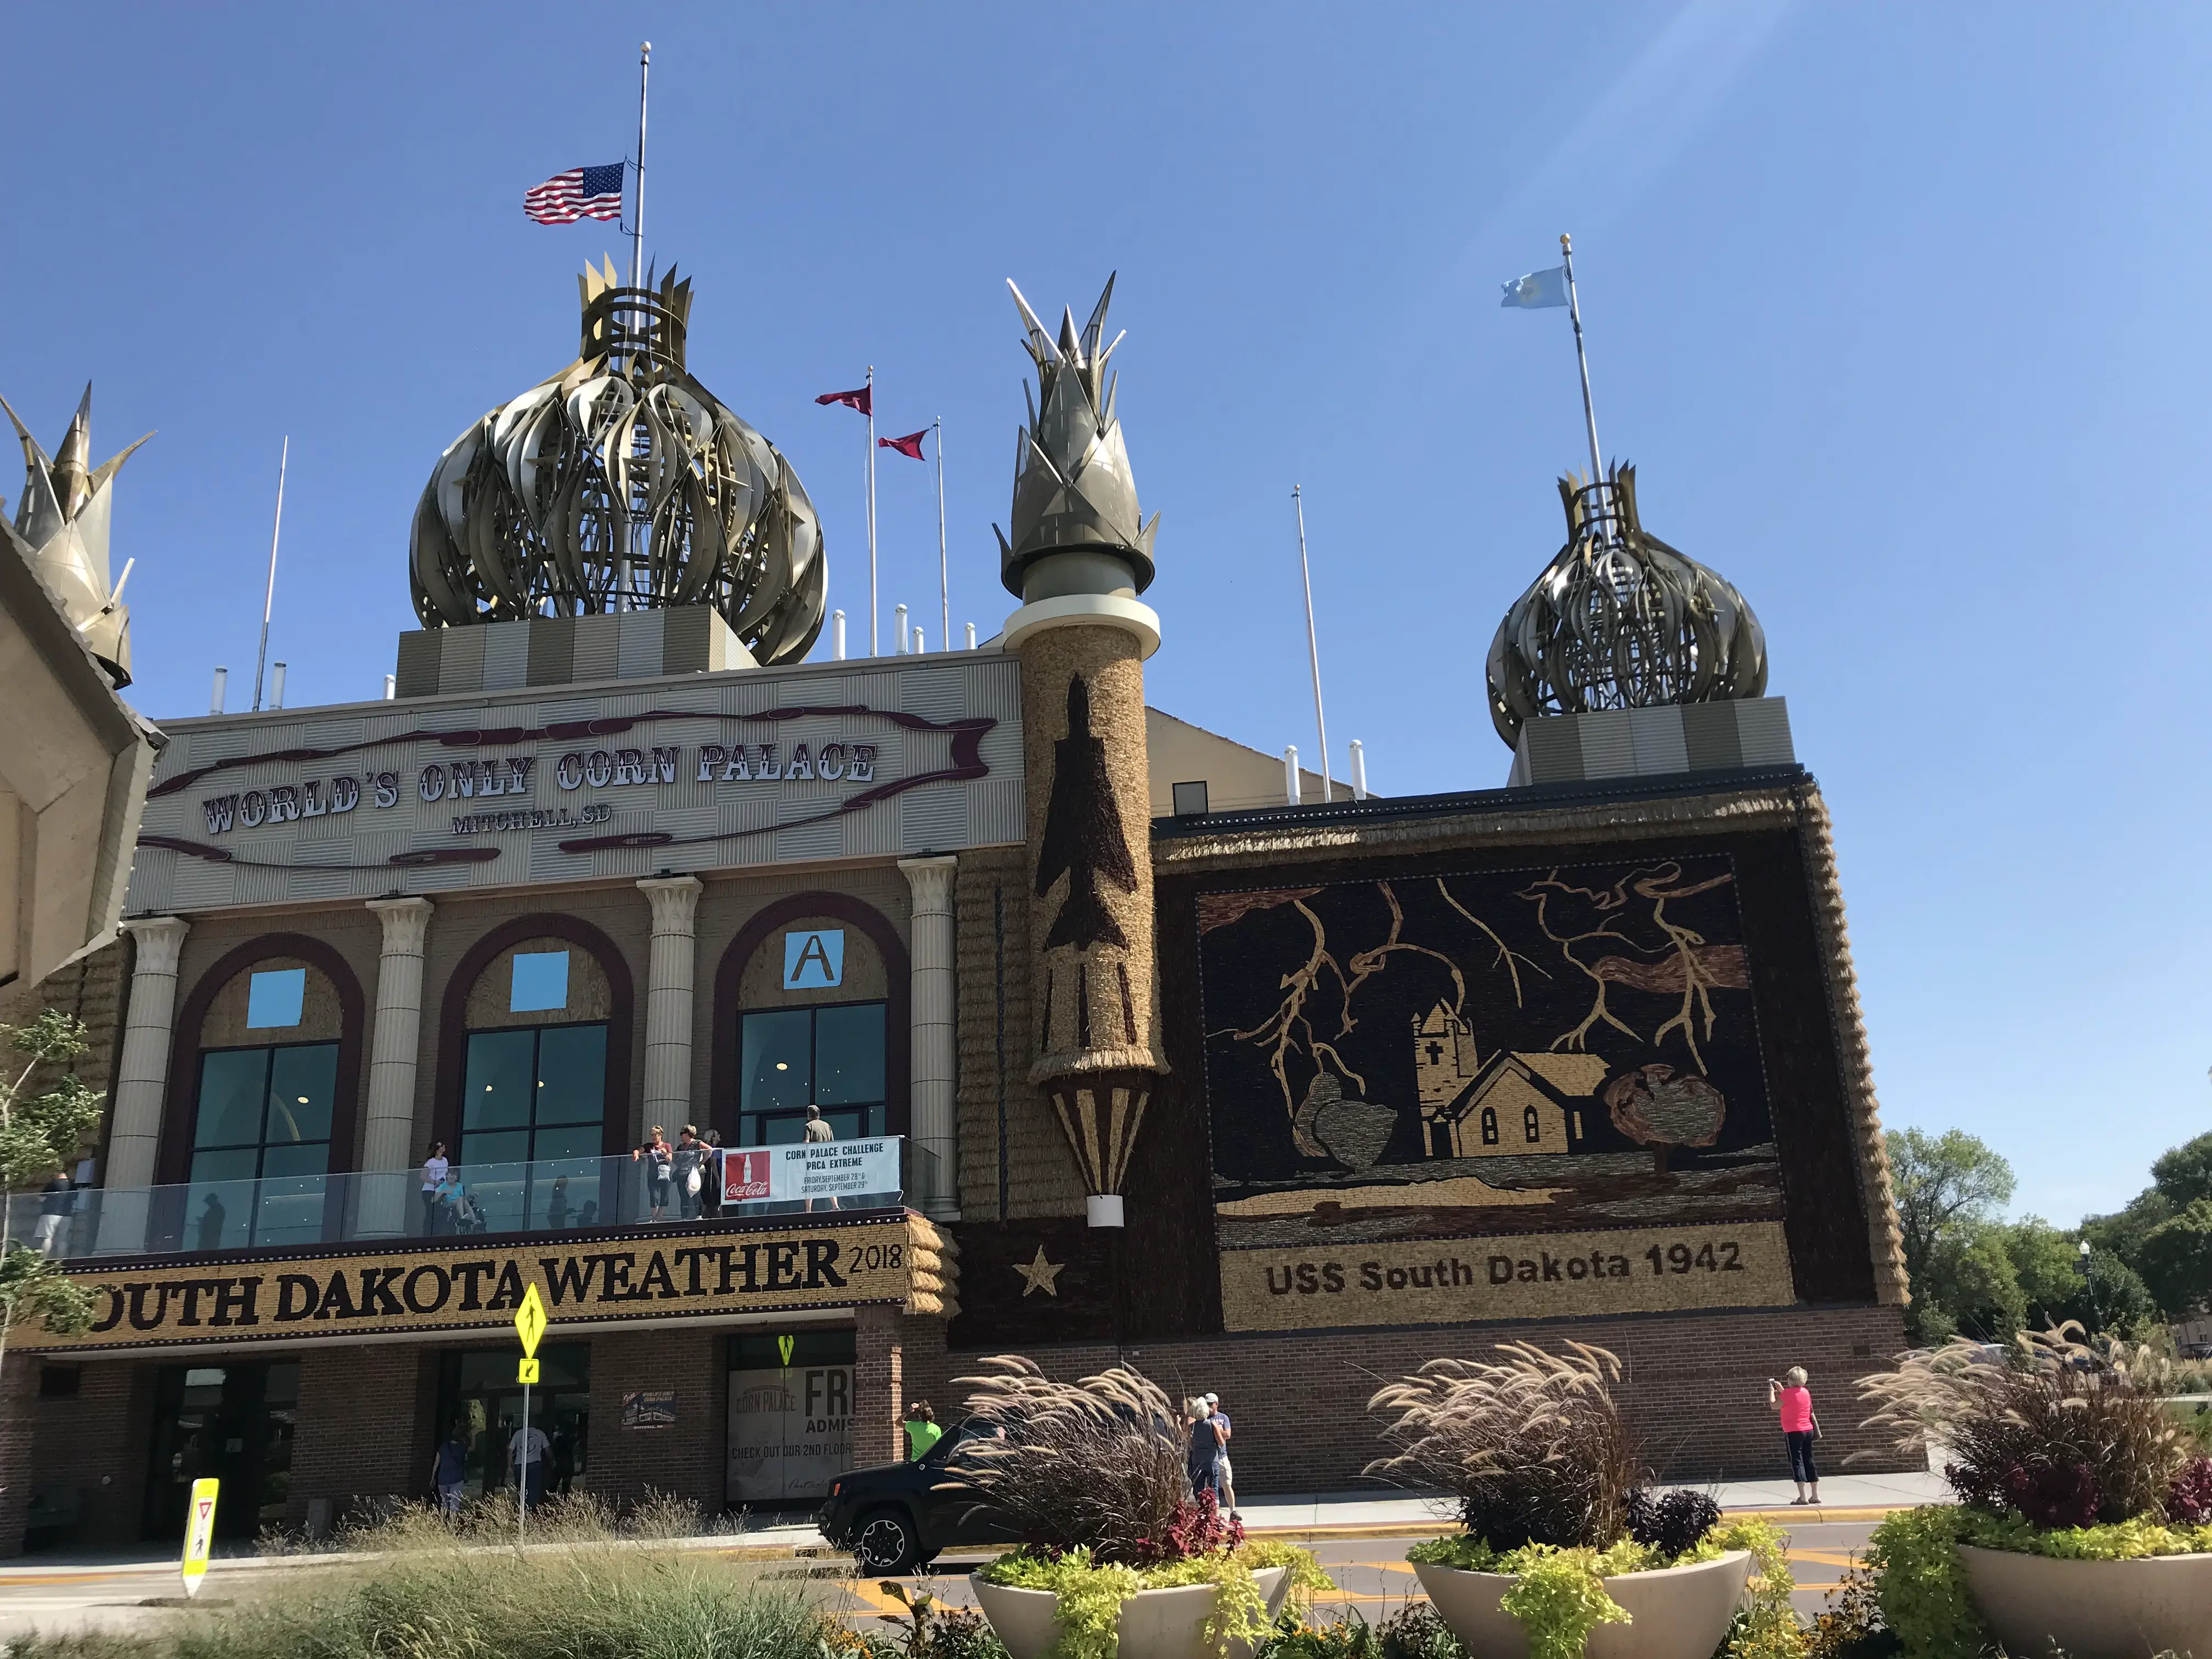
The Corn Palace has been rebuilt several times, but, it’s a typical steel and wood building with walls that are covered in variously-colored corn cobs and husks on the outside in designs that change each year (for 2018 the walls celebrated South Dakota weather, much to the delight of the meteorologist, Mr. Trekker!)
I thought this depiction of a tornado was so cool! (You can see that they’re in the process of transitioning the mural into the next year’s design.)
What is the Corn Palace like on the inside?
When you first enter it, it looks like the lobby of your typical high school (or small, college) gym. That then opens into a larger gymnasium/auditorium area where some local college/high school teams play.
The scene took me back to my country roots. The gymnasium reminded me of the one I spent many a Friday night in during my high school years back in Indiana (basketball is big there too, in case you were wondering. 😉)
I was impressed by the wide variety of themes that have been showcased on the walls of the palace throughout the years, relating to natural phenomena, worldwide events (such as the World Wars) as well as the culture and activities familiar to the Northern Plains.
I was also intrigued by the effort required to design and construct the various murals that cover the walls every year. (I can also recommend the YUMMY popcorn sold at the concession stand! 🤤 )
For more information on the Corn Palace, please visit the attraction’s website here. If you’re ever near Mitchell, South Dakota (it’s right off I-90), I’d encourage you to stop in and check out this relic of the past. I think you’ll be glad you did!
Have you ever visited the Corn Palace? Tell me about your experience in the comments!
Did you enjoy this post? Pin it!
Like what you read here today? Please feel free to leave a comment, like or share this post! Add your email at the bottom of the page, or the sidebar to the right, to be notified when a new post is published. By signing up for the email list, you will also receive a free copy of the Tranquil Trekker’s Top 10 Tips of Trekking Do’s and Don’ts!
You can also follow the blog on social media by clicking the links below!
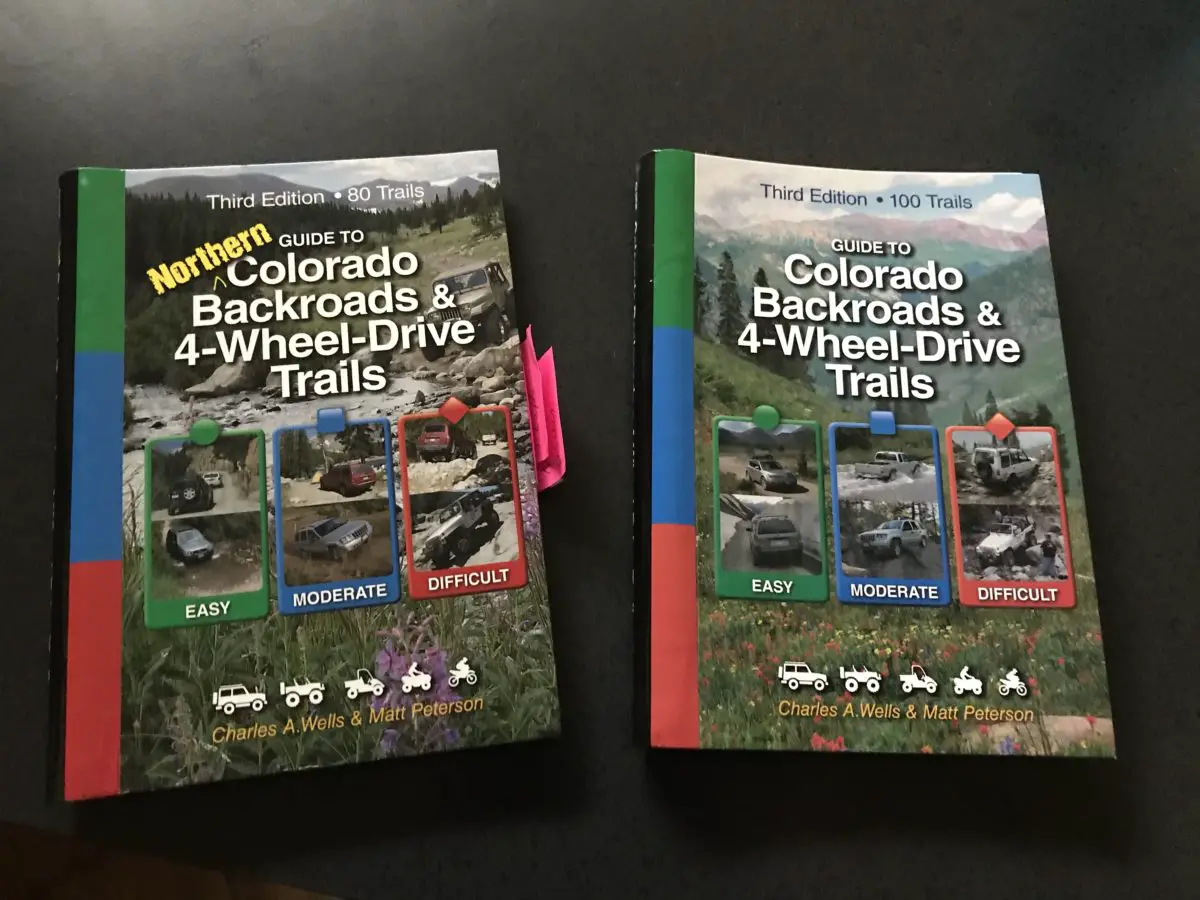
In this post, I review a collection of guidebooks the Trekkers have found helpful regarding 4×4 roads and trails in Colorado.
The Guide to Colorado Backroads and 4-Wheel-Drive Trails may have a long name, but these are some of the best guidebooks we’ve used for offroading, in general. (To be fair, I don’t have much experience with books that, specifically, discuss 4WD trails). In this post, I mentioned that we used these books quite a bit during our Colorado road trip this summer.
What makes the books so great?
The book series is composed of two volumes that encompass the central and southernregions, and the northern region of the state and divide the roads and trails into classifications of “easy”, “moderate” and “difficult”. They give incredibly detailed descriptions of the routes (down to the tenth of a mile) and also discuss rules regarding permits needed, unlicensed off-road vehicles, etc.
It should be noted that the books assume that a 4WD vehicle will be used when attempting these roads/trails, So, classifications of “easy” should be understood within that context. We found some (though not all) of the “easy” roads should be approached with care in a passenger vehicle (even higher-clearance vehicles such as my CRV). It should also be noted that even the easiest trail can quickly become difficult if weather conditions deteriorate.
The books tell you what you will encounter on the route
The books’ excerpts describe the types of vehicles that each route can accommodate–a full-sized truck or jeep versus an ATV with a shorter wheelbase, whether or not modifications (such as skid plates, rock sliders, winches, etc.) are advisable. These excerpts also do a good job of differentiating between paved and gravel roads (information we found to be lacking in the Gazetteer), the usual condition of the routes, as well as how surface conditions can vary based on changing weather conditions.
The books give directions on how to reach a route, bug-out options if needed (and if they’re available at all), hazards to watch out for, the best time of the year to experience the trail (as well as when they may be closed, entirely, due to weather conditions), and contact numbers to verify the most updated road conditions.
The route’s length, the highest altitude it reaches, and activities available on or near the trail (availability of camping, hiking, rock crawling, ghost towns to explore, etc.) are also discussed. Color-coded maps are provided in spiral-bound, durable pages that make for easy use in a vehicle (I can vouch for this as the navigator). 😉
Colorado is one of my favorite places to visit. Click here for more posts on this awesome state!
According to Amazon, similar books by the same authors are available for other locales as well, including, Moab, Utah, and portions of Arizona and California. I can’t speak for the quality of these volumes, though, if they’re anything like the ones described above (and I have no reason to believe they aren’t), they would be beneficial additions to any gear list if you’re visiting these areas.
So, if you’re itching to get away from the crowds and explore some Colorado backroads, consider these books for your adventure!
Have you ever used either of these books? What did you think of them? Tell me about your experience in the comments!
†As an Amazon Associate I earn from qualifying purchases
Did you enjoy this post? Pin it!
Like what you read here today? Please feel free to leave a comment, like or share this post! Add your email at the bottom of the page, or the sidebar to the right, to be notified when a new post is published. By signing up for the email list, you will also receive a free copy of the Tranquil Trekker’s Top 10 Tips of Trekking Do’s and Don’ts!
You can also follow the blog on social media by clicking the links below!
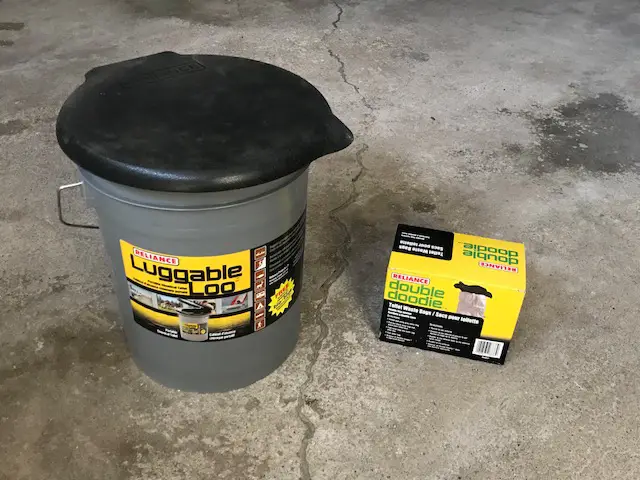
In this post I review the Luggable Loo and Double Doodie bags.
Where do you go, when you gotta GO…and you’re in the woods? 😳
Before our 12-year-old inner selves start giggling 😜, let’s get the awkwardness out of the way. Everybody poops! And, when you’re in the woods for long periods of time, you’ll probably need to do it there. Just pretend you’re getting in touch with your ancestral roots!
Let’s face it, the woods is often a far better–or at least less smelly–option than a pit toilet! 🤥😝
The Luggable Loo and Double Doodie Bags will help make this necessary chore as pleasant as possible!
Leave No Trace Principles
When we’re enjoying the great outdoors, we need to remember that we are guests of Mother Nature. This privilege should be respected, and in so doing, we need to be responsible and clean up after ourselves. Leave No Trace principles are practices we should all follow to ensure we leave the most minimal impact possible on the natural world. You can visit this website, maintained by the Center for Outdoor Ethics, for a listing of the various principles and how best to implement them.
There are several systems available for waste disposal when you’re in the wilderness, many are small enough they can be carried in a backpack. The Trekkers car camp, so we have room for one of the larger options. There are also several brands and versions of the loo and bags, these are just the ones I chose to use–you could, also, make this product on your own, though the success of your creation may vary.
What is a Luggable Loo?
A Luggable Loo is exactly what it sounds like. It’s a portable–or luggable–toilet comprised of a seat, a five-gallon bucket, some kitty litter, and some VERY sturdy Double Doodie (garbage) bags. The kitty litter and bags work GREAT to contain any odor, especially if they’re changed daily. The fact that the only people to use the facility are those in your own party makes them far more palatable as well.
I’ve said this before but I can’t stress it enough, when you’re in bear country, ESPECIALLY grizzly country, it’s essential to make yourself as uninteresting as possible to our friends of the Ursus variety. I recommend the unscented trash bags and the all-natural kitty litter with charcoal (it’s unscented and the charcoal works great to impede odor–it’s also slightly cheaper!)
What are Double Doodie Bags?
Double Doodie Bags compliment the Luggable Loo very well. They’re easy to install, sturdy, hold a large volume of “product”, and are easy to remove from the loo when you’re finished. You can simply dispose of the used bags in any trash can.
It is not essential to carry these, or any other waste disposal system, with you. You can always employ the old-fashioned method of burying your “leavings”.
There are certain steps you should take in order to accomplish this in a way that is least harmful to the environment. You can check Principle 3 on the Leave No Trace page for info on how to go “old school” when disposing of waste.
Regardless of the system you choose to use, you should always pack out any non-biodegradable items, such as feminine products.
With the use of these fine inventions (or other waste disposal systems), you don’t need to worry about the need to “go” keeping you from going out and enjoying the outdoors!
Have you ever used the Luggable Loo or the Double Doodie bags? What were your experiences? Tell me about them in the comments!
Did you enjoy reading this post? Pin it!
Like what you read here today? Please feel free to leave a comment, like or share this post! Add your email at the bottom of the page, or the sidebar to the right, to be notified when a new post is published. By signing up for the email list, you will also receive a free copy of the Tranquil Trekker’s Top 10 Tips of Trekking Do’s and Don’ts!
You can also follow the blog on social media by clicking the links below!
Black Elk Peak, formerly Harney Peak, is the highest point in the Black Hills and one of the most sought-after hikes in this area.
In case you aren’t aware of it (and as I outlined in this post), the name of this mountain changed just a few years ago and they’re still working on updating all the signs and maps.
There are multiple trail options for getting to the summit. The most popular route is the southern portion of Trail #9, the Black Elk Peak Trail, that starts at Sylvan Lake. However, in this post, I’m going to talk about the far less-traveled (and far more difficult) northern portion of this same trail.
It is a little confusing because the names are the same. Be watchful for this (there are signs!)} This portion of the trail is actually shorter than the southern route, but it is far steeper, which is why it is more difficult.
Accessing the Black Elk Peak Northern Route Trailhead
There are a number of ways to access this portion of the trail. One of the easiest is from the Willow Creek Horse Camp off of Route 244. You will find it directly across the road from the Mount Rushmore KOA campground (and around six miles west of Mount Rushmore.
The Willow Creek Trail is an easy and fairly short loop that makes for a great, quick hike. It is only around two miles in length and you can enjoy it in either direction. You will need to start on the Willow Creek Trail to reach the Black Elk Peak Trail which branches off about halfway through the Willow Creek loop.
1st Attempt to Conquer Black Elk Peak, the Hard Way
We’re standing at Black Elk Peak, we’ve been on the trail for five hours, the guidebook we’d consulted said the trail options we chose were only around eight, total miles long. We now KNOW that can’t be right as our GPS says we’re well over five miles into the hike and we’ve only reached the summit. It’s 5 p.m. and…it’s starting to drizzle…
We had used the Lost Cabin trailhead off Palmer Creek Road to ascend the mountain on this attempt. We weren’t sure if we’d make it the whole way or just turn back at some point, but at lunchtime, we were nearly four miles in and the book had said it was only an eight-mile trek so…this is a lesson in listening to your gut. When your guidebook (and/or GPS) say one thing, but while looking at the map and using human logic your gut says another…ALWAYS listen to your gut! 😝
Fortunately, it was Memorial Day weekend so we had guaranteed daylight until 8:30 pm or so, and we had headlamps with us. (This was one of the only, true, “uh oh” moments I’ve ever had on a trail. The thought crossed my mind that we could be facing a long, cold night.).
We did, eventually, make it down safely, and with daylight remaining. We even managed to save one set of dry pants, each, to change into when we got back to the car!
After descending this trail in drier conditions, I’m somewhat impressed we made it down as safely and easily as we did. Water trickles over the large, boulder steps on sunny days, so, on rainy days, it can turn into a veritable river in spots!
The path is steep and technical enough on its own, in the rain and growing darkness, it can get muddy and slippery very quickly–portions of it literally turn into mini-waterfalls from water running down the slope! I thank Mr. Trekker for suppressing my tendency to rush…I hate this trail. 😝
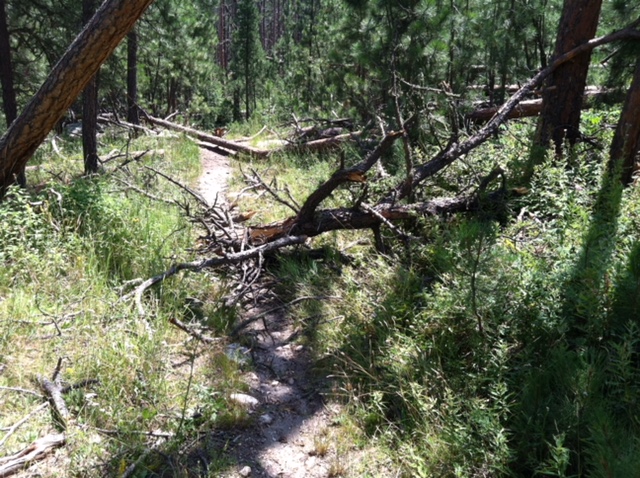
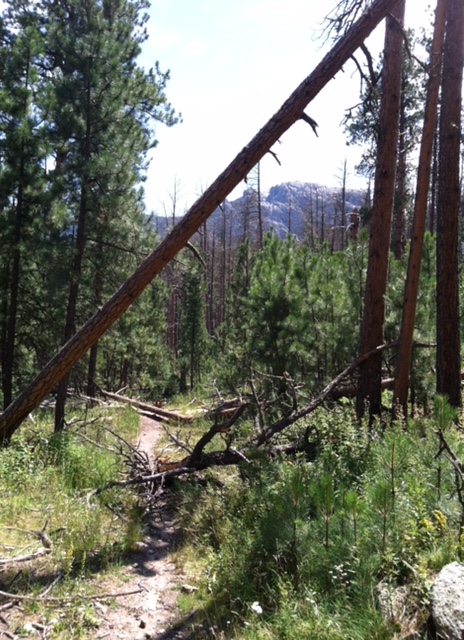
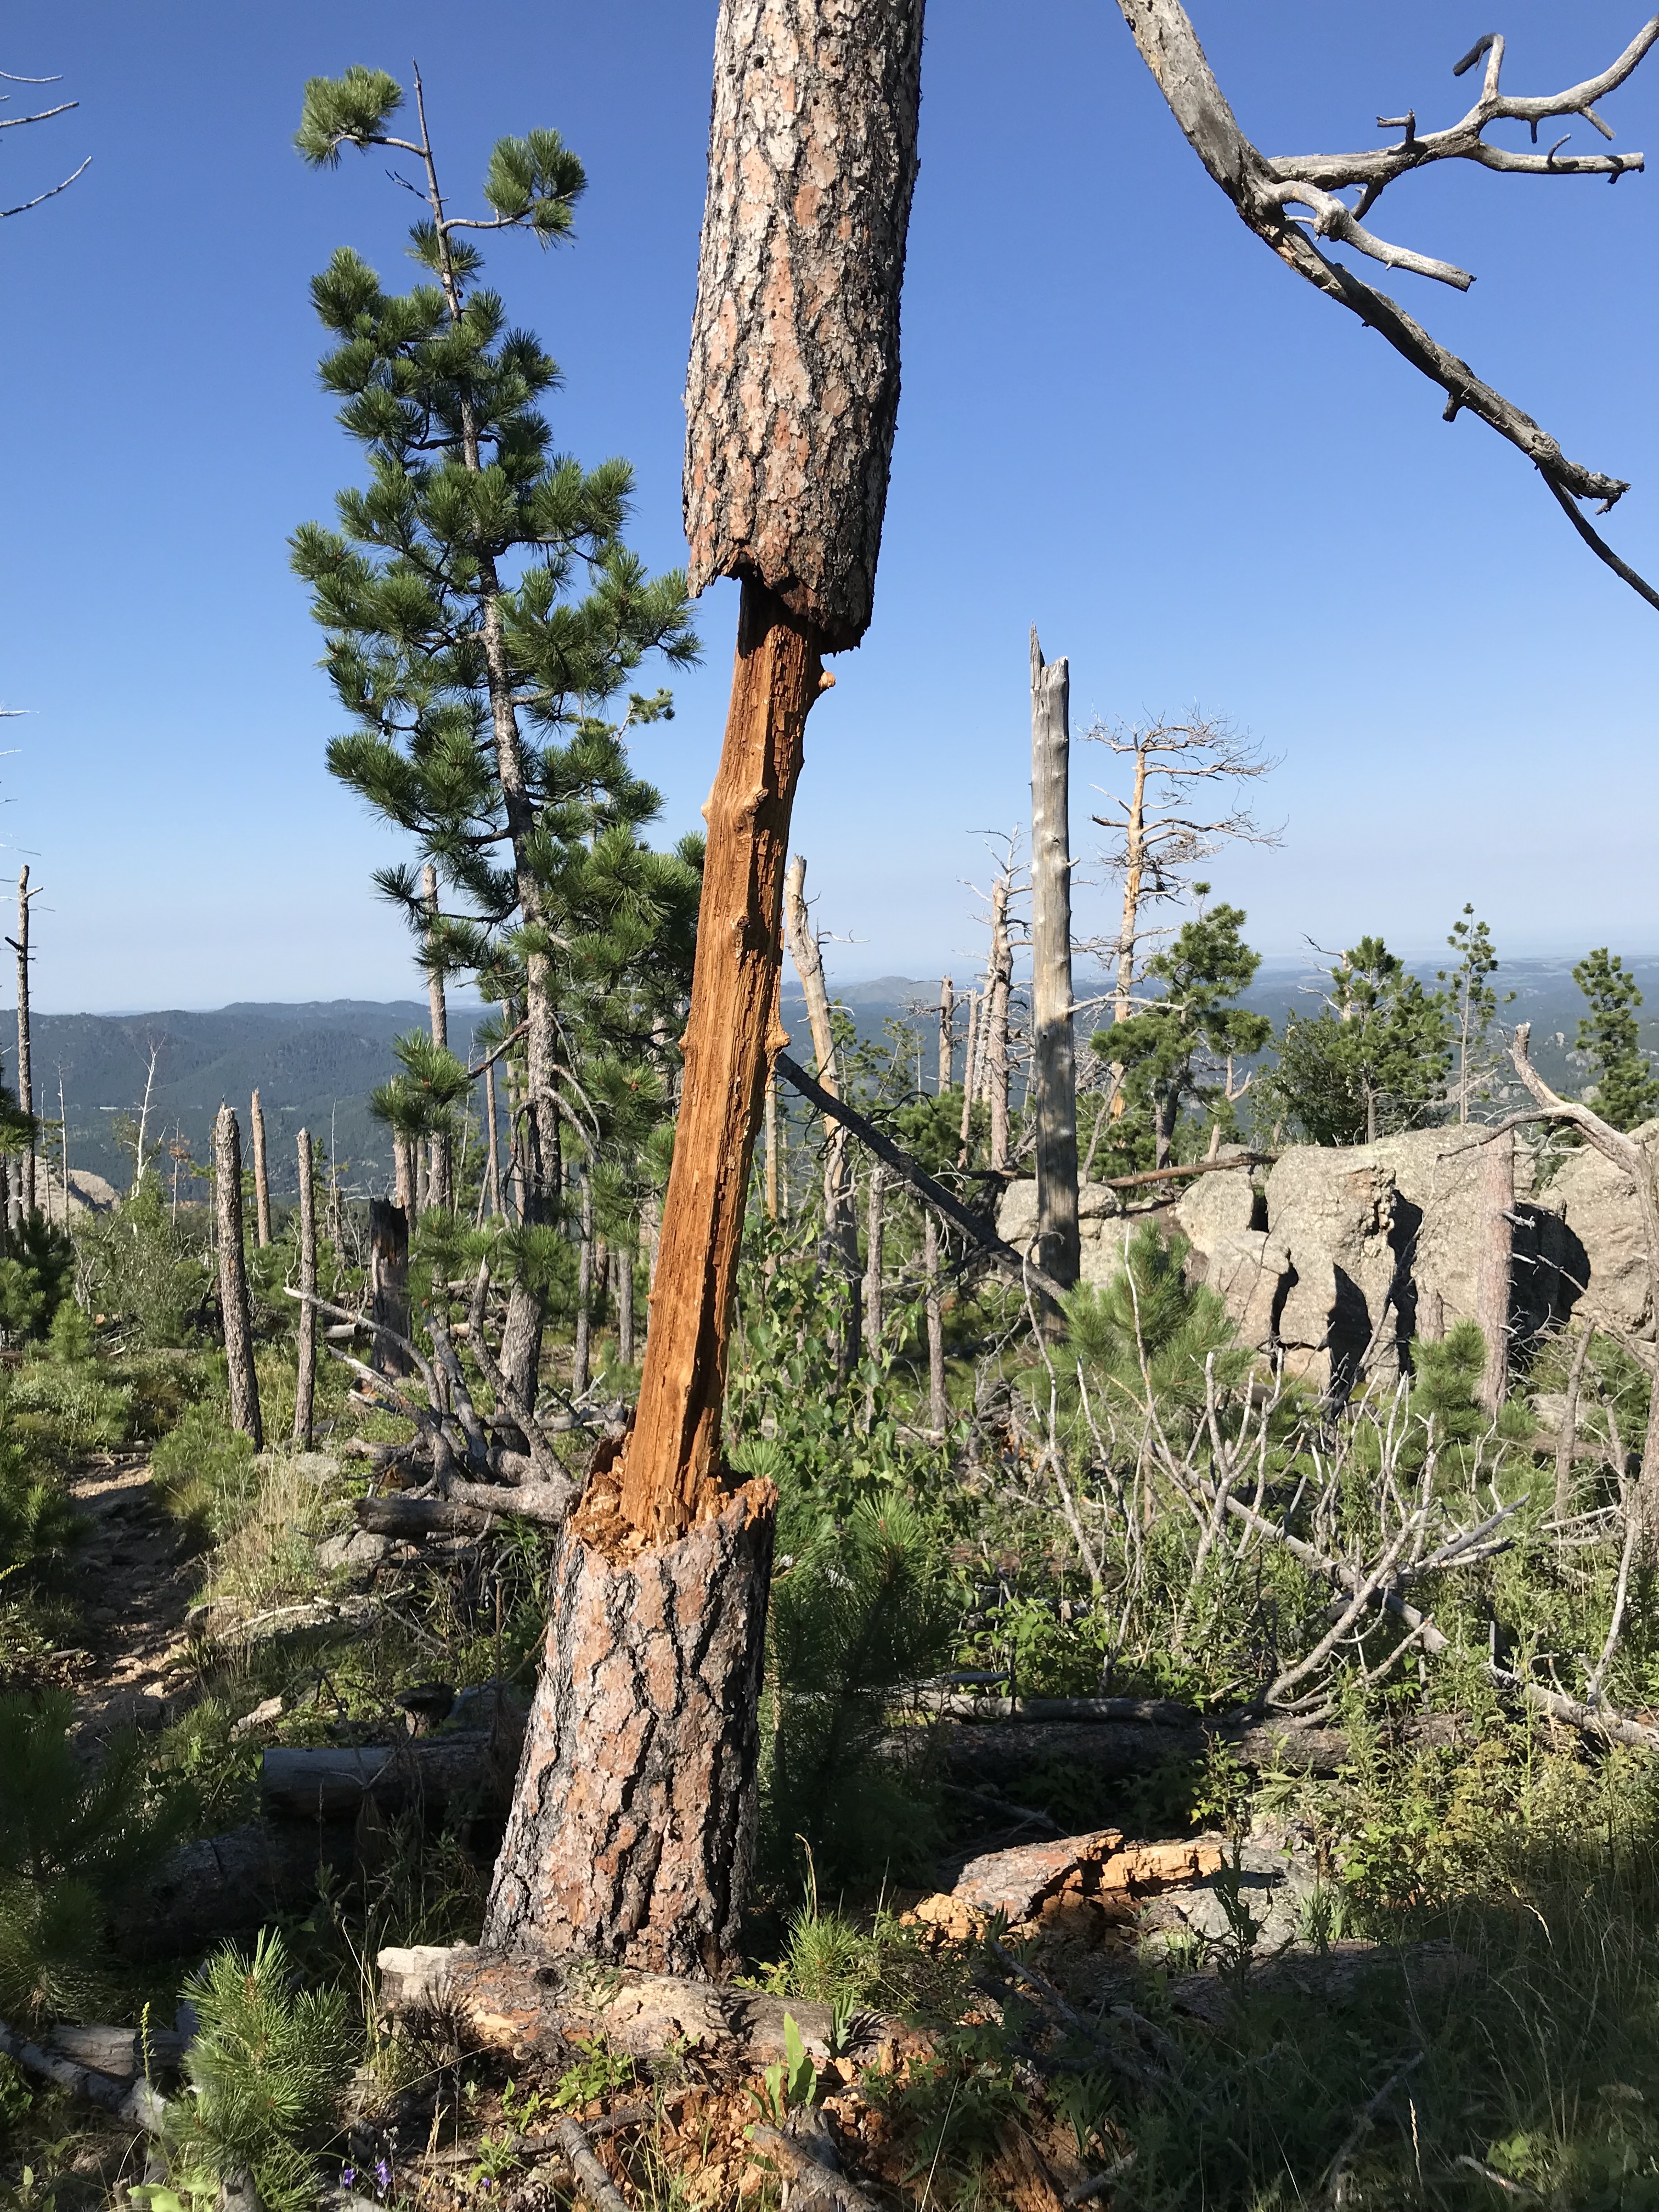
This trail system is a beast! Mr. Trekker and I almost had a dead limb fall on us on another, nearby trail during a hike a few years ago, on a day that wasn’t particularly windy. 😳
This big guy is the one that almost fell on us!See the limb? See the trail? About five minutes before this fell we walked through this area. We then stopped for some lunch and were startled by the “CRASH!” when it fell!
2nd Attempt to Conquer Black Elk Peak’s North Route
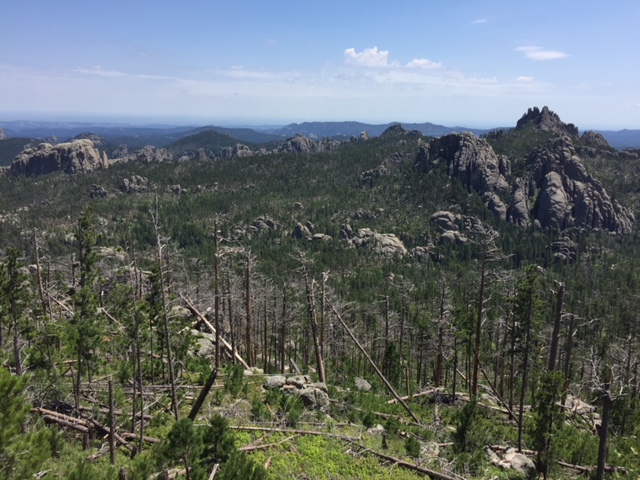
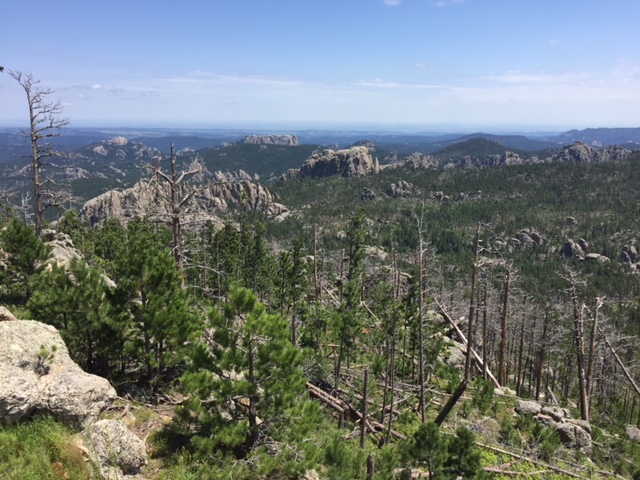
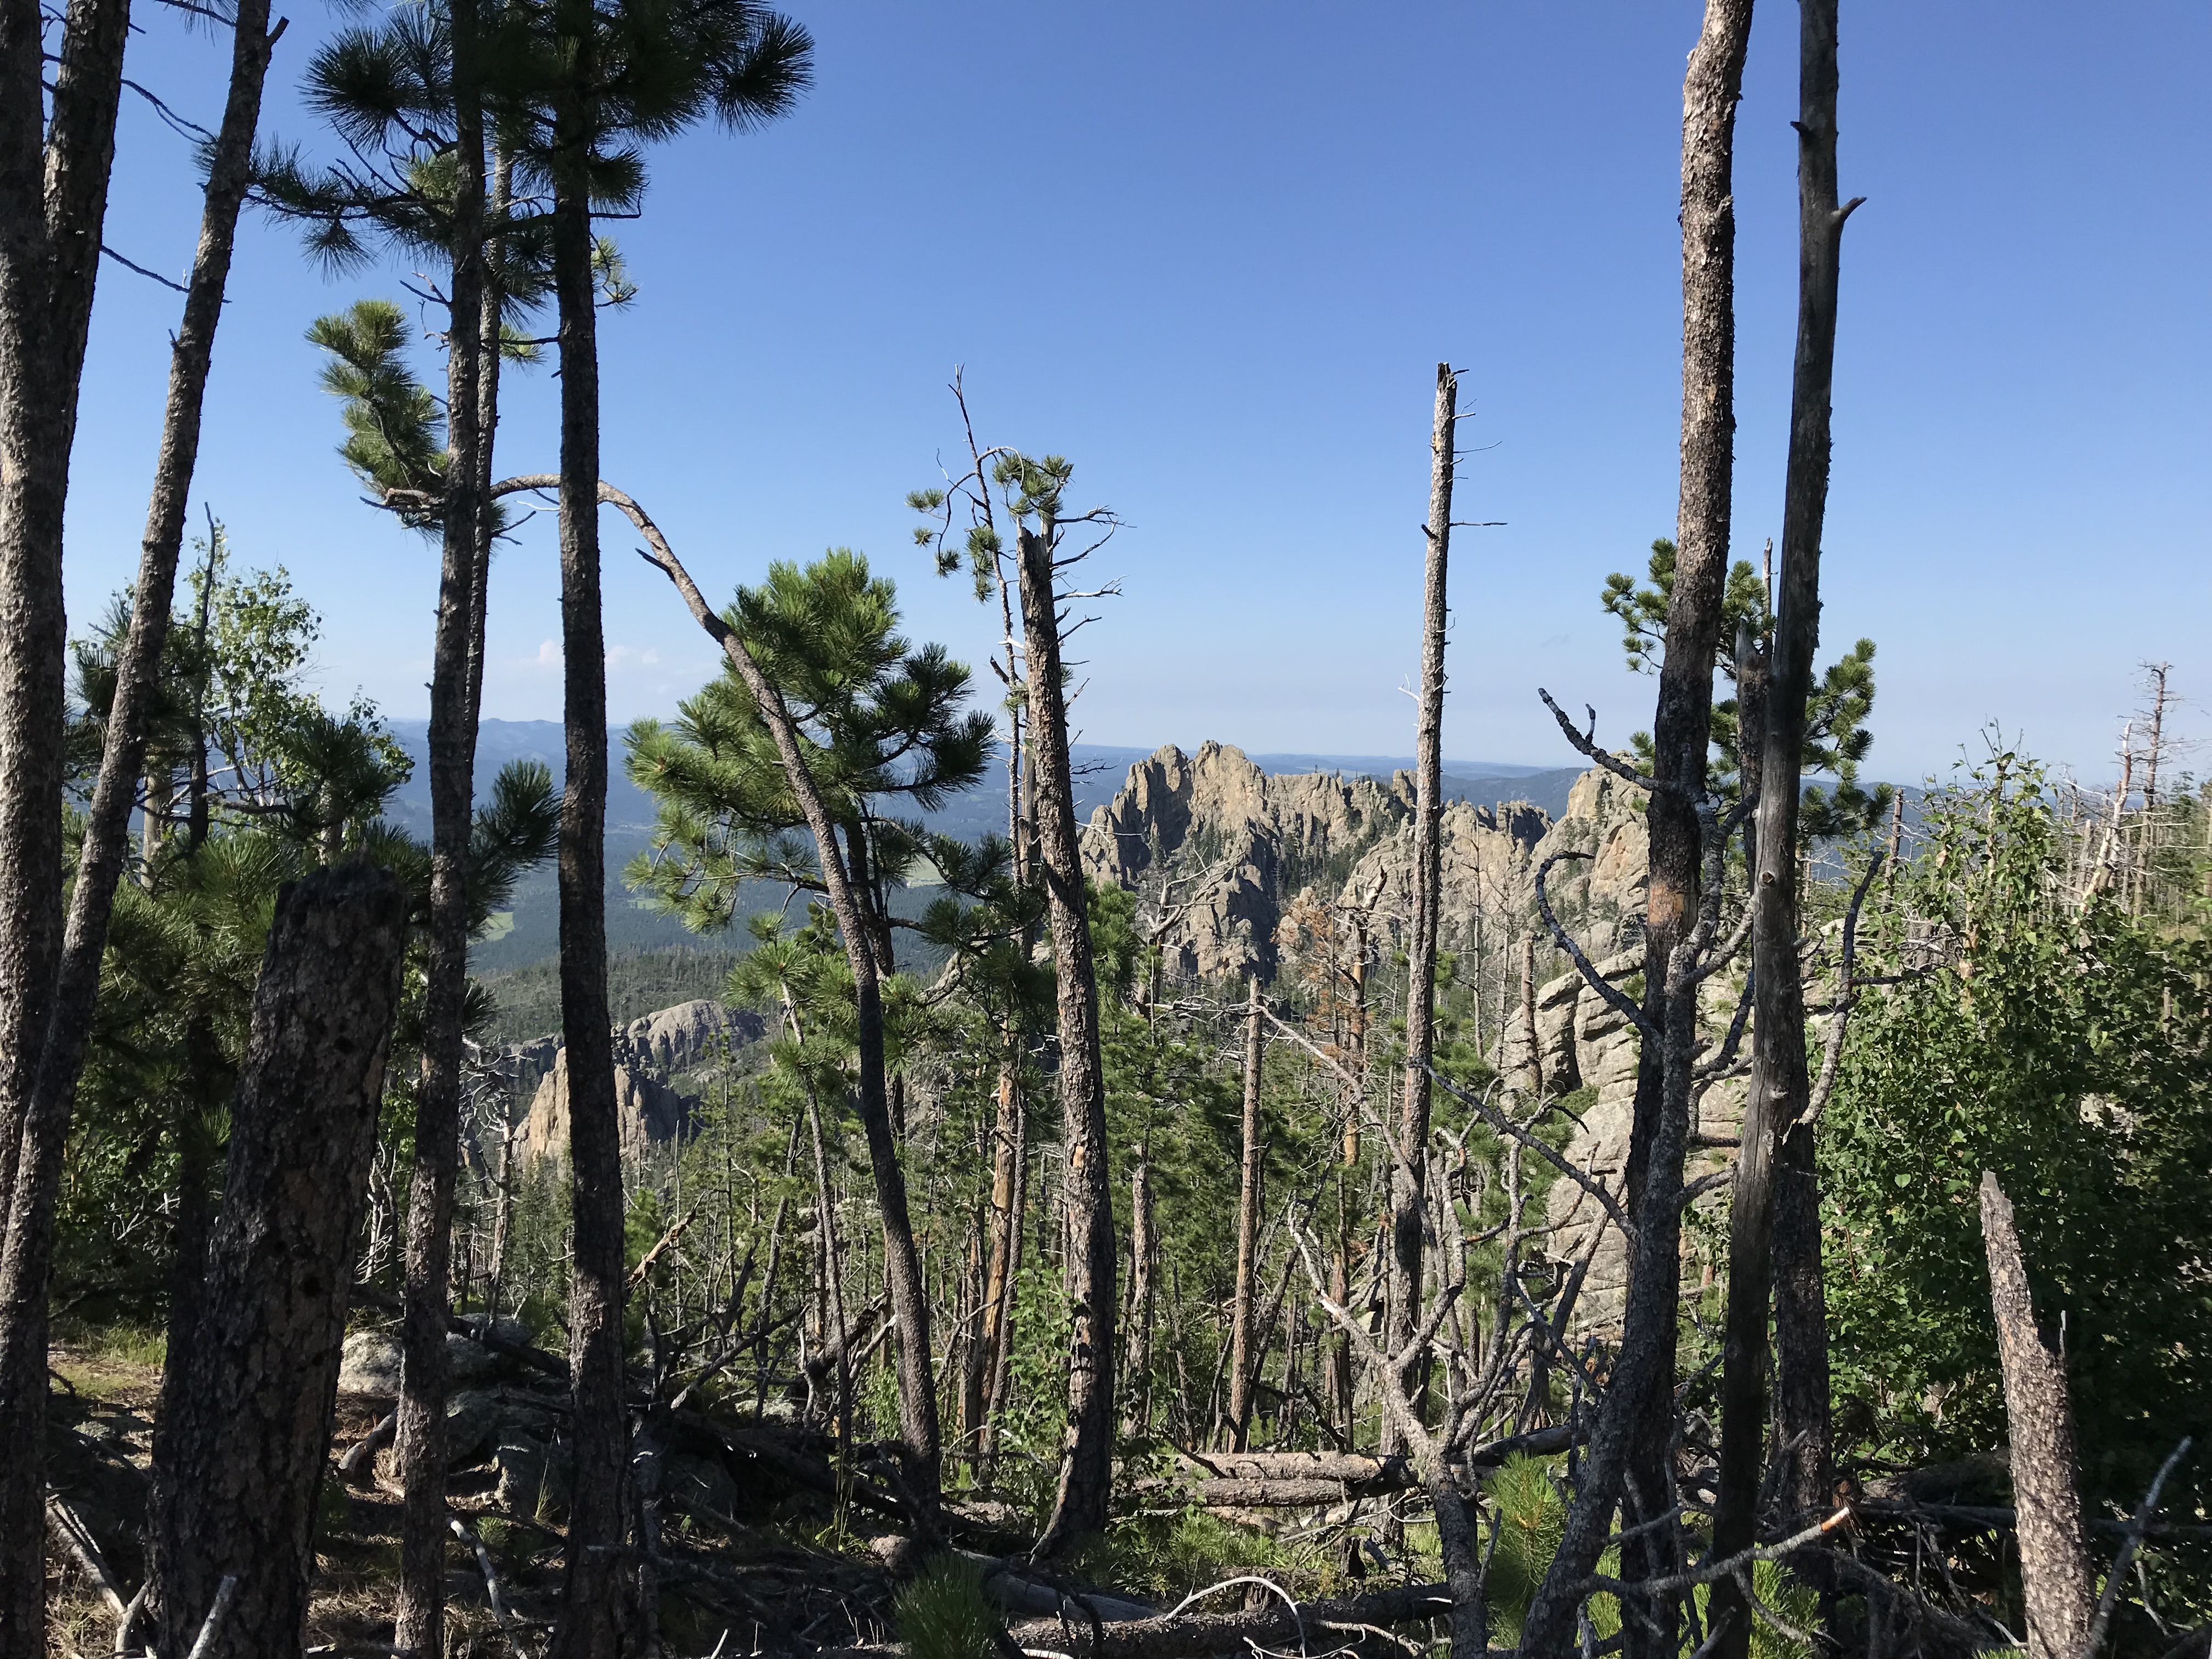
It’s a beautiful, sunny day. We began hiking fairly early in the morning. One problem with Trail #9 is its exposure. It used to be fairly shaded…until the pine beetles had their way. That and the resultant logging to lessen the danger of falling, dead trees has culminated in A LOT of sun exposure. Fortunately, a breeze is often present…but not always…
The heat got the Trekkers on this day (especially me). I’ve mentioned beforethat I don’t do well with heat. We made it about halfway to the summit, to the point where it really starts to get difficult.
I call this “the Boulder Section” because you have to clamber across a long length of boulders while negotiating a rather steep incline–this is the section that becomes mini-waterfalls in wetter conditions.
After this section comes the first phase of mind-numbing switchbacks (that’s right, I said FIRST! 😝)You then proceed to a flatter section, before the final phase of switchbacks, which takes you to the junction with the Black Elk Peak Summit Trail (a short, spur trail).
About the time we reached the “Boulder Section”, I started suffering from stomach cramps and nausea, similar to what I experienced when I became overheated hiking in Glacier National Parkseveral years ago. Due to this, we made the wise decision to turn back…have I mentioned that I HATE THIS TRAIL?! 😩
3rd Attempt…SUCCESS!!!
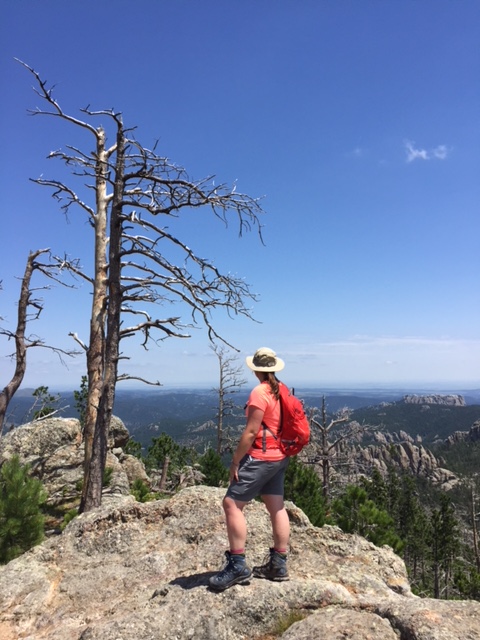
It’s a, fairly cool, July day (lower 80’s). Earlier that week we had returned from a 10-day trip to the Colorado High Country that I outlinedinthesefourposts. Due to hanging out at 8000 – 10,000 feet throughout that trip, we were especially acclimated to the altitude. (Black Elk Peak, at a little over 7000 feet, is not only the highest peak in the Black Hills, but it is also the highest peak in the country east of the Rockies). I honestly felt in my gut that if I ever hoped to vanquish this monster, this was the time to do it. All conditions were perfect, we were both feeling great and it was a beautiful day!
We made it through the easy, early section with no difficulty. We happily said “hello” to others on the trail, and avoided the occasional “remnant” from horses that had gone before us. 🤥 We reached “the Boulder Section”…my first nemesis. We conquered that fairly easily as well!
Then, we reached the first section of switchbacks. Fortunately, the shade was on our side at that time of the day. It was starting to hurt…but we made it through.
The next section traverses a ridge that parallels Black Elk Peak, so it is fairly flat. This is beneficial as it’s also fairly exposed.
This area affords lovely views of the crags that lord over you from nearby peaks, and the panoramic vistas of the plains to the east (on clear days). Buzzards soar on the thermals high above your head (waiting for beleaguered hikers to falter? 🤔) There are also several, lovely, lookout points along the way that make for a great break/lunch spot. We stopped at a couple, both on the trek up and down the mountain.
Then…we hit the final section of switchbacks. Both of us had just started feeling the altitude a bit (we were pushing 7000 feet at that point). This was the only spot where I started feeling ill. Fortunately, it was still early afternoon and we were in a shaded, quiet area, so we were able to take some time to rest and recover.
And then…
…we began our final push…
…as we rounded one, final switchback…
…and crested one, final rise in the trail…
…we saw a brown sign appear in the distance, indicating our destination was just ahead…
…WE HAD MADE IT!!! 😁
My ray of hope, the sign at the top of the trail!
Seriously ya’ll, I almost broke down in tears! I get emotional now, just thinking about it. It had taken us three attempts to conquer this beast!
I maintain this is the toughest trail I’ve ever completed in the entire Black Hills. It has a reputation for being “a doozy”. It’s long, it’s difficult, it’s exposed, and the weather can change at a moment’s notice. Fog and rain can seep in, which is an experience unto itself. (You won’t have the grand vistas that you’ll see on clearer days, but the granite columns materializing through the mist create a spooky gloom that is definitely worth experiencing, just watch your footing!)
Descending the Northern Route of Black Elk Peak
On the way down…we ran out of water (seriously). With the exception of another difficult trek in Glacier National Park, this almost NEVER happens! We usually return with a liter or so left in each of our water bladders.
It was projected to be a fairly cool day and we wanted to limit weight as much as possible– due to the strenuous hike–so we didn’t fill them quite to their max, fill line. I will NEVER make that mistake, in July, again!
Fortunately, by the time we ran out, we were only about 1.5 miles from the trailhead, it was all downhill from there and we had reached the easier portion of the trek. (Also, fortunately, a gas station in Hill City, the nearest town, had LARGE Gatorades for sale! 😜)
Have I mentioned that I HATE this trail?! I don’t think I’ve ever said that about a hike before. I am SO GLAD that we finally beat this brute, but seriously, I don’t know that I’d do it again.
I may consider it with two cars, one parked at Sylvan Lake so you can take the easy route up, and the other parked at Willow Creek trailhead as descending the hard route isn’t too bad…as long as it isn’t raining. 😝 (Or, find a nice friend who will shuttle you between the two points). Or I would try ascending the Lost Cabin trail and descending this one again.
Below are some pics from our day of achievement! 😁 (Thanks, as usual, to Mr. Trekker for some of these!)
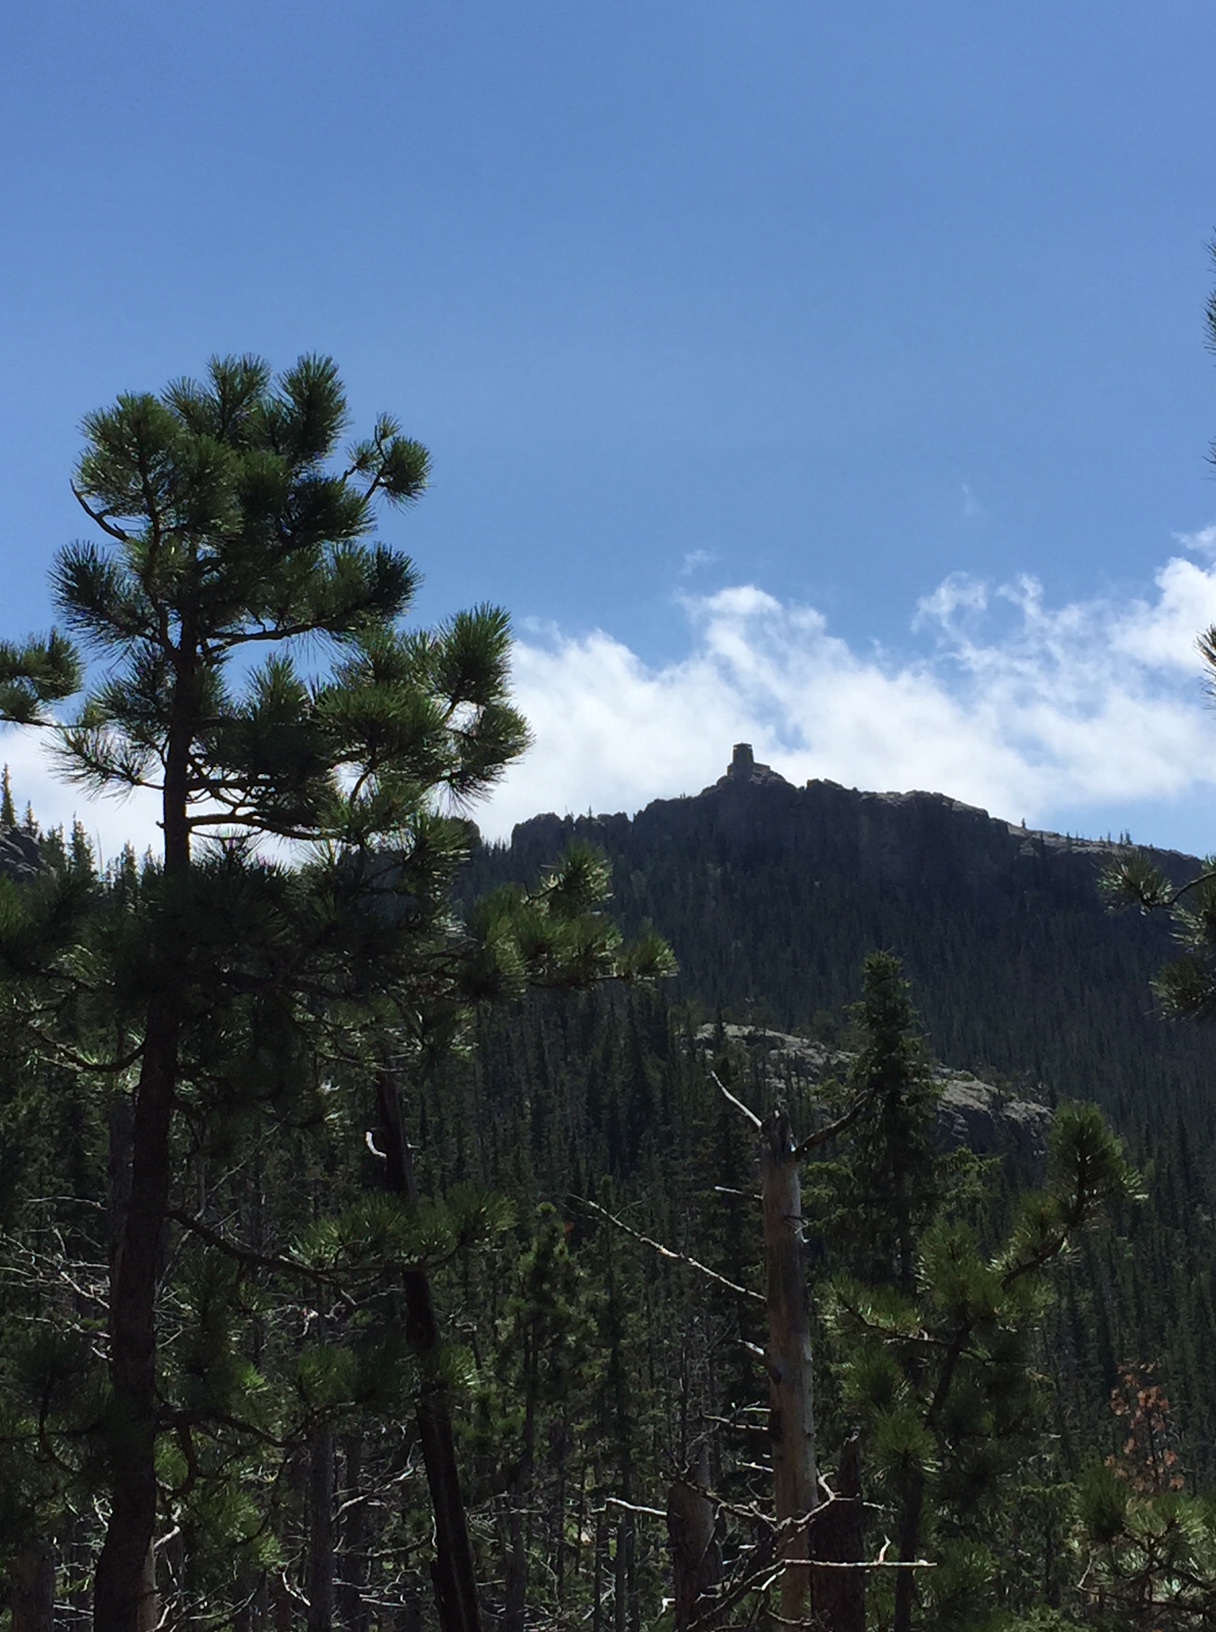
Our first glimpse of the fire tower on the summit!My Hills! You can see the sparseness of the foliage in the foreground.If you look closely, you can see the plains, far in the distance. I “think” one of those rock faces is the backside of Mt. Rushmore! 🤔This view of the nearby crags is on the first set of switchbacksNot really sure what happened here?! Deer or elk perhaps? Looks like somebody has been gnawing on it!
Conquer Fear by Reaching your Goals
This trail had beaten us twice before, but we had finally defeated it! If we hadn’t already been acclimated to the altitude, it may have won again. This was a personal goal of mine that I had wanted to achieve for years!
This trail had made me sick, it left me with (several) blisters, it hurt me, it caused lingering anxiety to even think of attempting it again, and it pushed the limits of my endurance. But…I beat it!
Reaching this goal was an incredibly empowering, inspiring experience. This was, truly, my “white whale”. It’s hard to express my sense of accomplishment for finally completing this hike. I know others have done it and claim it “isn’t that bad”. I know it’s not a “14-er”, but so what? I don’t hike “14-ers”! 😉 This was a personal goal and desire I had set for myself and I had achieved it! What could be more empowering than that!
I don’t mean to sound like I’m bragging. My point is just that, each person has their own, personal goals, whether they be to learn a new skill, to conquer a specific challenge, etc.
Don’t compare yourself to others. Only be concerned that you push yourself to expand your comfort zone. It doesn’t matter what the goal is, as long as you strive to achieve it and, perhaps, find a way to trounce a few personal demons along the way. 👊
Have you attempted this trail? What other difficult goals have you set for yourself and achieved? Tell me about your experiences in the comments!
Did you enjoy this post? Pin it!
Like what you read here today? Please feel free to leave a comment, like or share this post! Add your email at the bottom of the page, or the sidebar to the right, to be notified when a new post is published. By signing up for the email list, you will also receive a free copy of the Tranquil Trekker’s Top 10 Tips of Trekking Do’s and Don’ts!
You can also follow the blog on social media by clicking the links below!
In this post, I review a hot air balloon launch that occurs every year at the historic Stratobowl, in the Black Hills.
The alarm wails and wakes you from a deep slumber, it’s 4:30 am…
…you stumble out of bed and feel for your clothes through sleep-blurred eyes…the dog wonders if you’re crazy for being up before the sun…
…a short drive later and you park along the roadside in an ever-growing line of vehicles, strap a headlamp to your brow, and set off for the mile-or-so-walk to the Stratobowl as, ever so slowly, the darkness perceptibly lessens…
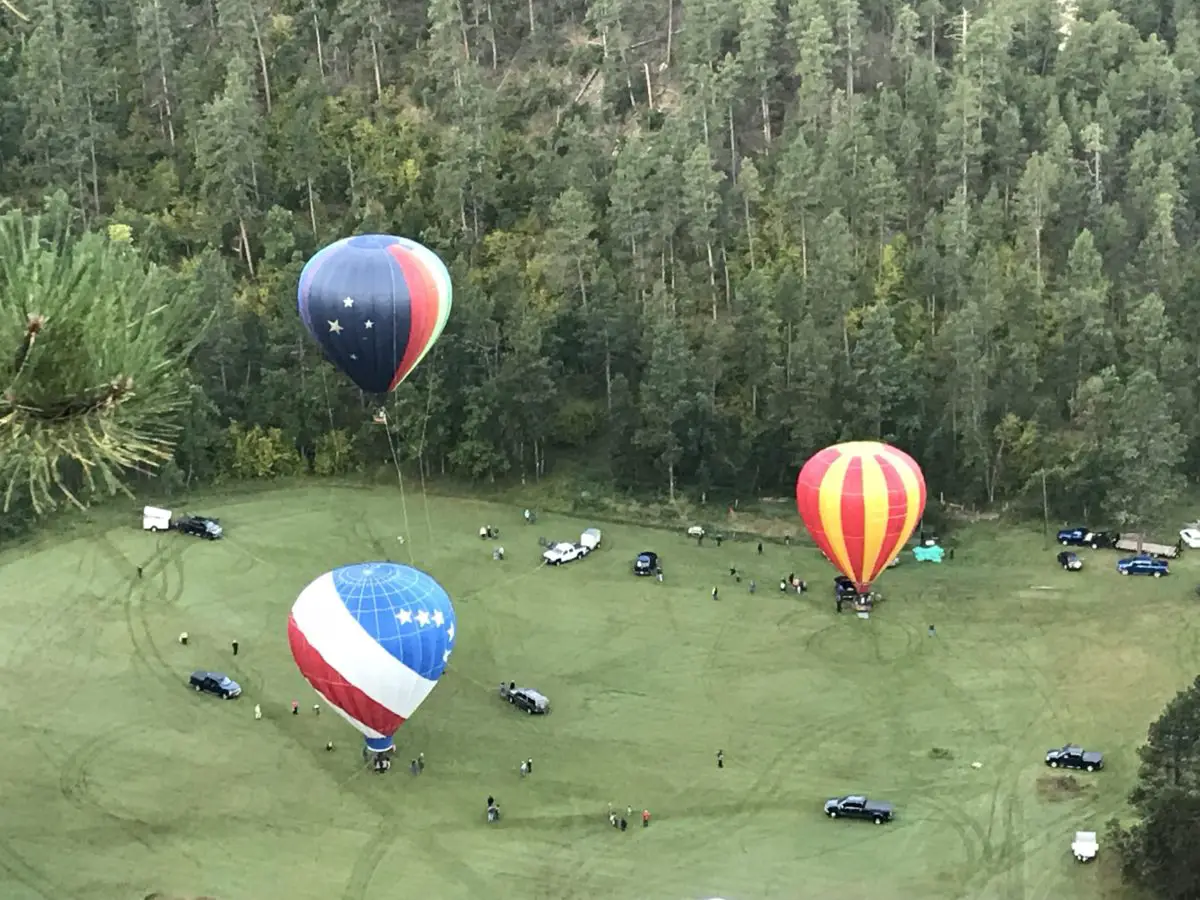
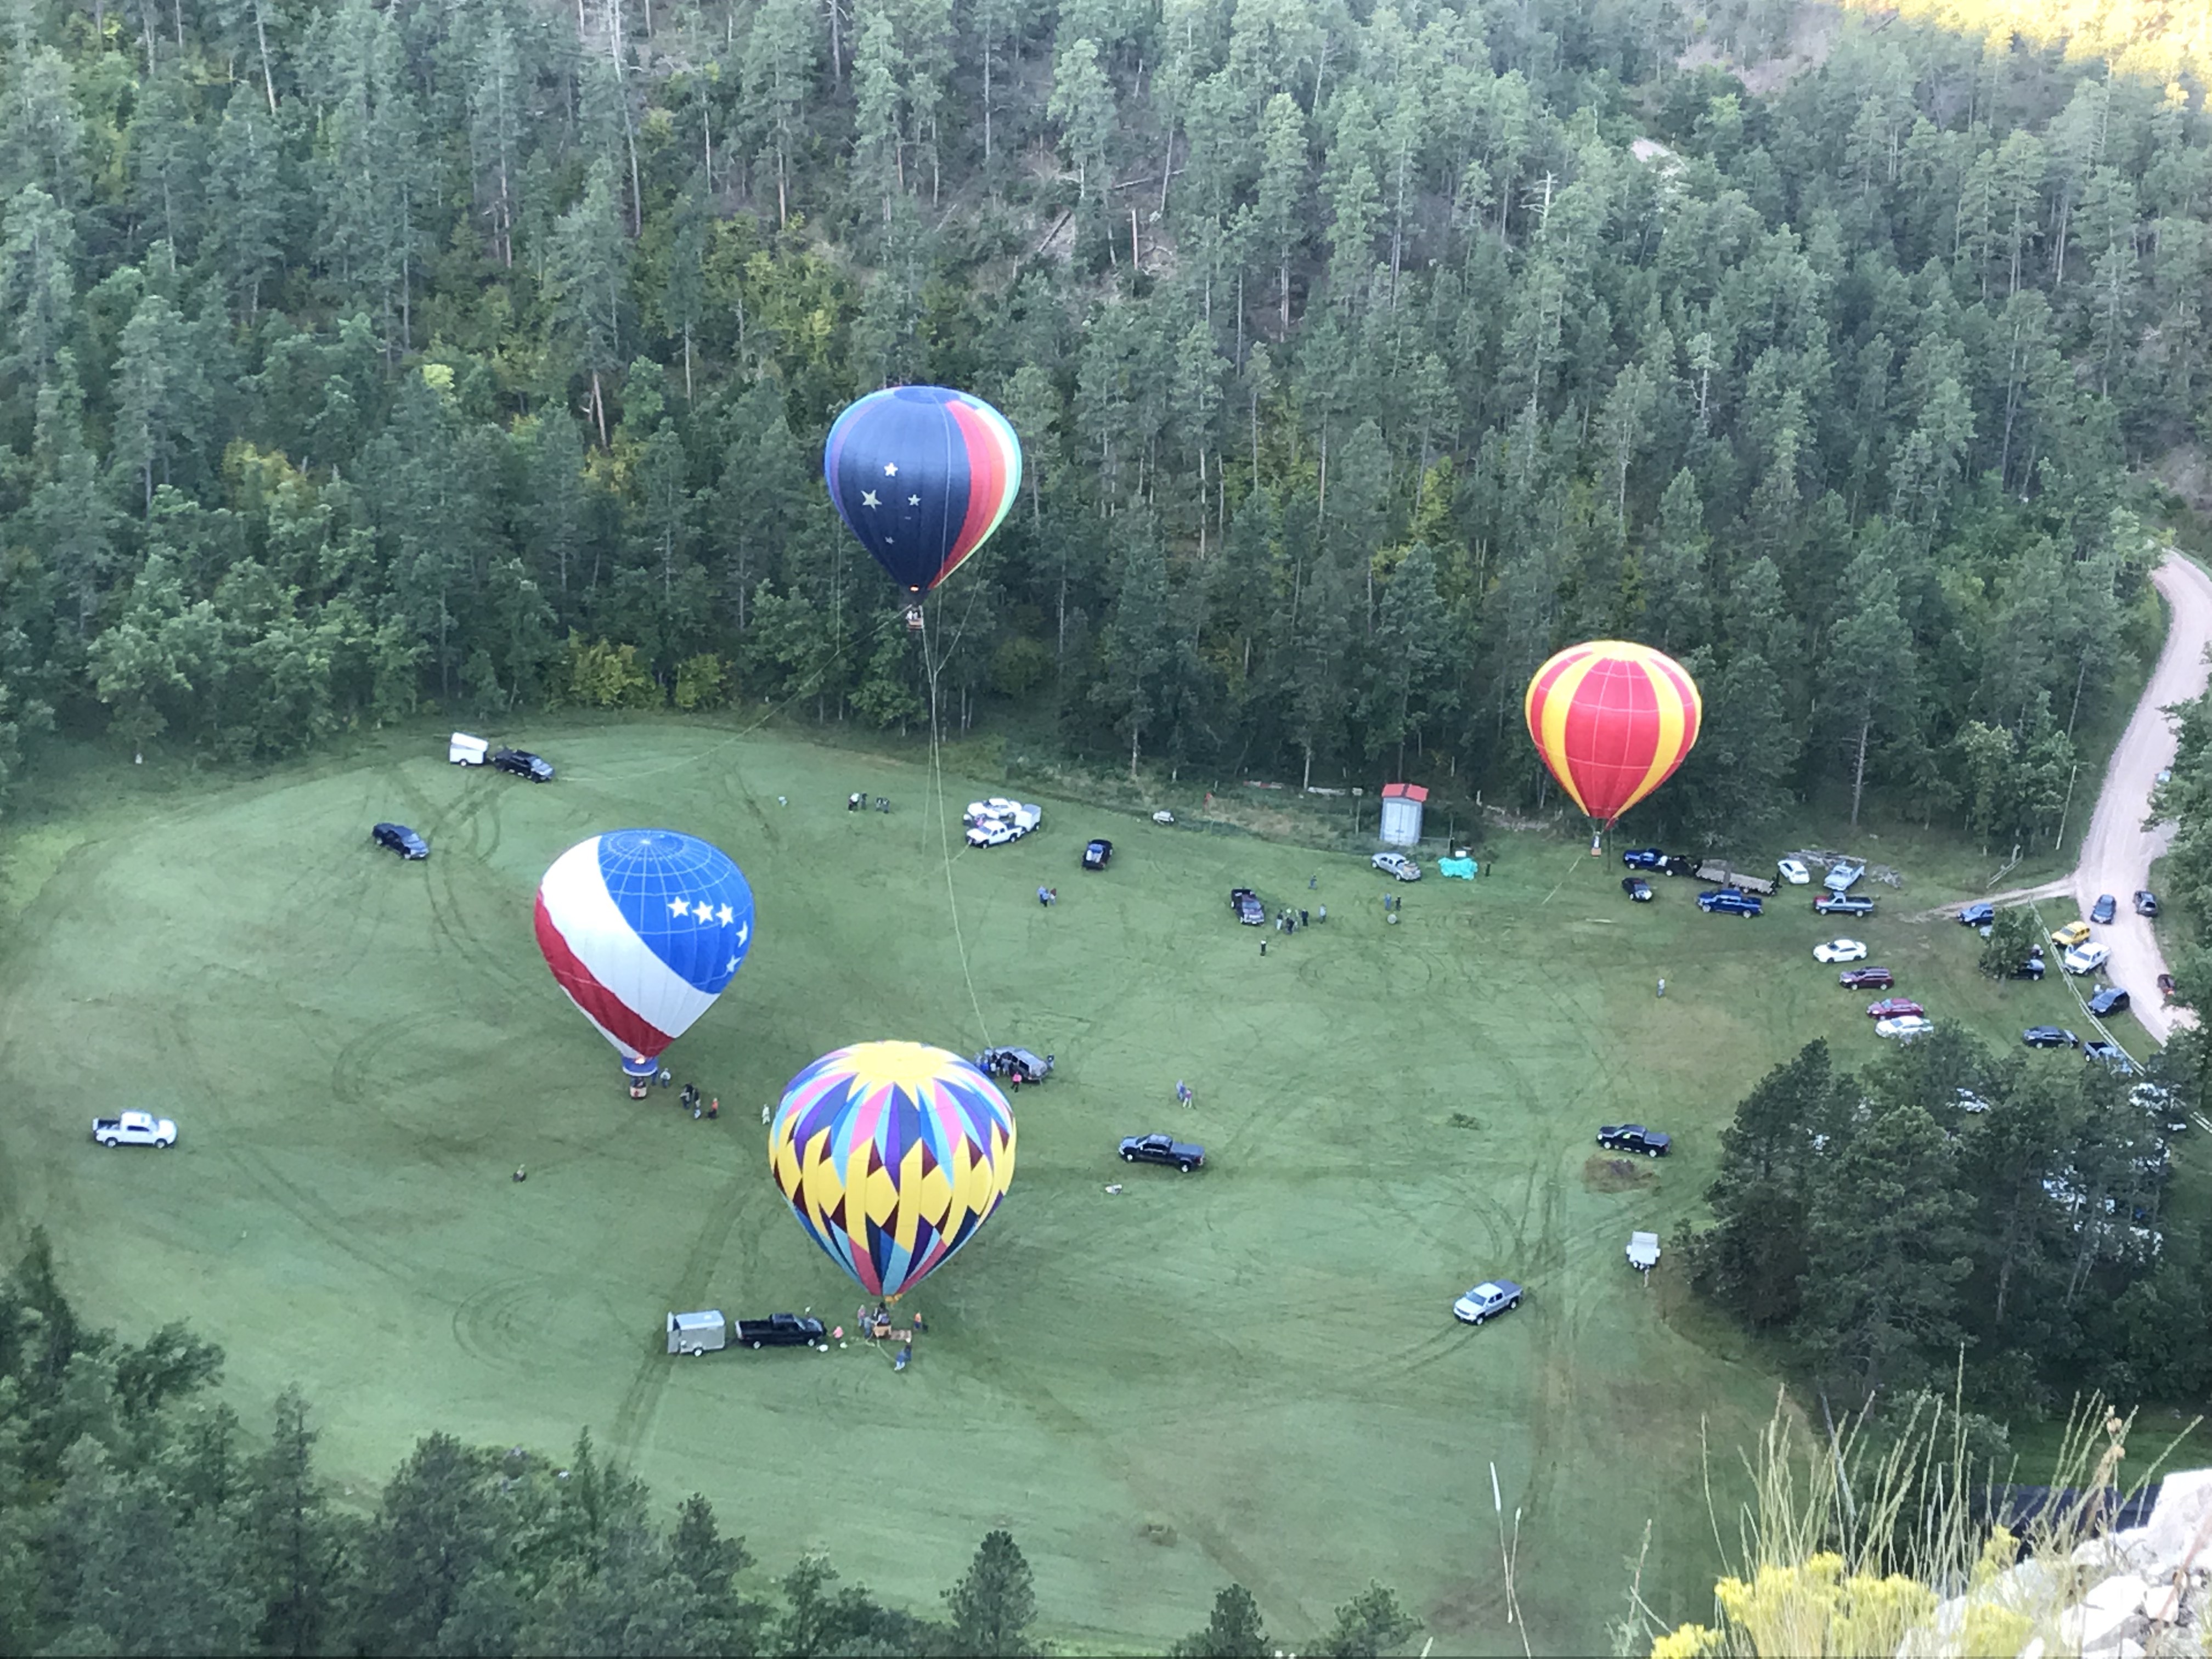
The Stratobowl Historic Hot Air Balloon Launch
This is a really cool annual event that occurs one weekend each year in early September. It is VERY weather-dependent and can be canceled due to the frequent, South Dakota wind. On the days the flight is canceled, some of the balloons are often at least inflated and fly, tethered, several hundred feet above the ground.
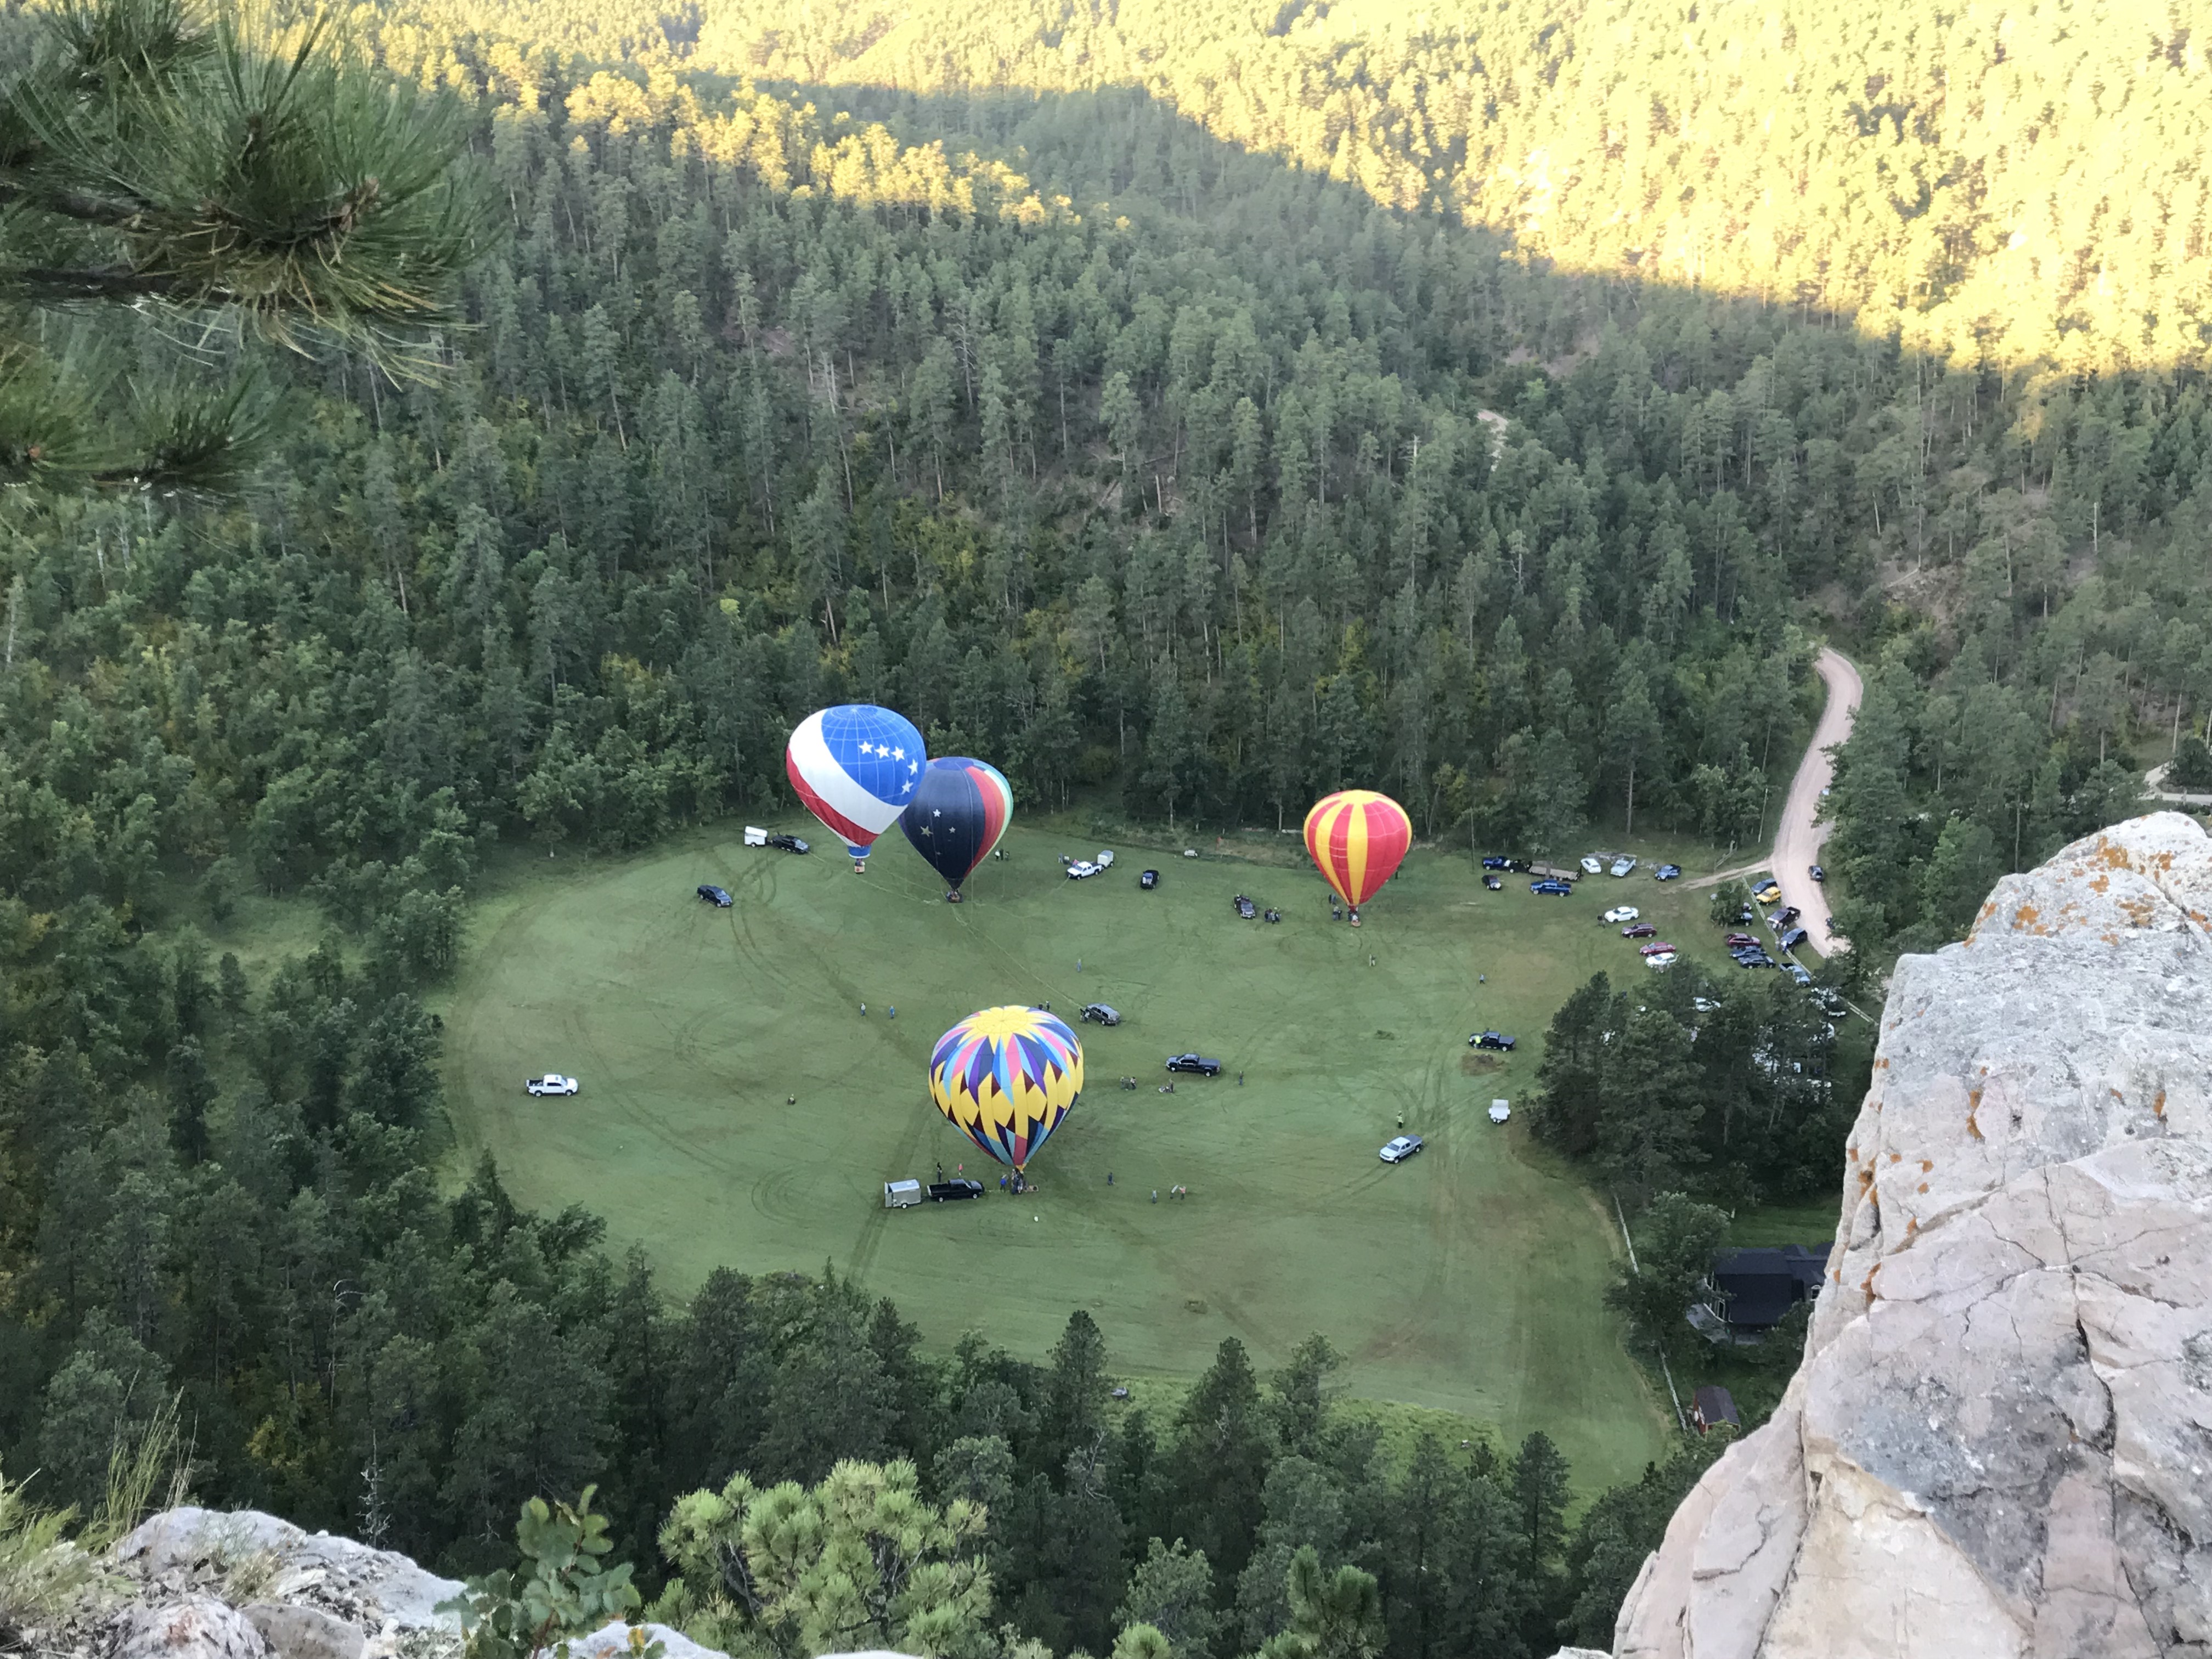
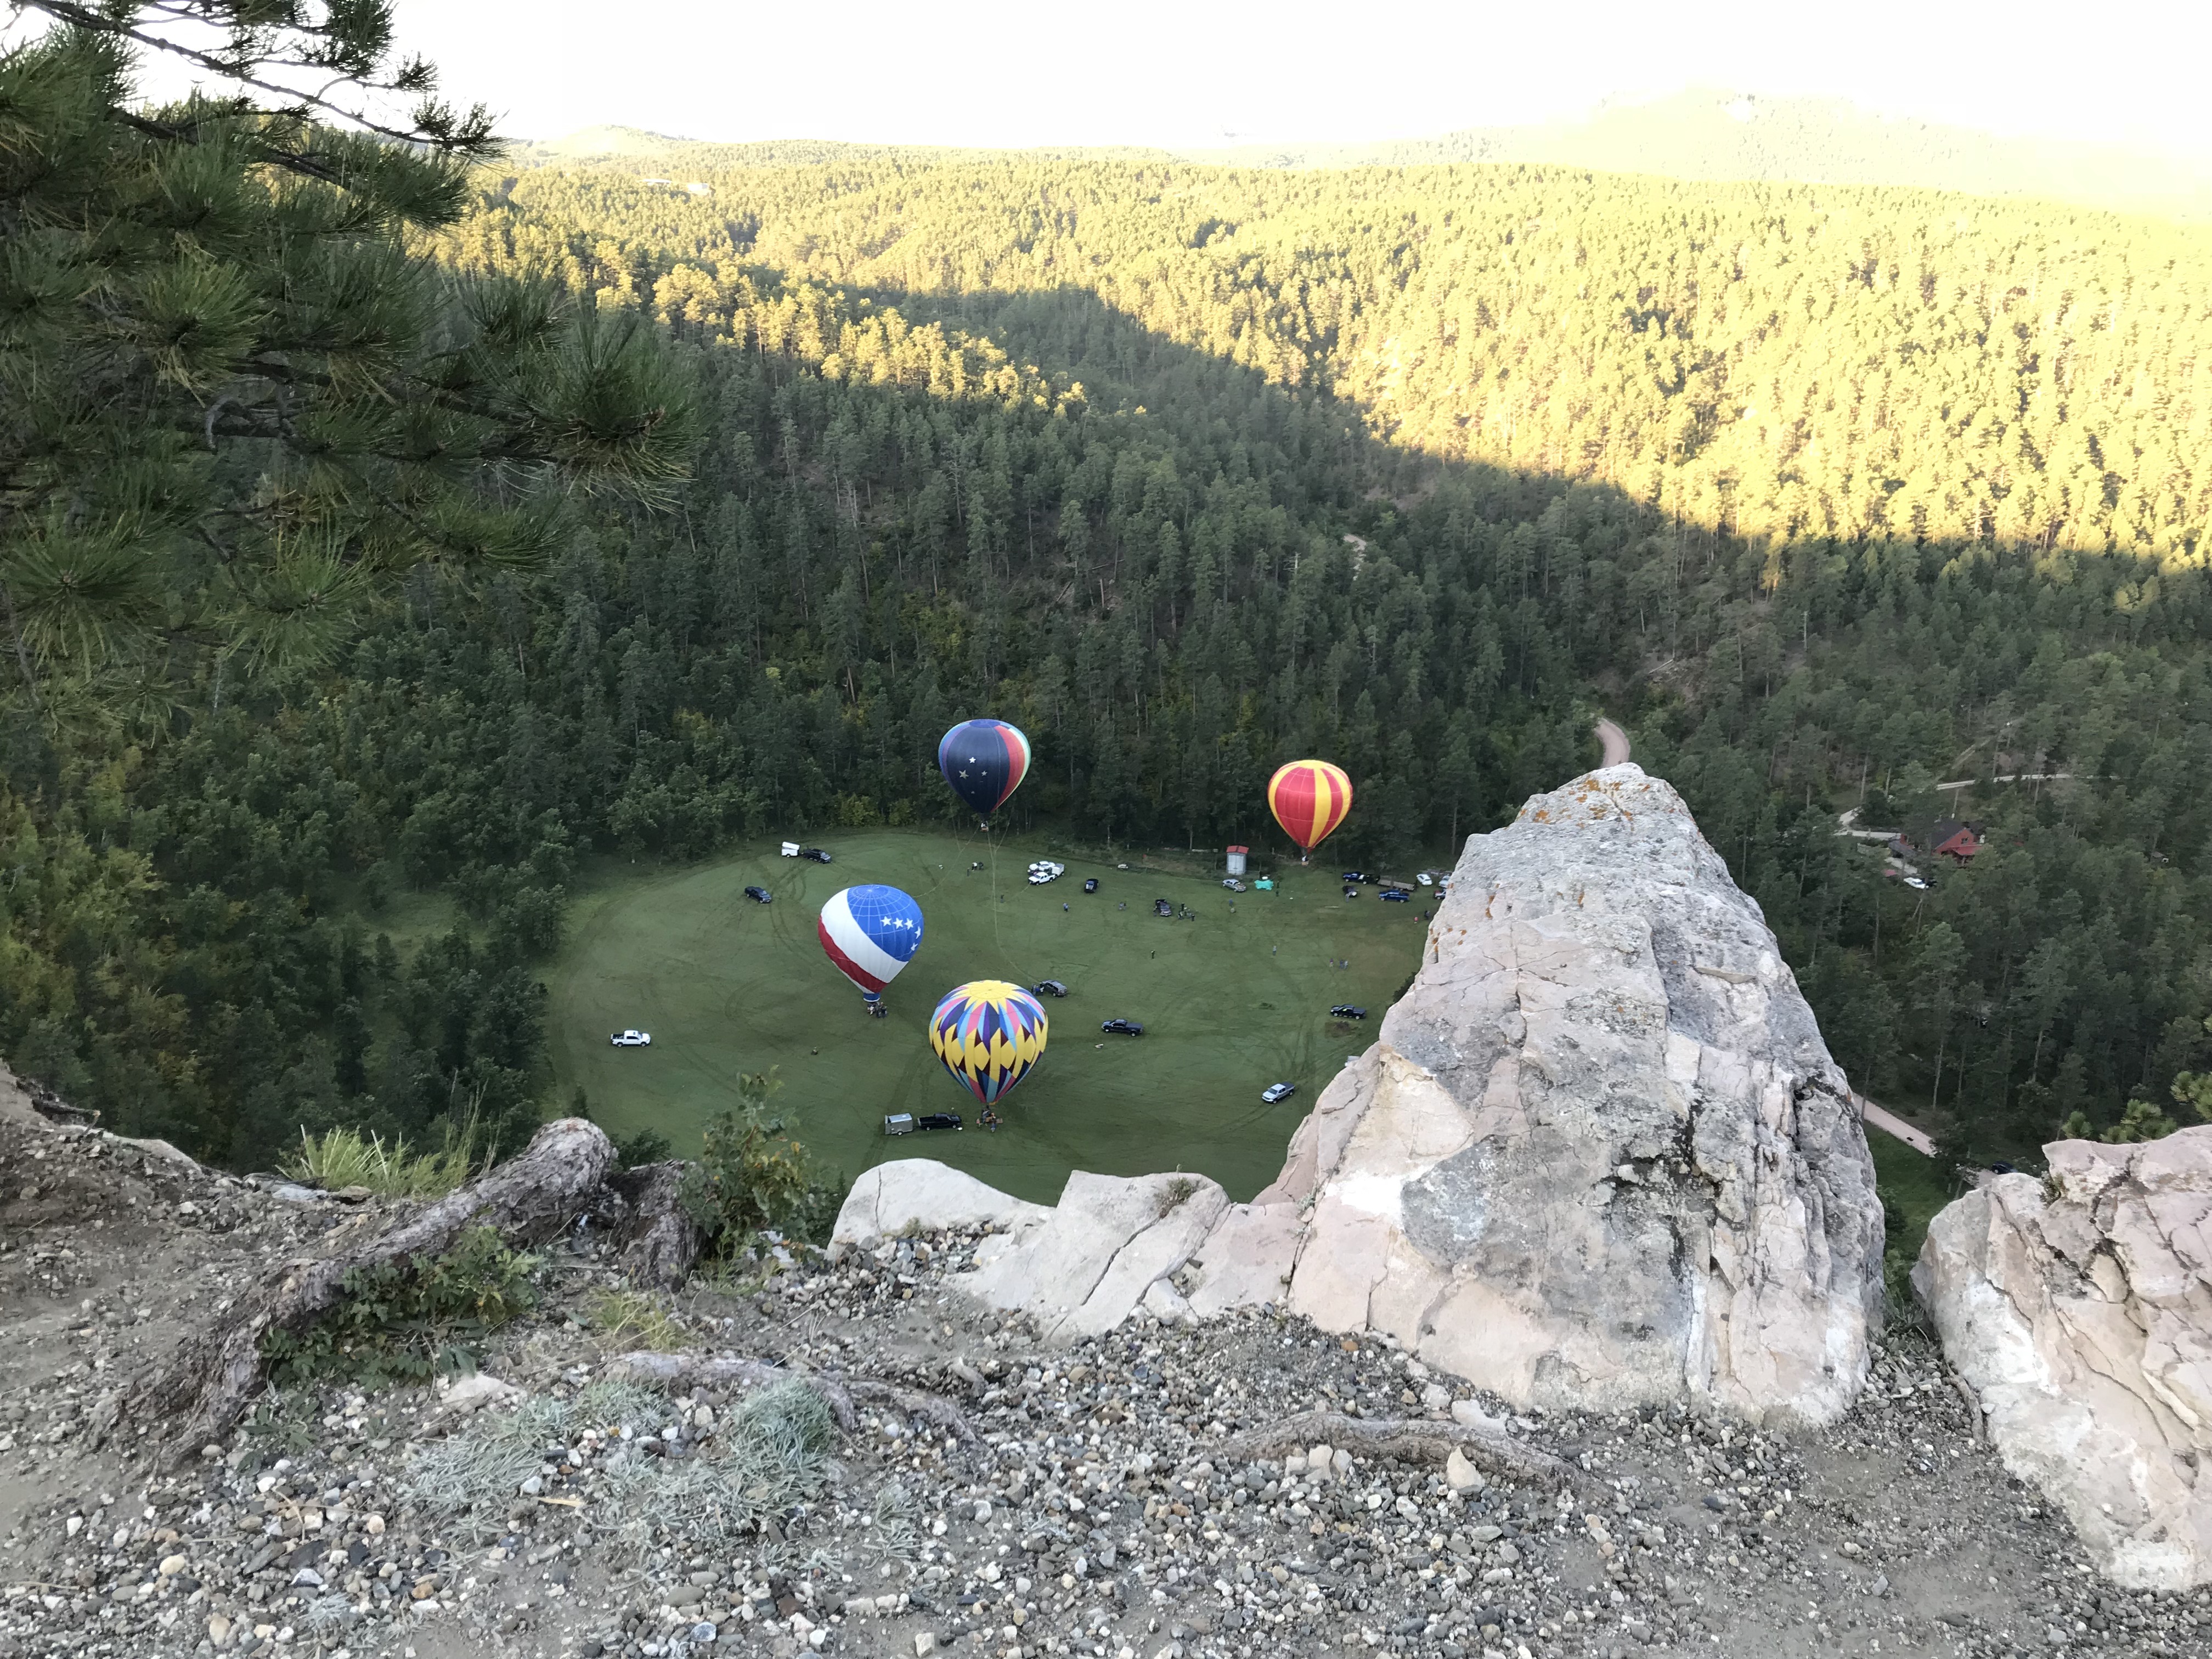
I discussed the Stratobowlin a previous post. If, however, you’re unfamiliar with this location, the hike takes you along the Stratobowl rim with a valley that spreads far below you. (The balloons take off from the meadow in this valley.) One of the meadow’s unique aspects is that one of the residents who lives there mows a peace sign in the same field that is the site of the launch. It fits the tranquility of the site–and the Black Hills in general–well. It also compliments the kaleidoscope of bright colors that adorn the balloons.
Our view from the Stratobowl rim. If you look closely enough, you can see the “peace sign” mowed into the grass.This gives you an idea of how far below you the valley floor is
The rainbow of colors from the balloons make for a spectacular contrast against the dark green backdrop of the Black Hills National Forest, where the aspen trees are usually just beginning to take on their autumnal, yellow hue. As the sun rises, it slowly unfurls its light over the tree-covered Hills to the west. The *whoosh!* of the flame-heated air rushing in to fill the balloons then reaches your ears from the basin far below.
If you’ve never seen a hot-air balloon, a large propane tank is attached to a basket. At regular intervals (as controlled by the pilot) the tank springs to life, spurts out a flame, and rushes hot air into the balloon. (A fan also helps with the initial inflating process.)
Hot air rises, so, once it’s full enough, the balloon does as well–yay science! 😝 The pilots can control the altitude of the balloon using this device, allowing for a safe landing, but they can’t control where the wind blows the craft (Someone Else is still in charge of that department 😉). A “chase vehicle” follows the balloon to collect it from whatever field it finally lands in.
I have fond memories of hot-air balloons from my childhood in Indiana. There were several pilots around the local area where I grew up, so these craft were a regular sight in the sky. We also enjoyed several mass-launches at the county fair in the summer. I have one, specific, memory of a balloon flying over my grandparents’ pool so low to the ground that we were able to talk with the pilot (he ended up landing in the field across the road).
Embrace Life’s Simple Pleasures
This is another opportunity to enjoy the simple things in life, not to mention a micro-adventure close to home. It is a family-friendly, free activity, less than a half-hour drive from Rapid City, which requires only the small sacrifice of missing some sleep. But it allows us to enjoy the natural beauty that surrounds us in a unique and easy way.
So again, strive to seek out these simple, everyday opportunities that are present in your local neighborhood (farmer’s markets, county fairs, free events downtown or in local parks, etc.) You’ll be surprised how much fun you can have (and it’s frugal too!) 🤑
You can see the tethers on the dark blue balloon, anchoring it to the ground
Have you ever watched balloons take off from the Stratobowl? What did you think? Tell me about your experience in the comments!
Did you enjoy reading this post? Pin it!
Like what you read here today? Please feel free to leave a comment, like or share this post! Add your email at the bottom of the page, or the sidebar to the right, to be notified when a new post is published. By signing up for the email list, you will also receive a free copy of the Tranquil Trekker’s Top 10 Tips of Trekking Do’s and Don’ts!
You can also follow the blog on social media by clicking the links below!
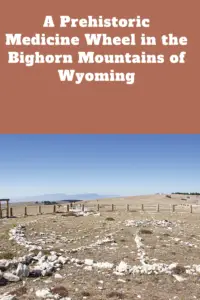
In this post, I discuss an ancient medicine wheel in the Bighorns!
**Author’s note: Just a word of warning, as this is a protect cultural, spiritual and historical area, no dogs are allowed on any trails (exceptions for Service Animals). They are only permitted in the parking lot.**
There is a prehistoric Medicine Wheel hidden in the northern, Bighorn mountains of eastern Wyoming. It was built by the ancient ancestors of today’s American Indian tribes. More than 80 tribes claim the wheel in their oral traditions so it can’t be attributed to any one group or culture, though it’s, obviously, a very sacred site.
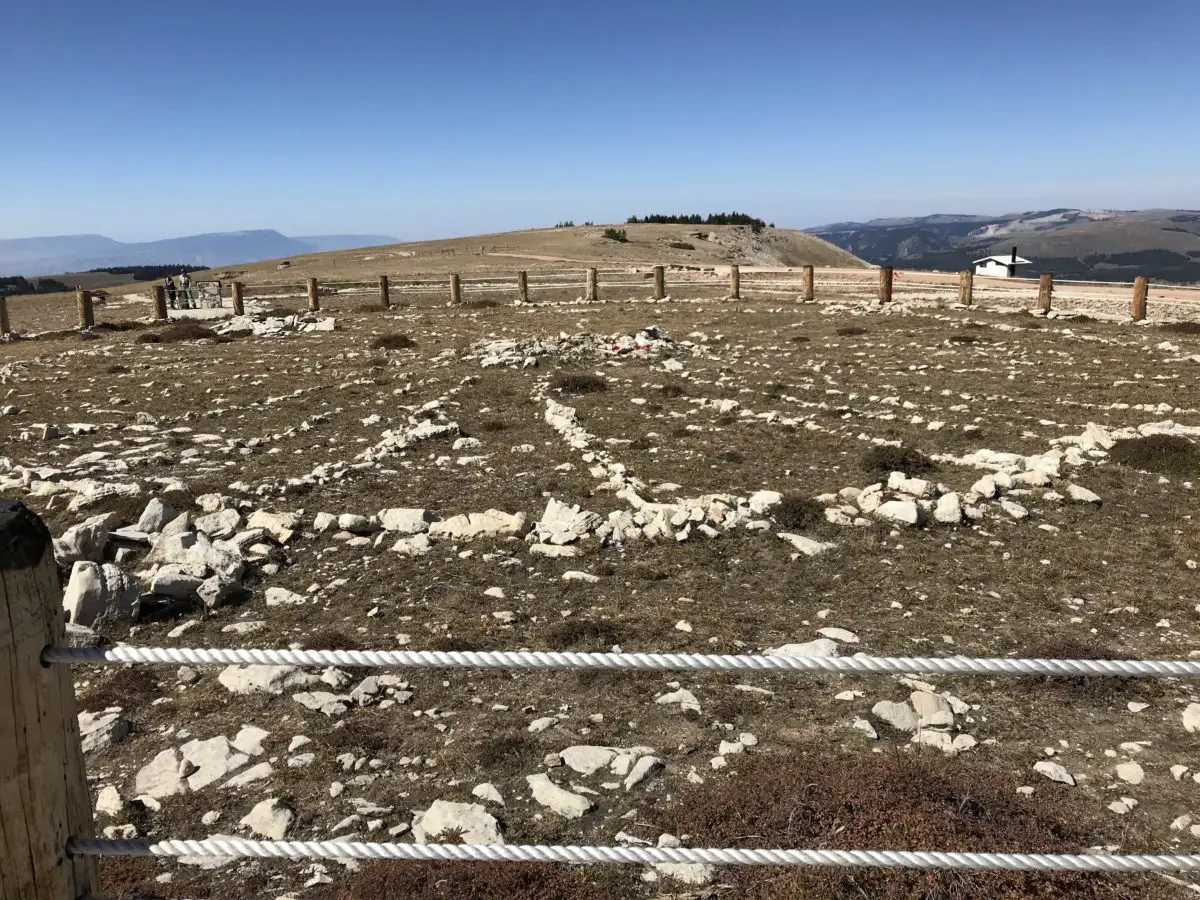
What does the Bighorn Medicine Wheel look like?
This is one of the largest, stone medicine wheels in North America (there are at least 150 spread throughout the continent). It’s constructed with a center cairn with spokes emanating from it to an outer circle that connects six, smaller cairns that appear to be strategically placed.
Archeologists aren’t sure of the wheel’s exact age, most estimates date it back at least 800 years, but it could be far older. Archaeological evidence shows human habitation as far back as 12,000 years in this area!
The ranger we spoke with stated the six rock cairns that dot the outer portion of the circle are believed to have a celestial purpose, but the exact function remains a mystery–it is thought that they may have been used during vision quests. The last time the six cairns matched up with celestial markers was at least as far back as the 1700s!
Medicine Wheels are Sacred Sites
Religious ceremonies are still held at the wheel on a regular basis as many tribal members make religious pilgrimages to the site. Some of the ceremonies involve large groups, while others include only a few individuals–two, small, private ceremonies occurred while we were there. Anyone with American Indian heritage can participate in a ceremony.
It’s always enthralling for me to observe religious practices that I’m not familiar with. I’m fascinated by the emotions you see play out on the faces of the participants, and how descriptive their movements can be. I find their actions evoke emotions within me as well. You can actually feel the peace and tranquility emanating from them as they dance, pray, or worship in their own way.
A tour of the wheel may be delayed if a ceremony is occurring, though they usually don’t last longer than 30 minutes, so please be patient and respectful during this time of worship. Numerous religious offerings are tied to the fence that rings the site (or are placed within the wheel itself). Please do not touch or photograph these items directly as they are sacred. It is also requested that people not take photos or videos of the ceremonies, as they are occurring, to respect the privacy of the participants.
Where is the Bighorn Medicine Wheel?
The wheel is located on Forest Road 12, off of US 14A, in the northern part of the Bighorns. It’s about 20 miles from Burgess Junction (where 14A branches off from US 14 to the east) and about 30 miles from Lovell, Wyoming, to the west.
The parking lot is a mile-and-a-half walk from the wheel on a graded, dirt road. The hike isn’t bad, though it is uphill both ways (seriously 😝) and the altitude is over 9,000 feet, so take your time. The site is also above tree line so bring a hat, water, and sunscreen, and be prepared for the ever-present, Wyoming wind. It usually takes an hour or so to complete the entire route. The site is free to visit, though donations are appreciated. Because this is a sacred site, pets are not permitted and must be left in the parking area.
The only thing that marred the experience was the large, FAA radar placed on the adjoining peak (because none of the numerous, other peaks in the surrounding area, that were a little farther away, wouldn’t have worked? REALLY?!) Federal Government, do better! 😤
The incredible view of the Bighorns from the Medicine Wheel site (to the right is the road you hike to reach the wheel)The Medicine Wheel (you can see one of the rock cairns in the foreground to the left)
The Backroads of Wyoming
I’ve suggested before, to always take the scenic route, when time permits. We enjoyed a good bit of that on this trip! We started by taking Route 24, west, from where it branches off near the Island Park campground. We then took Forest Road 408, to BLM Road 1117, on to Hyattville.
This route is listed in the gazetteer as being Hyattville Road, but we saw NO signs reflecting this. Similar to what we’ve found in Colorado, even though a road may be listed as a “major connector”, especially in the gazetteer, this could easily mean the road is actually dirt (sometimes wide and graded, other times little more than a narrow, two-track, high-clearance road that I wouldn’t be comfortable taking an Outback on). 😝
We used three separate maps–the gazetteer, a Bighorns map we picked up at a local, outdoor store, and a road atlas–to gather a–somewhat accurate–estimate of the roads’ actual conditions. Part of the difficulty was the roads traversed National Forest and BLM land in this area, and each department names and maintains their roads differently.
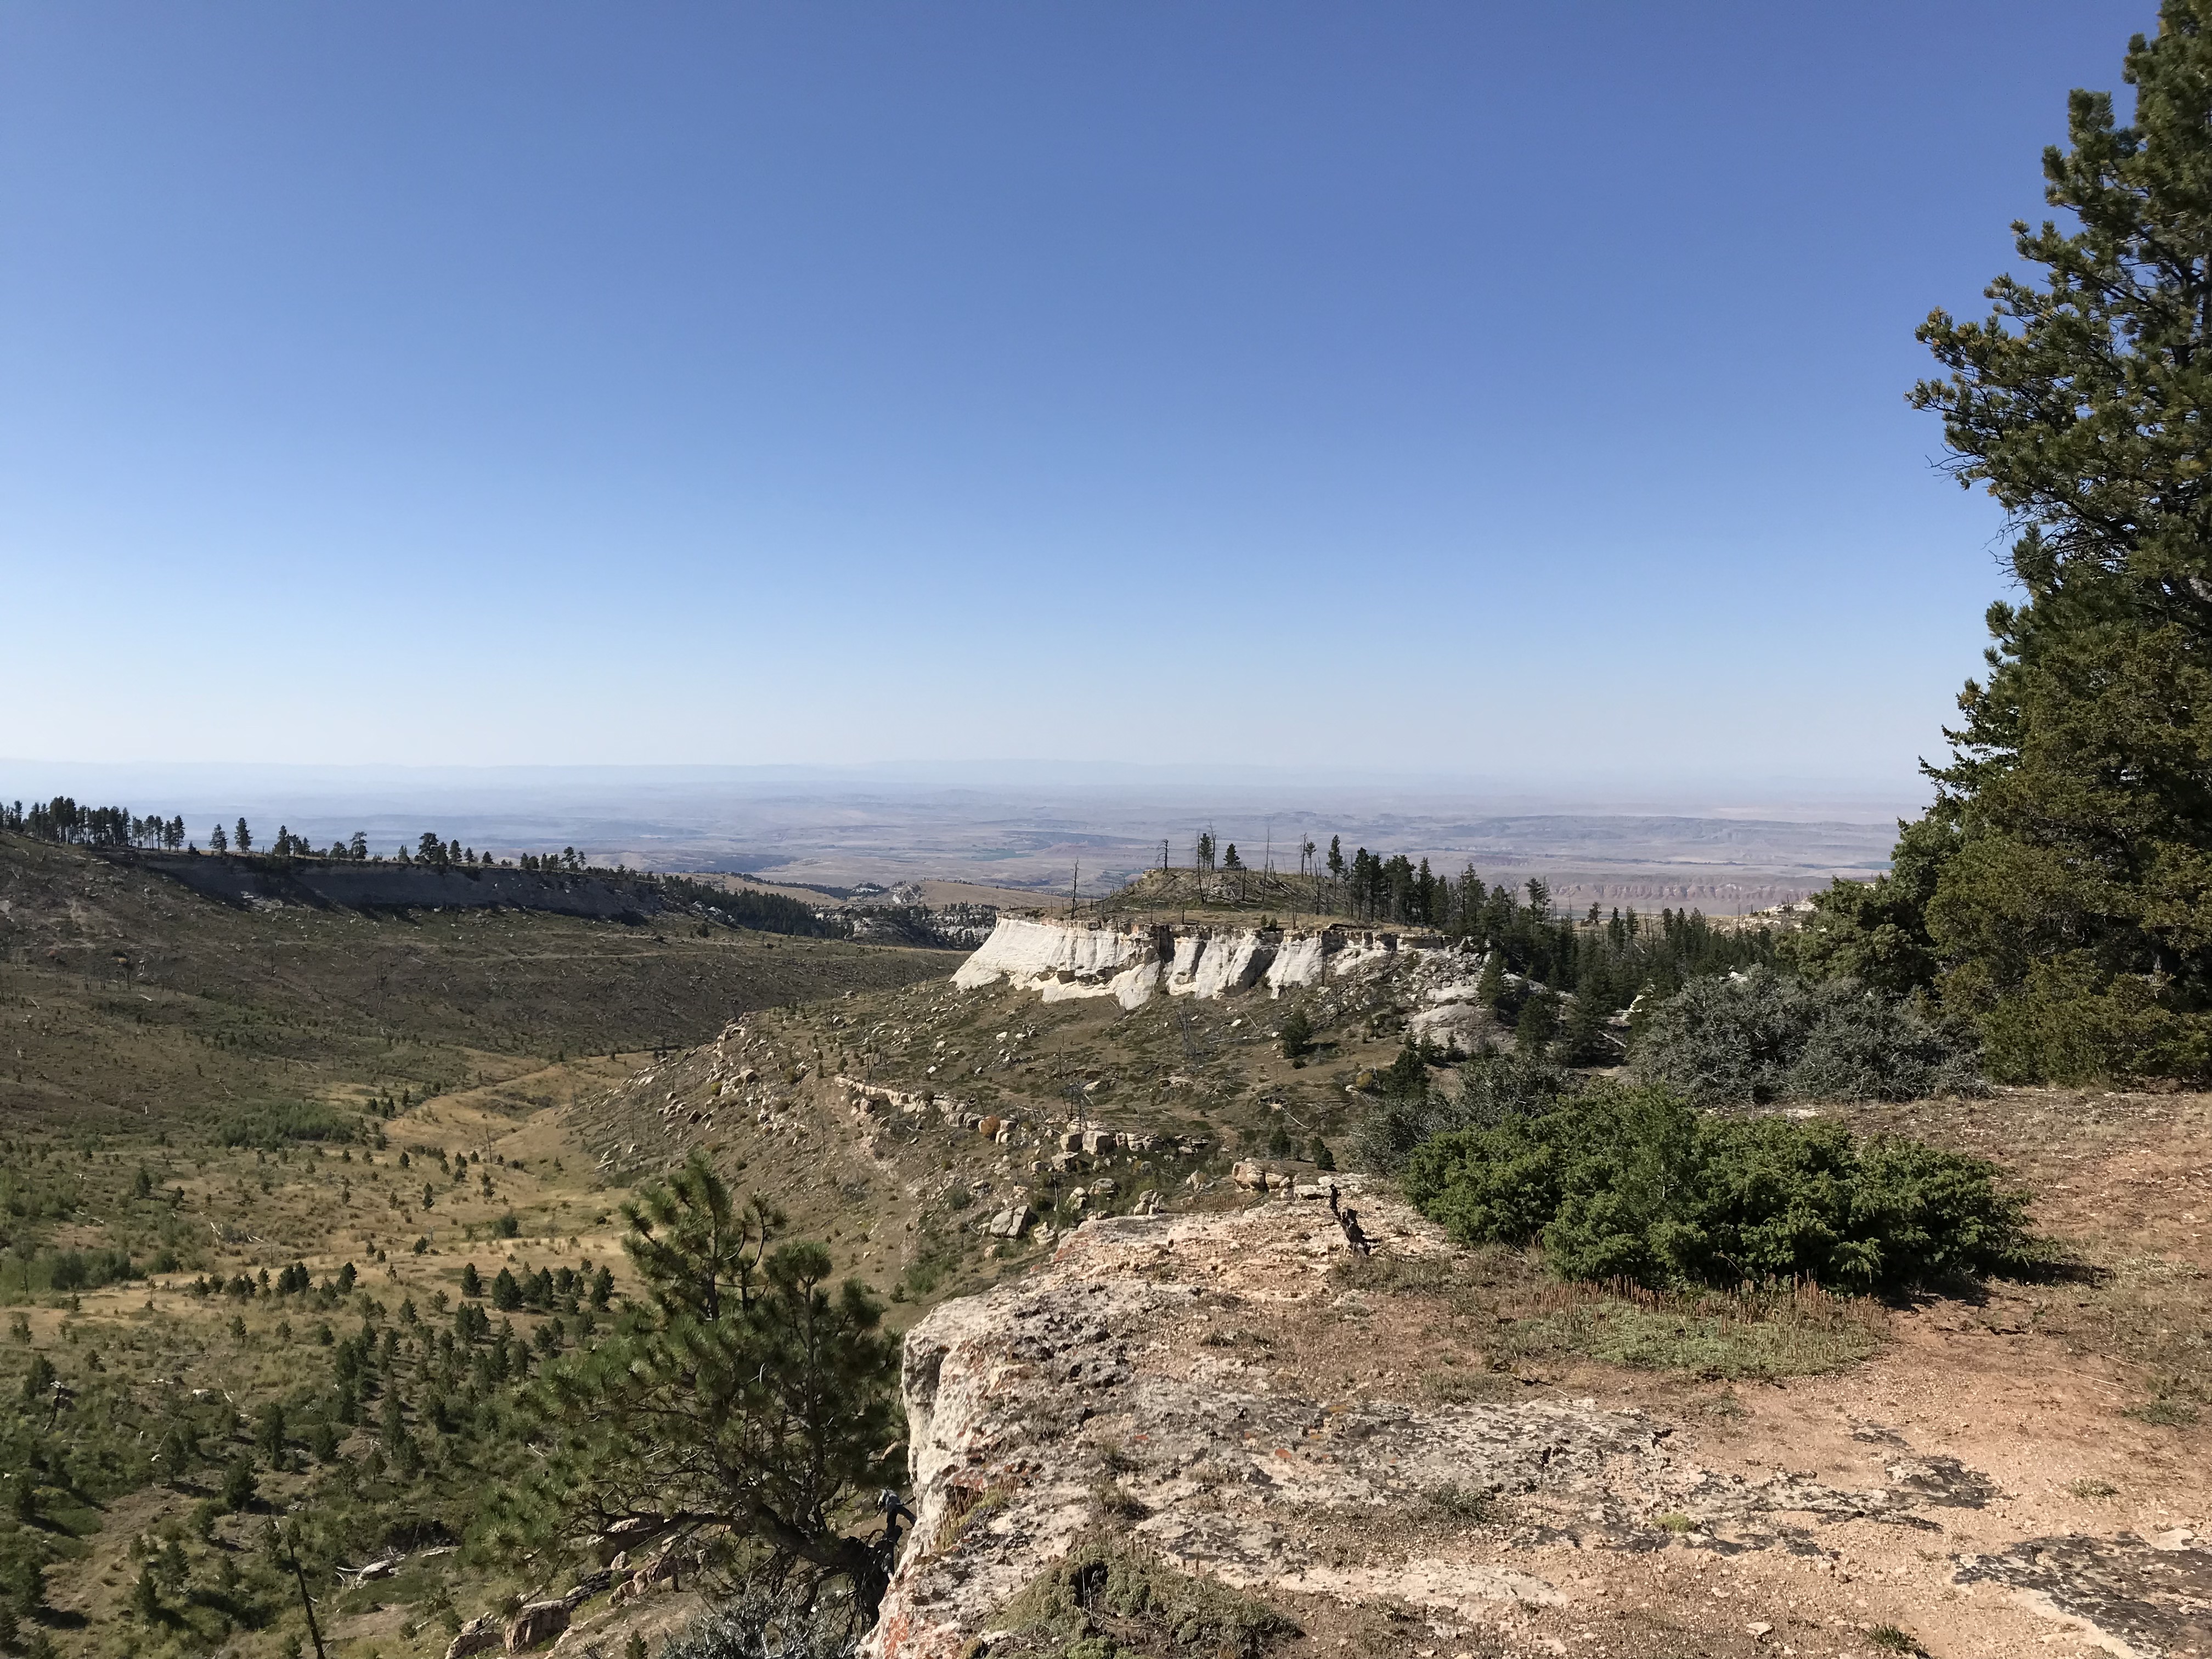
A view from our backroad trip
The drive was very manageable with Mr. Trekker’s Tacoma (any high-clearance, 4WD vehicle could handle it in good conditions). There were no steep drop-offs and no, real, technical obstacles like what we’ve encountered on some of the roads in Colorado. It was also beautiful, ranging from alpine, spruce forests and aspen groves, to dun-colored high prairies dotted with tan and red clay mounds, adorned with the varying greens of the diverse foliage. Rock-rimmed canyons with their gaping mouths open onto prairie grasses far below, while rocky cliffs of various colors traverse throughout, all with the imposing Bighorns as a backdrop.
Here is a video I made that showcases the beauty that is eastern Wyoming.
After leaving the Medicine Wheel, we decided we were game to try a few more back roads. We took another scenic trip, east, on US 14A to Burgess Junction, where we picked up US 14 and took it west. We took that road to Route 17, another “major connector”, that we then took to Alkali Road/BLM Road 1111/Route 228, back to Hyattville (this is a back way to reach the Medicine Wheel from the south).
Again, these road numbers and names were listed on the gazetteer and one of the maps–some of these roads didn’t even appear on the Atlas–but were NOT shown on the actual road. We just trusted the signs that directed us back to Hyattville. You always need to be flexible when taking back roads, as you never know what kind of obstacles or conditions may cross your path. I should also note, there was NO cell coverage in this remote location (and GPS can often be inaccurate), so maps are often times your only option–time to go “old school” folks!
Another road we could have driven was labeled in the Gazetteer as the “Red Gulch, Alkali National Back Country Byway”. We didn’t actually drive it this time–though we returned at a later date to check out the fossilized dinosaur footprintsit leads to! 😯
The Back Country Byway is more of a two-track, high-clearance path, at least in spots. I certainly wouldn’t call it a “main road”. Funnily enough, the roads we took back to Hyattville ended up being in better shape than the back road we brought out from the campground. They were graded, gravel roads that one could expect to travel 30 – 40 mph on (if the rancher in front of us hadn’t decided a slower speed was better. Unfortunately, on those roads, that are only about 1.5 lanes wide, passing really isn’t an option unless the person in front of you is feeling charitable and pulls over. This man didn’t. 😜) So, we enjoyed a leisurely, scenic stroll through the beautiful Wyoming countryside. 😁
After reaching Hyattville we took Route R54 (another graded, well-maintained, gravel road) to Ten Sleep and then got to enjoy the, INCREDIBLY beautiful, US 16 east through Ten Sleep Canyon, back to our campground. (Did I mention, almost all of these roads, despite their varying conditions–with the exception of the highways–had the EXACT SAME indicators on the map? 😜)
The topography of Wyoming is very unique. It’s characterized by the towering Bighorns in the northeast, to the Grand Tetons that criss-cross Yellowstone and the Rockies, in the west. A drier, large, bluff-filled basin sits between Yellowstone and the Bighorns.
Some parts of the state are prettier than others–while the dry, scrubland that surrounds the mountains can be pretty and green in spring, it usually turns rather drab in the later months. The basin area is dotted with oil fields and sketchy-looking, government sites with warning signs plastered on the fences, which can be rather intimidating. 😳
Below are some more pics of our scenic drive:
MOOSE in the Bighorn Mountains!
Earlier that summer, we spent ten days in the Colorado high country during peak season and we didn’t see one moose. Later that fall, we spent ten seconds in the Bighorn mountains of Wyoming (literally), and TWO moose were waiting to greet us when we arrived at our campsite! Bighorns for the win!
Our ungulate friends (this year it was Maggie and Megan)
As I’ve mentioned previously, I’m always surprised at how much this part of Wyoming reminds me of the Colorado mountains. The scenery and critters are very similar, with the added benefit of being half as long a distance from the Black Hills and FAR less crowded than Colorado. 😉
If you’re looking for an amazing, historical site to visit in the Bighorn Mountains of Wyoming, check out the Bighorn Medicine Wheel!
Have you ever visited the prehistoric Medicine Wheel in the Bighorns? Tell me about it in the comments!
Did you enjoy reading this post? Pin it!
Like what you read here today? Please feel free to leave a comment, like or share this post! Add your email at the bottom of the page, or the sidebar to the right, to be notified when a new post is published. By signing up for the email list, you will also receive a free copy of the Tranquil Trekker’s Top 10 Tips of Trekking Do’s and Don’ts!
You can also follow the blog on social media by clicking the links below!
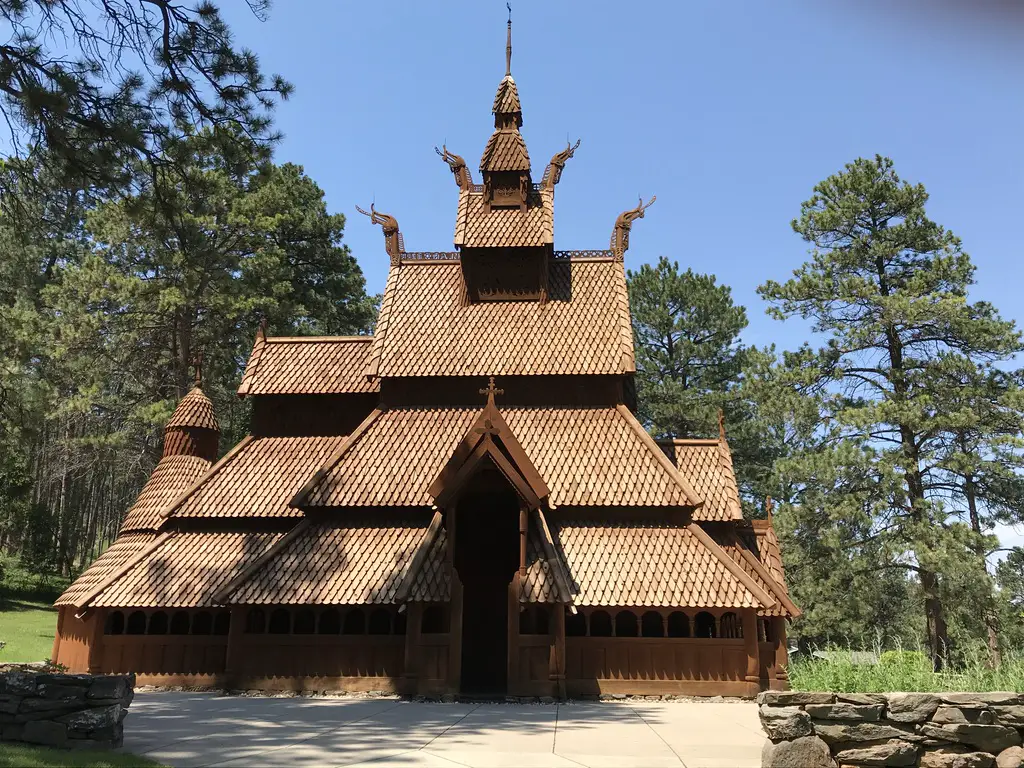
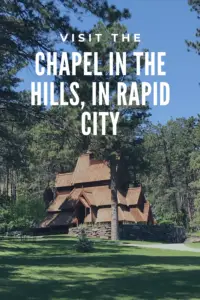
In this post, I review the Chapel in the Hills, located in Rapid City.
Unlike most of the places I write about, Chapel in the Hills is unique because it is hidden within the limits of Rapid City. This makes it easy to access, even if it is a bit difficult to locate. 😁 As you pull into the parking lot, the Chapel commands your view as it appears, positioned against the hill, dominating over the surrounding landscape.
Where in Rapid City is the Chapel in the Hills?
To reach the Chapel in the Hills, take Route 44/Jackson Boulevard west, out of Rapid City, and then take the first left, past Canyon Lake Park, for Chapel Lane. Stay on Chapel Lane until you reach the gate. There are a few jogs in the route and several roads branch off, so be watchful (there are signs, though a few are small). The chapel is located about 1.5 miles from Canyon Lake Park.
As an aside, if you’ve never visited Canyon Lake Park, I recommend it. It’s a perfect place for a picnic, to walk your dog, or take a jog, and at night, the path is illuminated with lovely, subdued lighting. Just be wary of the MANY geese and their “leavings”, especially on the island in the middle of the lake. 😝
The drive to the chapel traverses a lovely, tree-lined, residential area complete with the 1960s architectural style that is common to the west side of Rapid City. I’m regularly, pleasantly surprised by the picturesque, residential areas around town; not to mention the spectacular views of the surrounding countryside that they bestow–in this case, views of the Black Hills.
What makes the Chapel in the Hills unique?
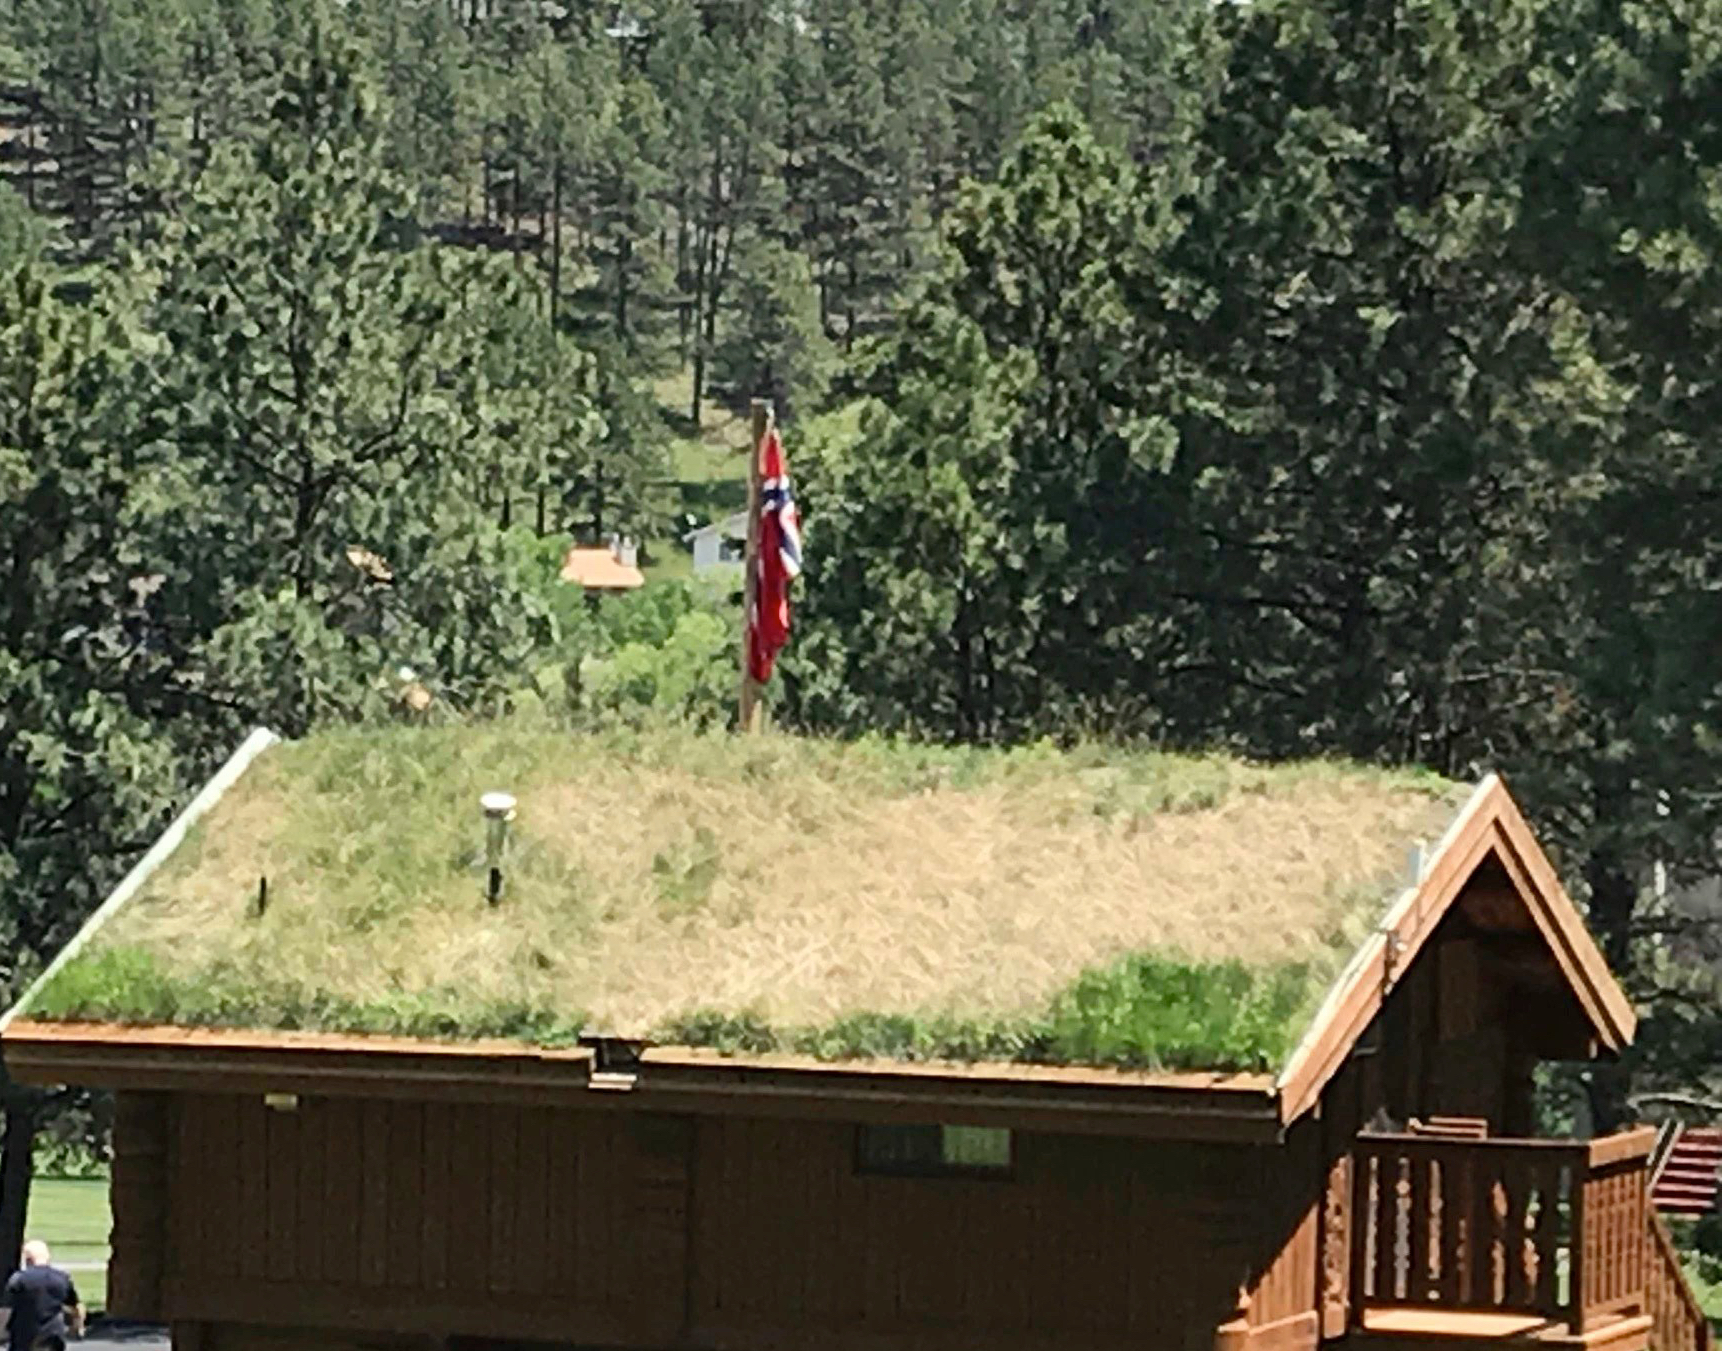
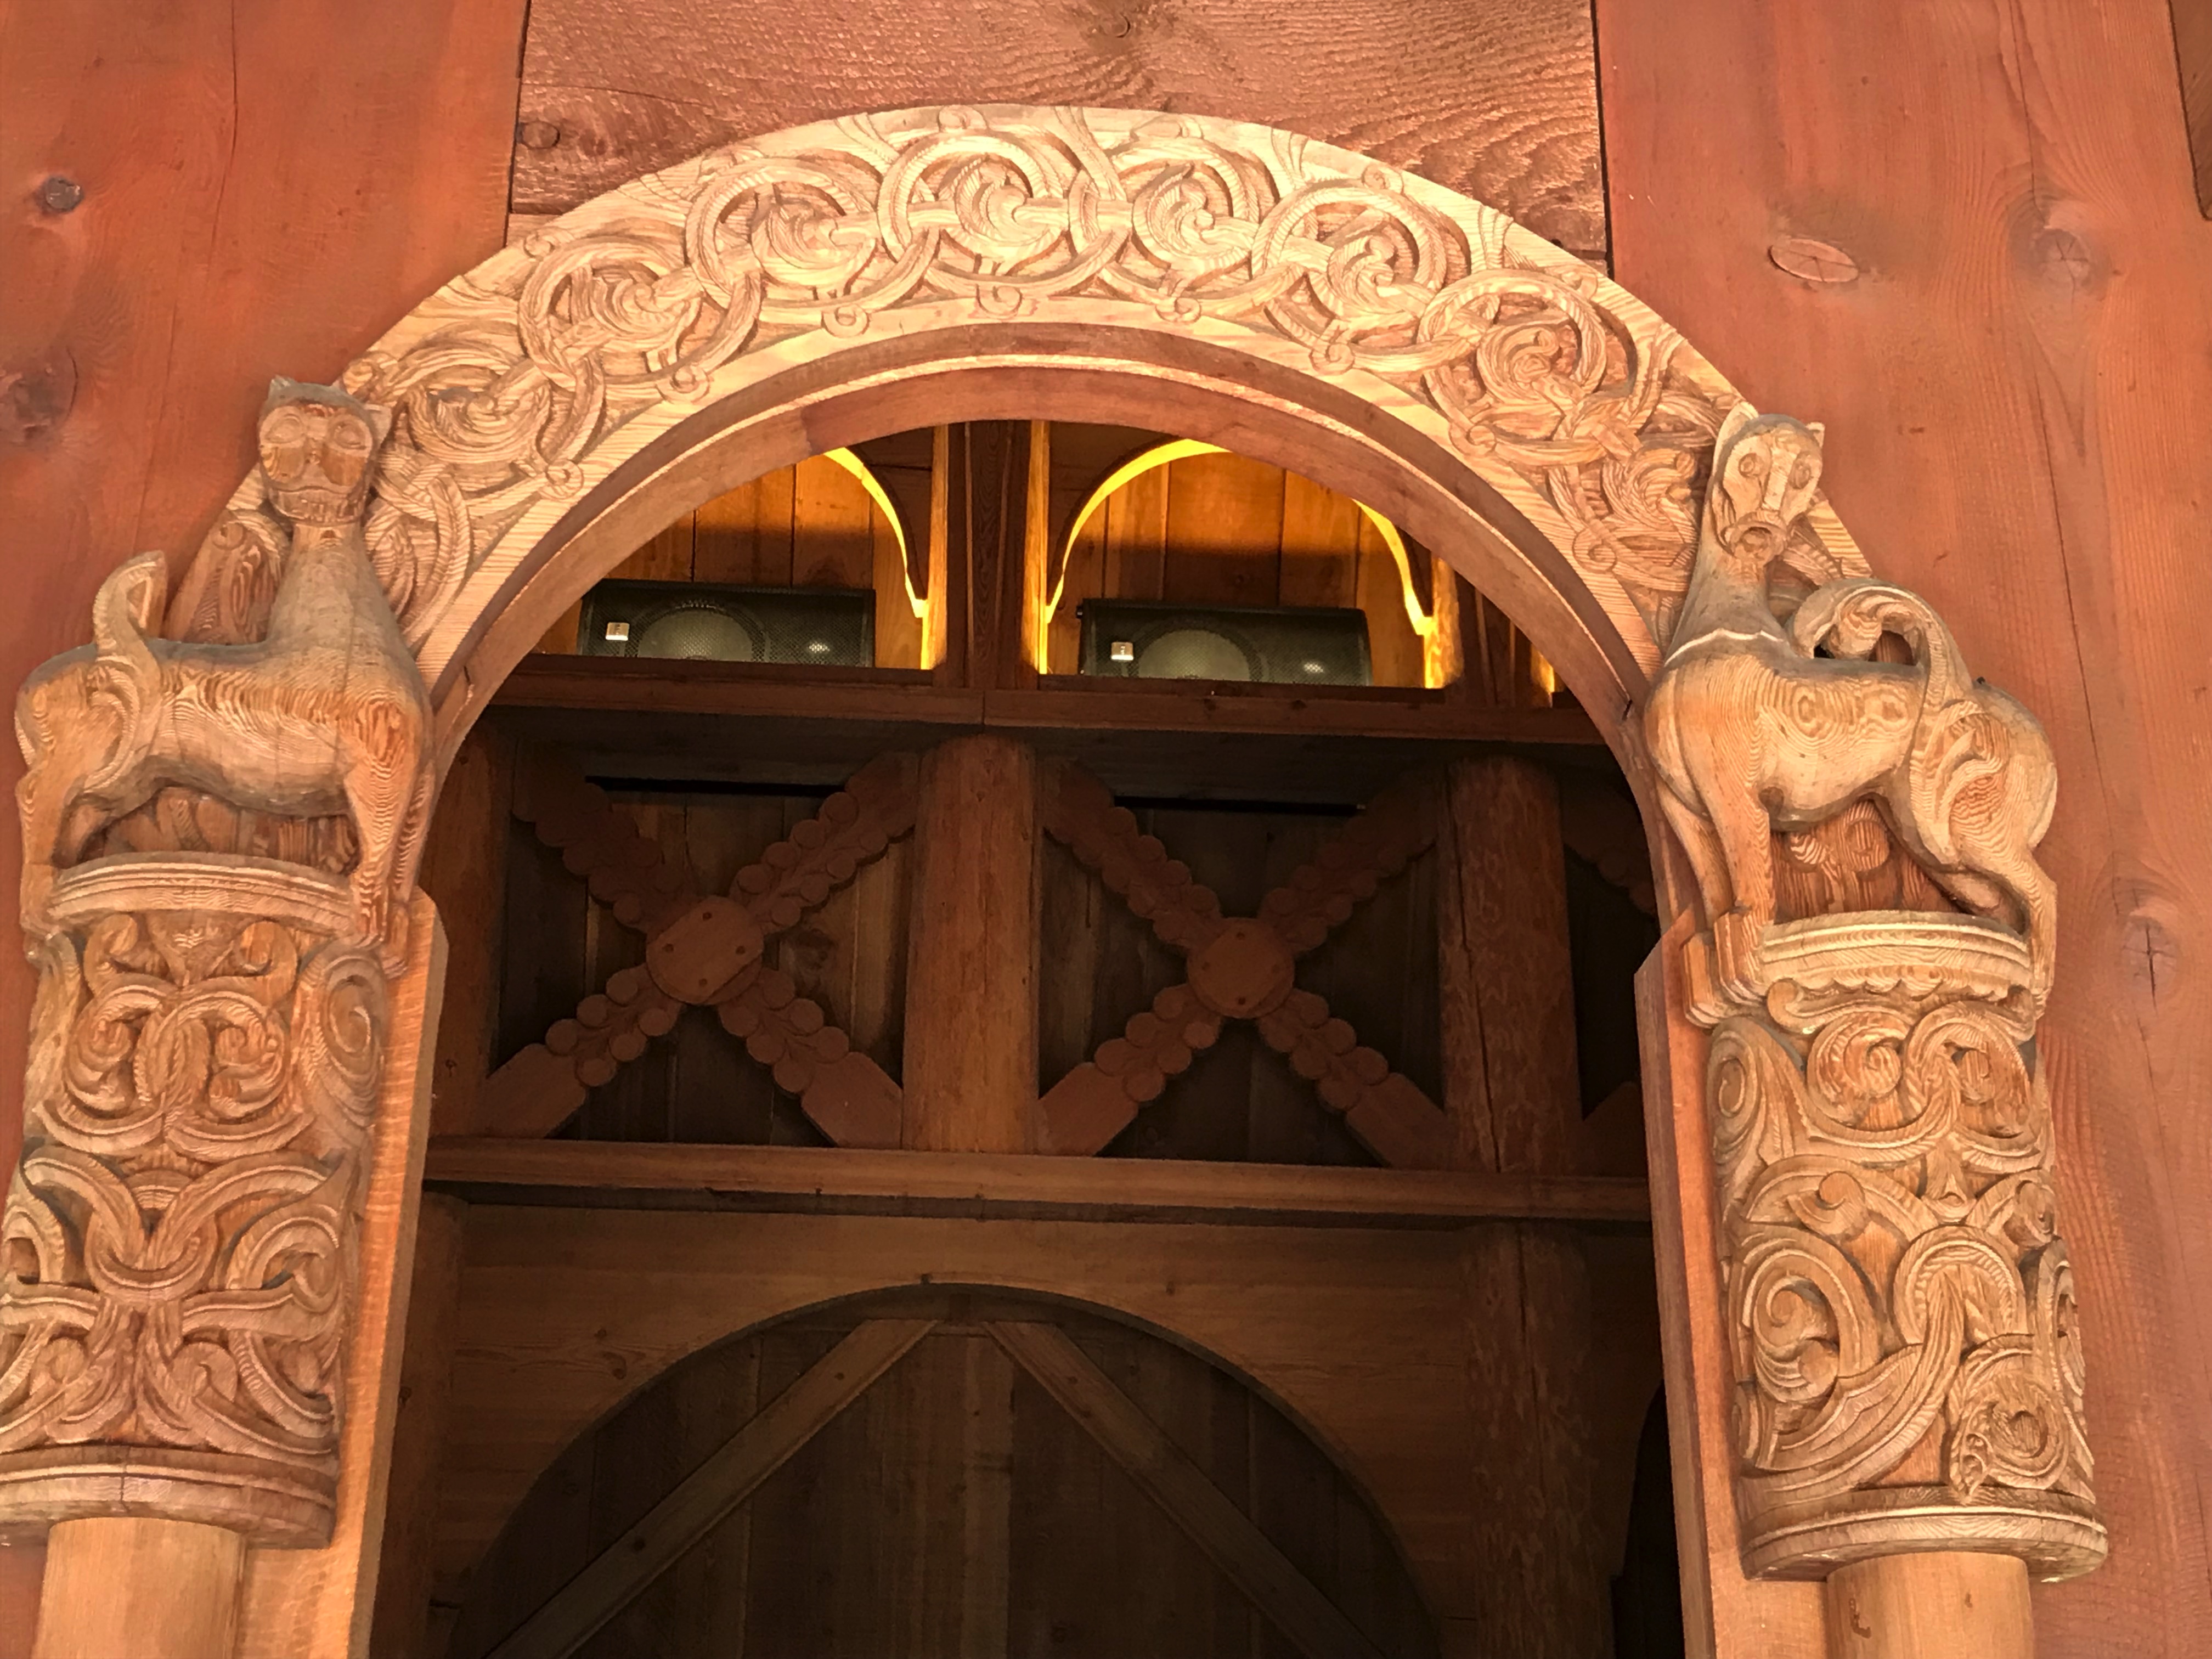
The campus is cool! The chapel, an ELCA Lutheran church, is modeled after a Norwegian stave church (the Borgund stavkirke, of Laerdal, Norway, to be exact, that was built in the 12th Century), in honor of the Norwegian Lutherans that settled the area. There is also a small visitor’s center that dons a traditional, grass roof that was built in Norway and shipped to Rapid City. The site also sports a small museum showcasing what life would have been like for the church’s parishioners at the time it was built.
The traditional grass roof of the Visitor Center
Weddings are held here and evening vespers occur, nightly, during the summer months. You can visit the websitehere. There is no cost to tour the site, though donations are appreciated.
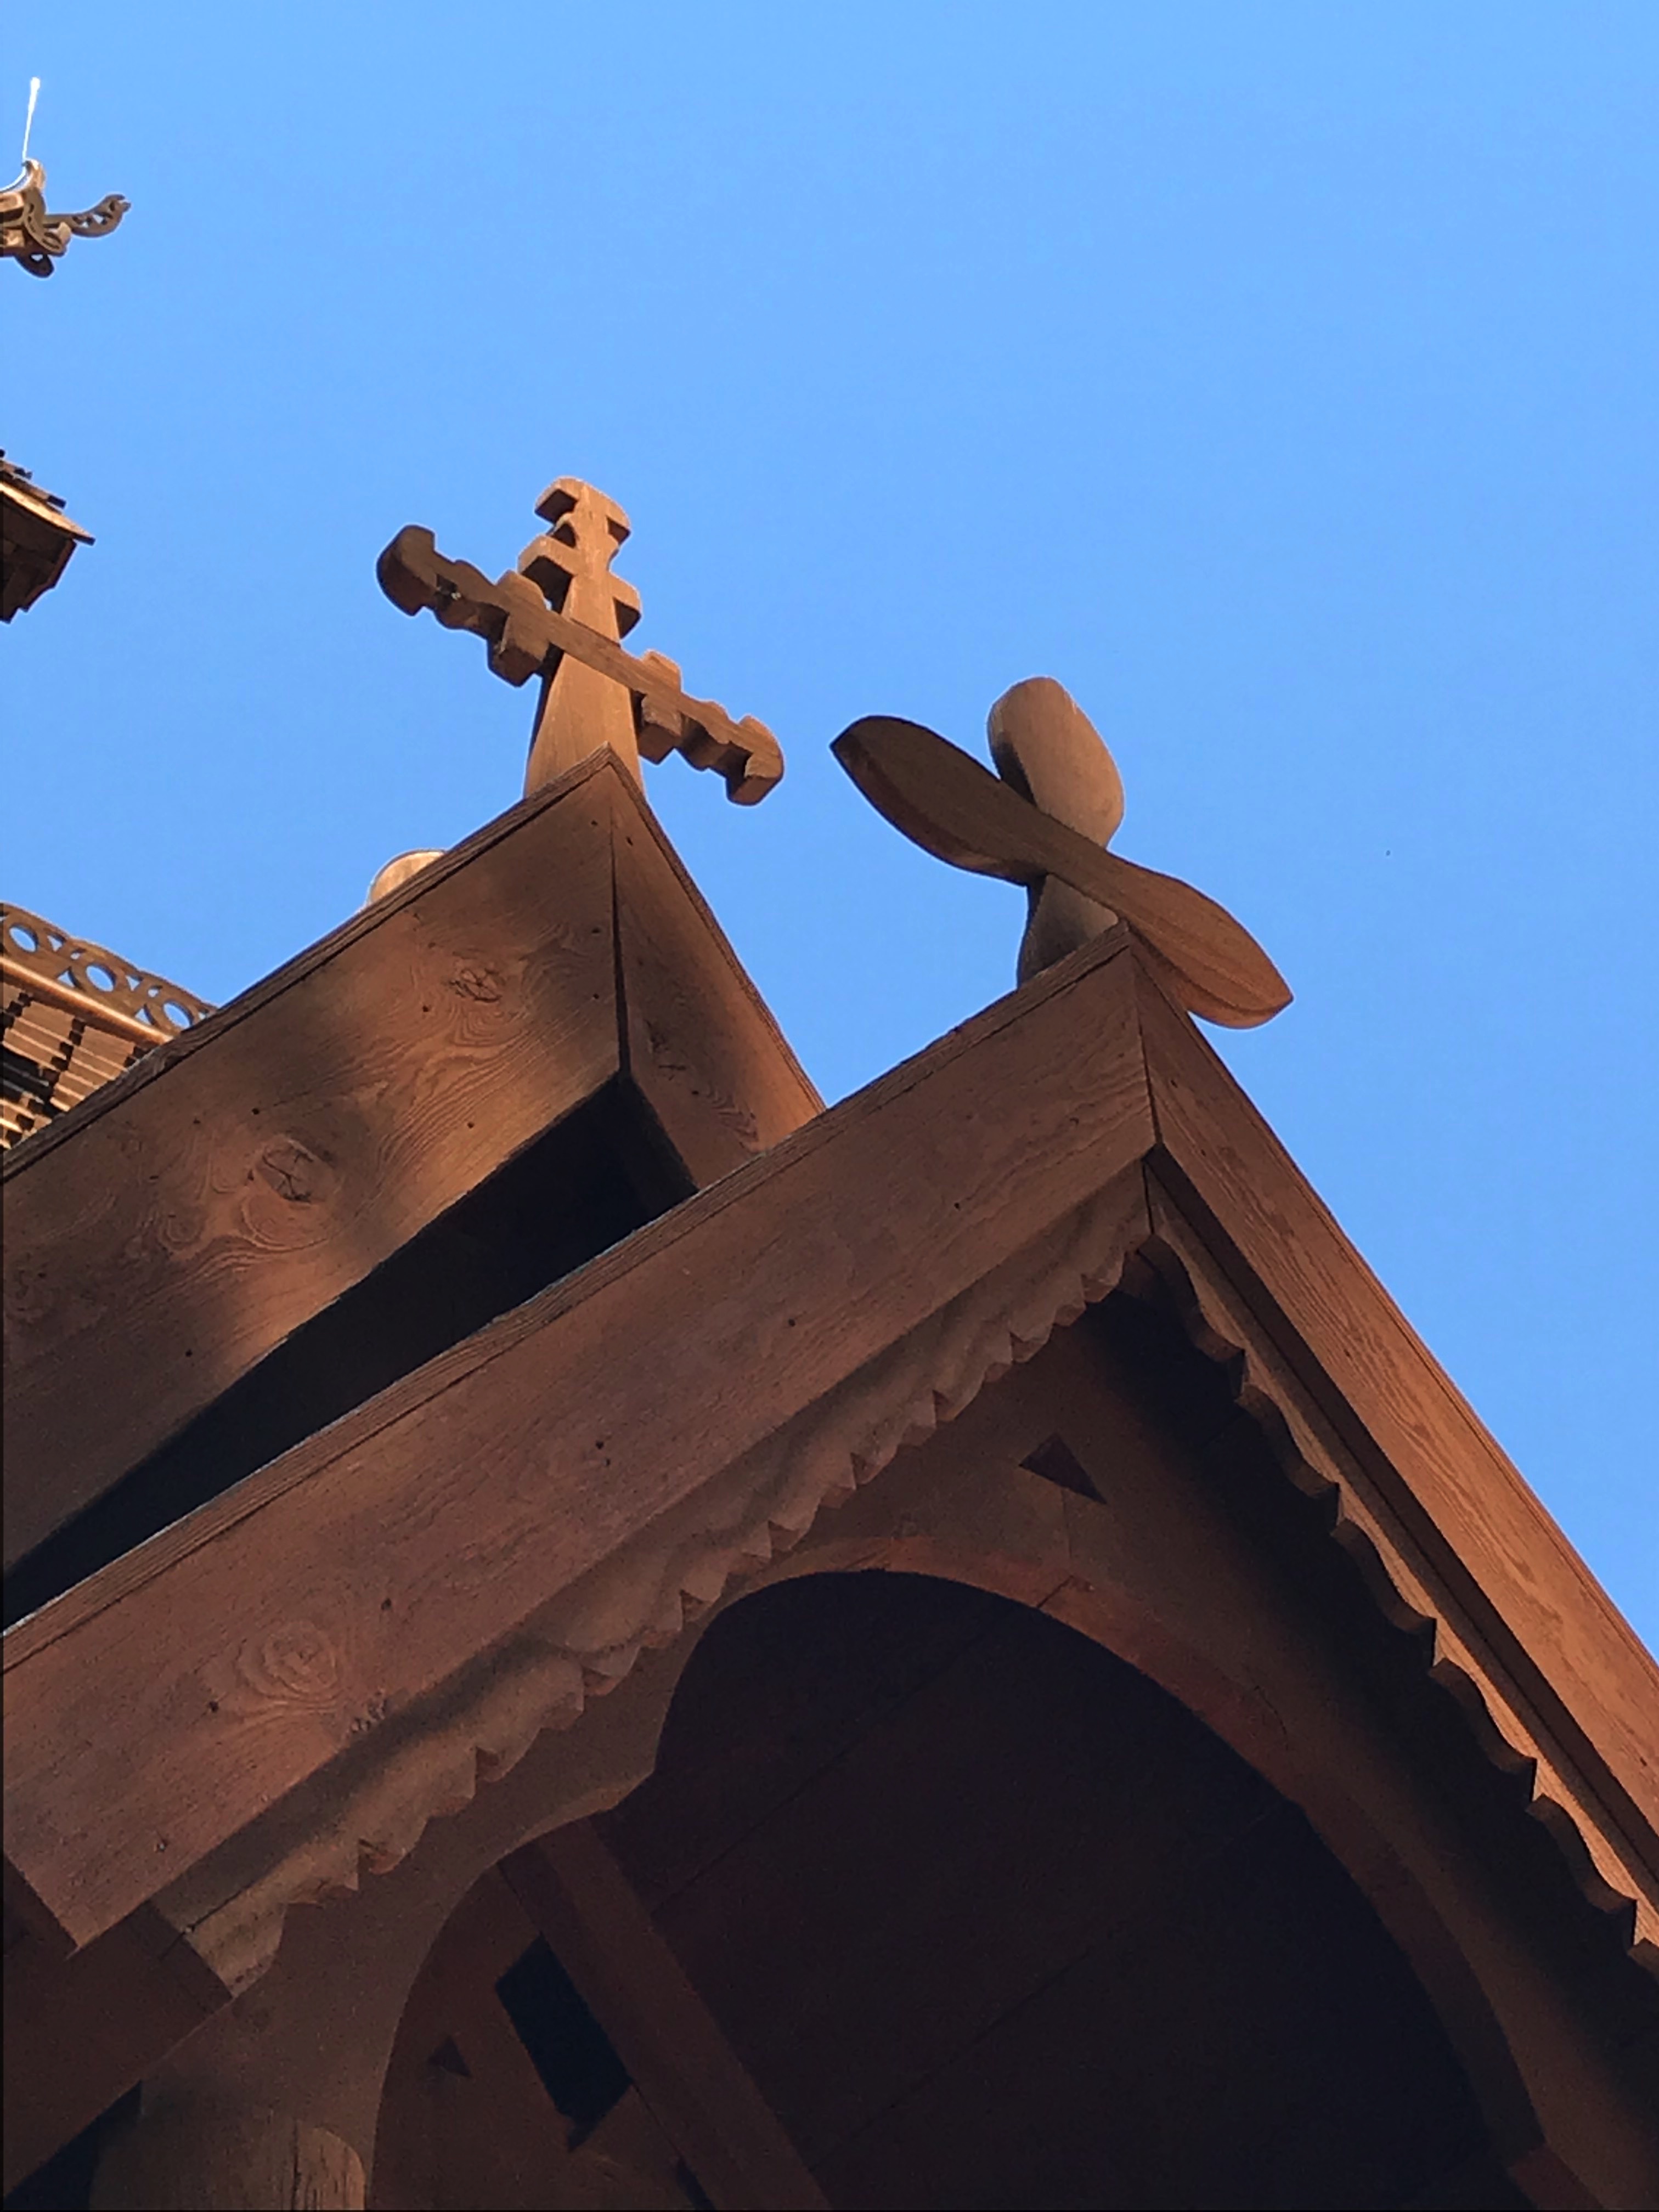
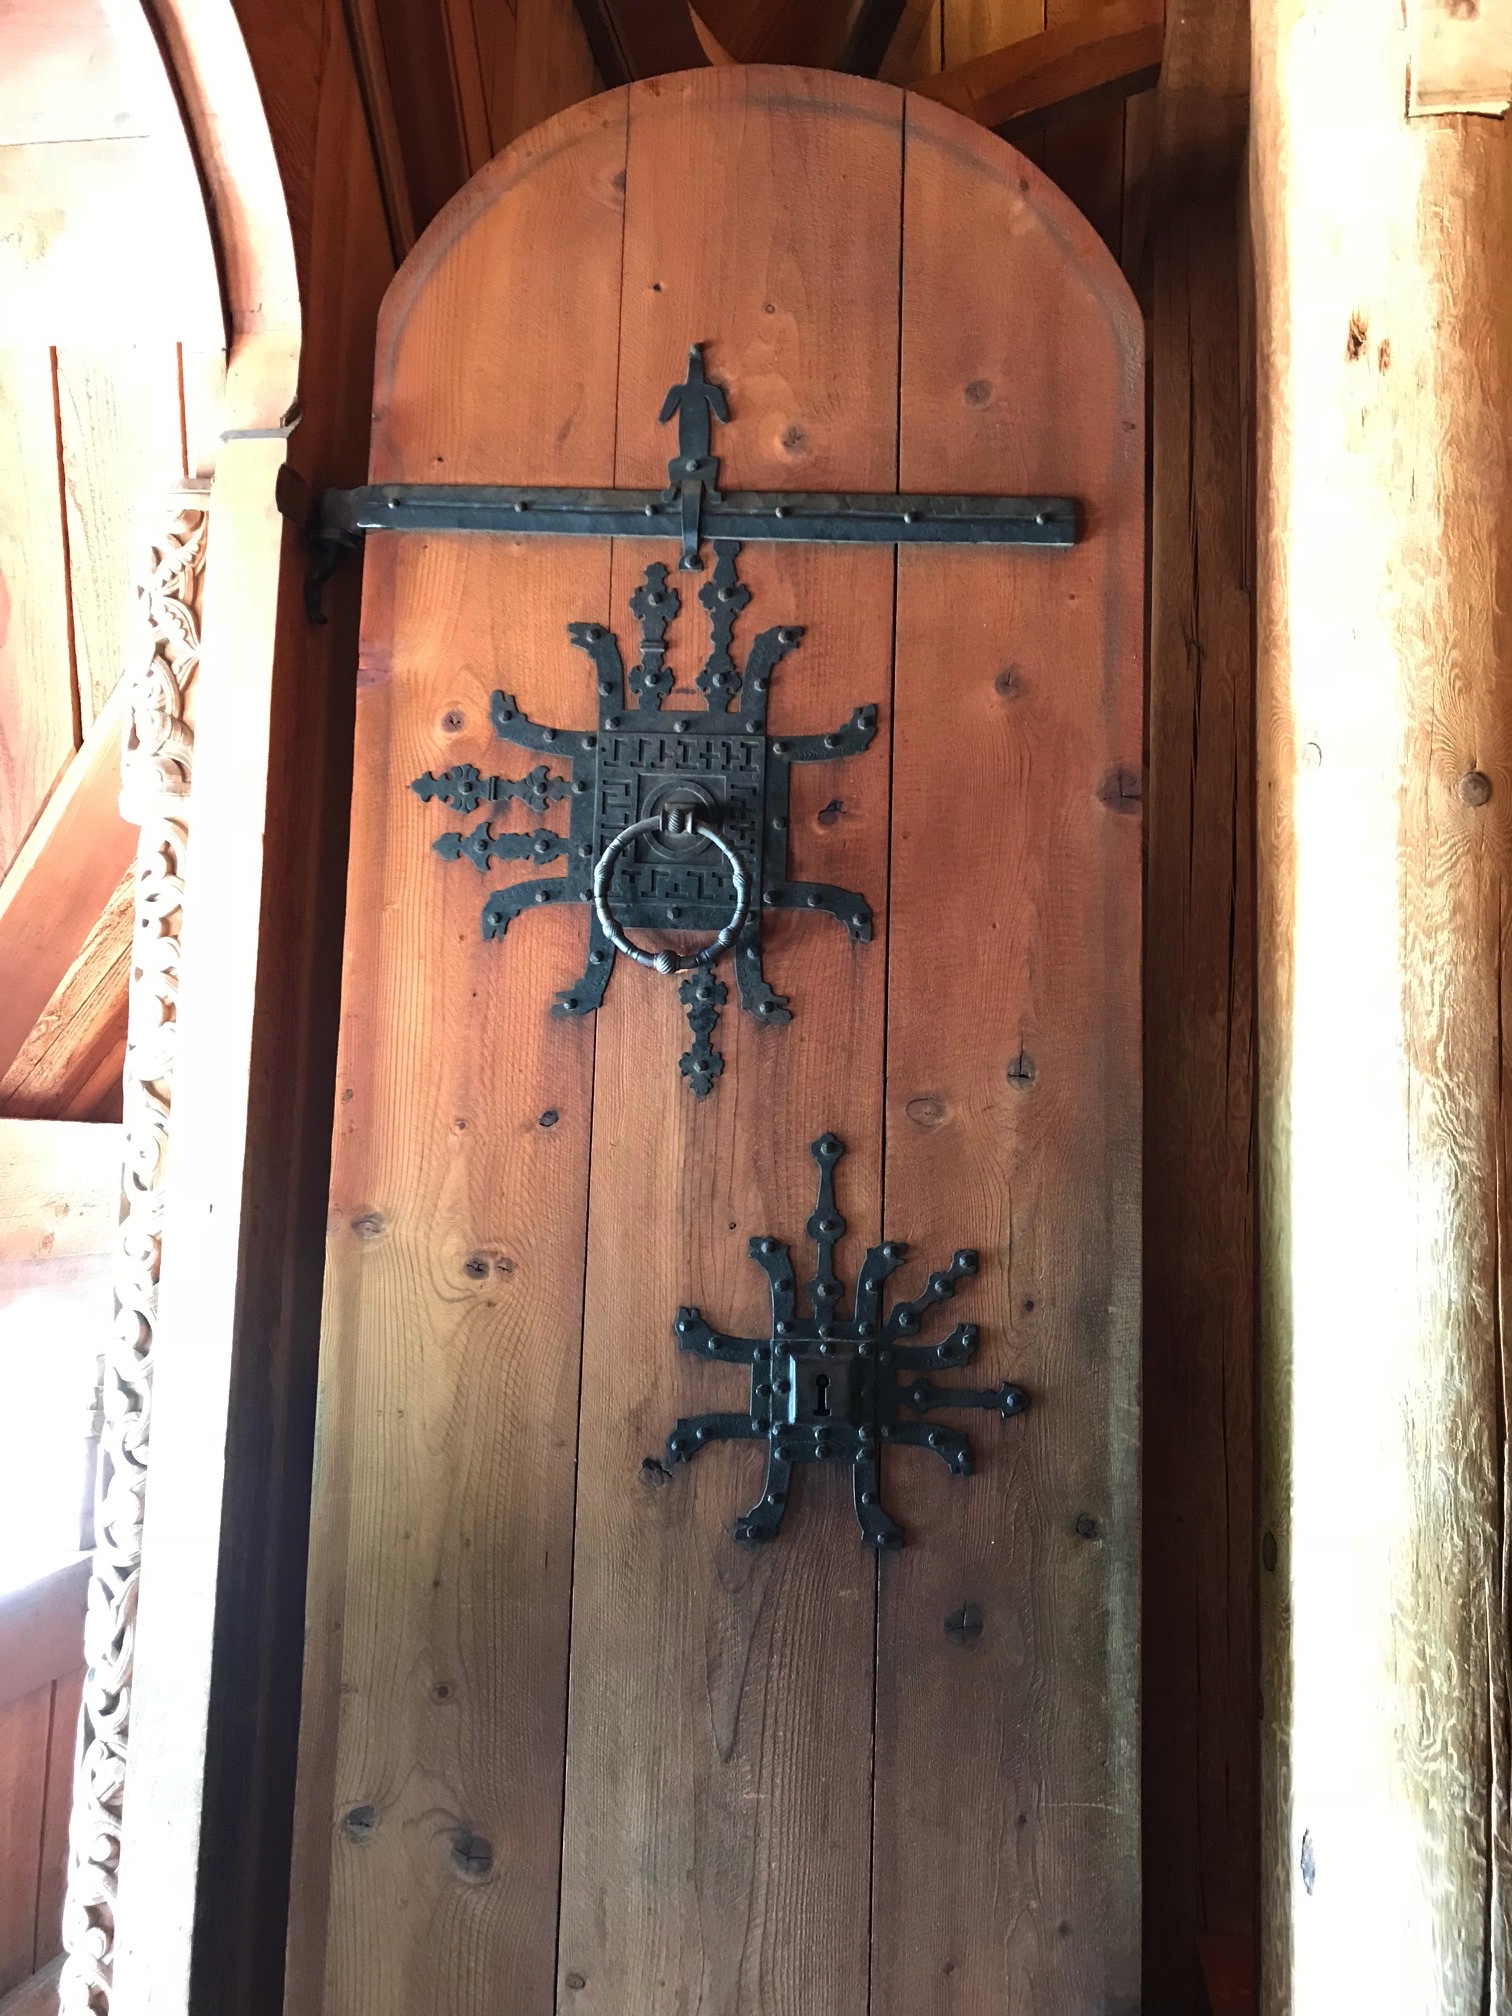
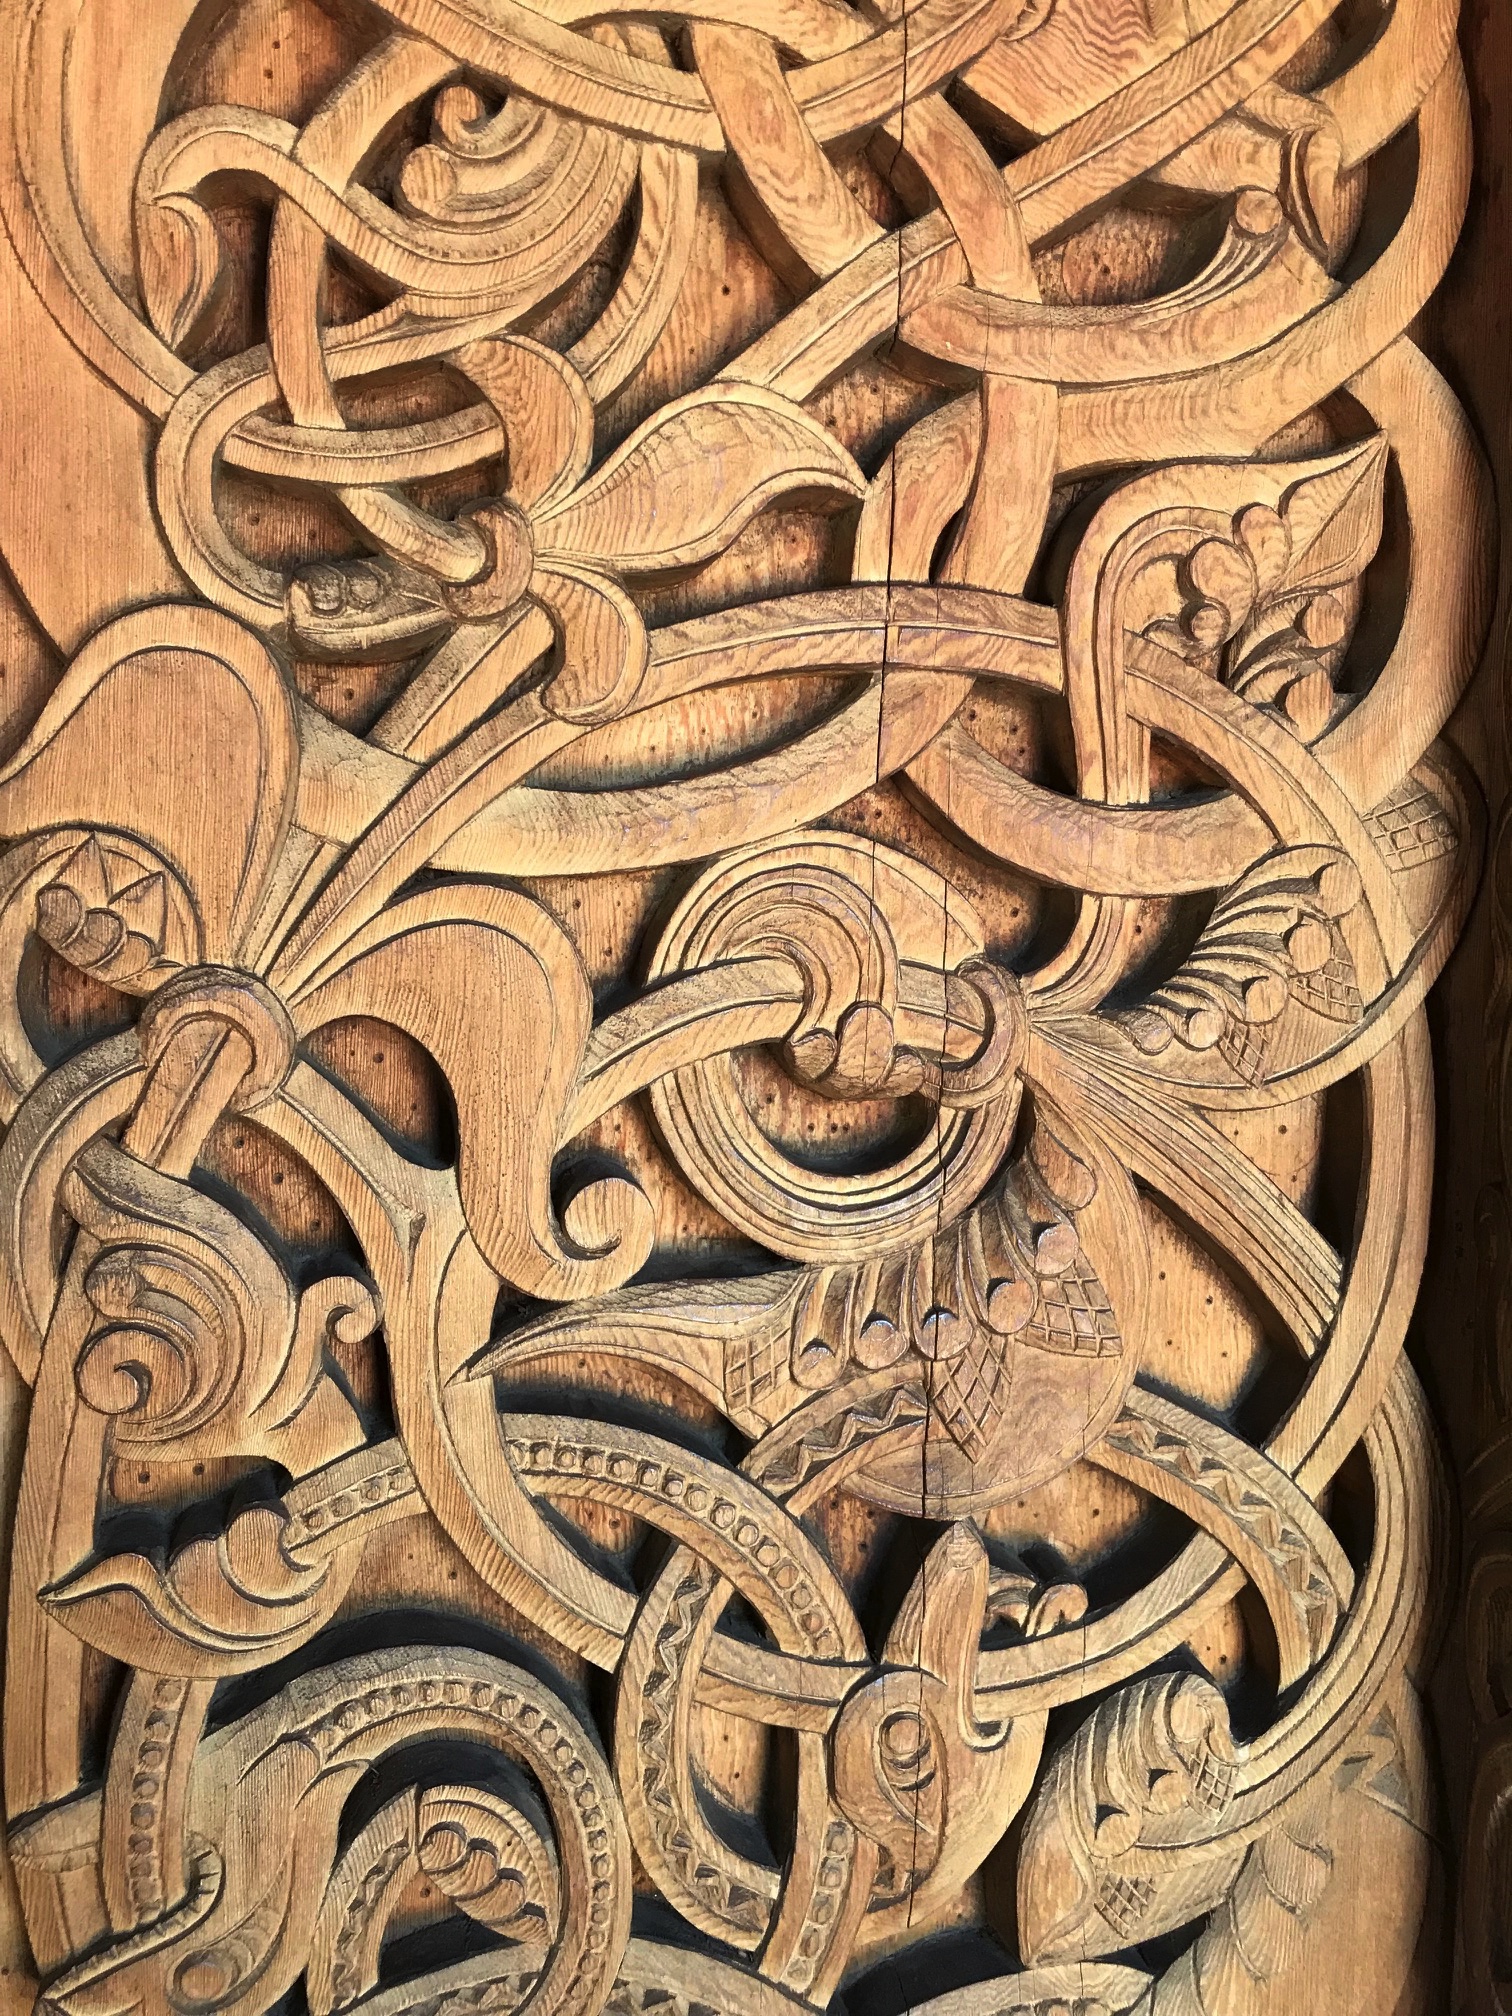
The architecture of this building is incredible! Intricate wood carvings adorn the walls of the church, both outside and in, and the russet-colored wood contrasts with the vibrant green of the surrounding lawns, the azure blue of the sky, and the sun-dappled trees of the forest backdrop. Flowers of various types colorfully frame the chapel and dot the beds that encircle it while butterflies flit about and bees sip the nectar from the Russian sage flowers. The musty aroma of old wood tickles your nose, while bird chatter surrounds you; the gentle breeze sighs through the boughs of the trees and dry leaves crackle as they are swept past.
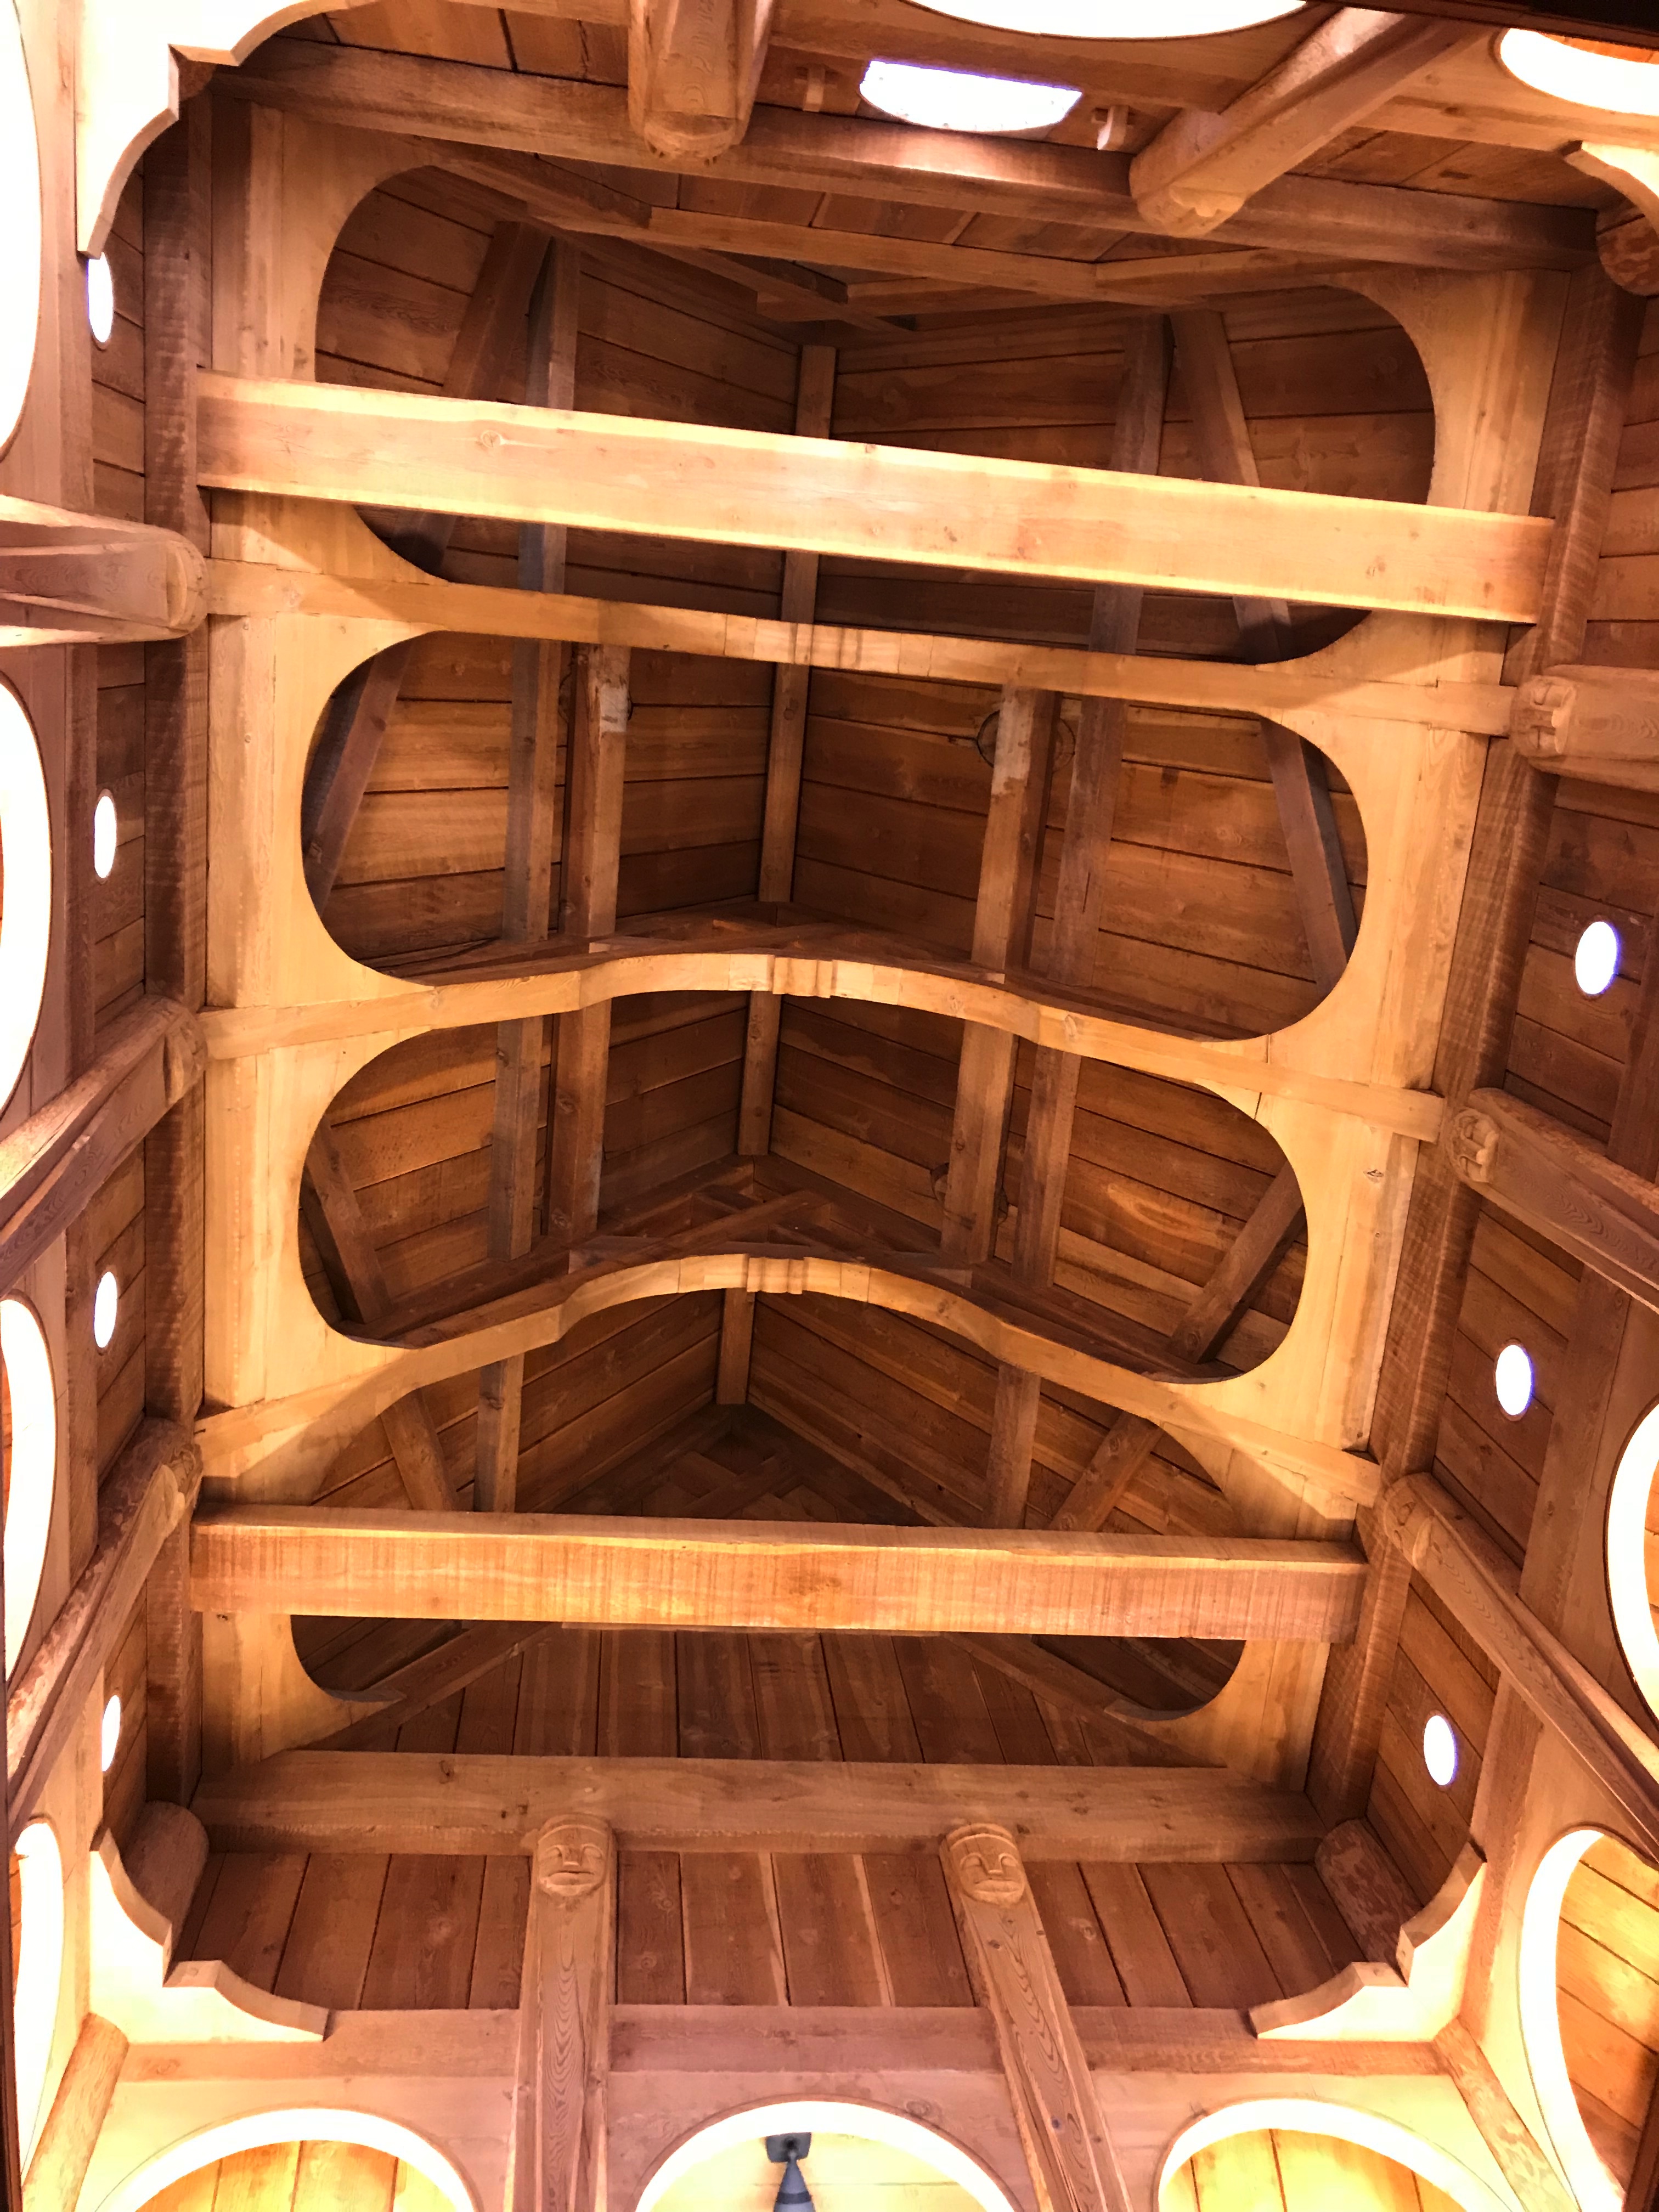
The front entrance to the ChapelThe ceiling of the Chapel
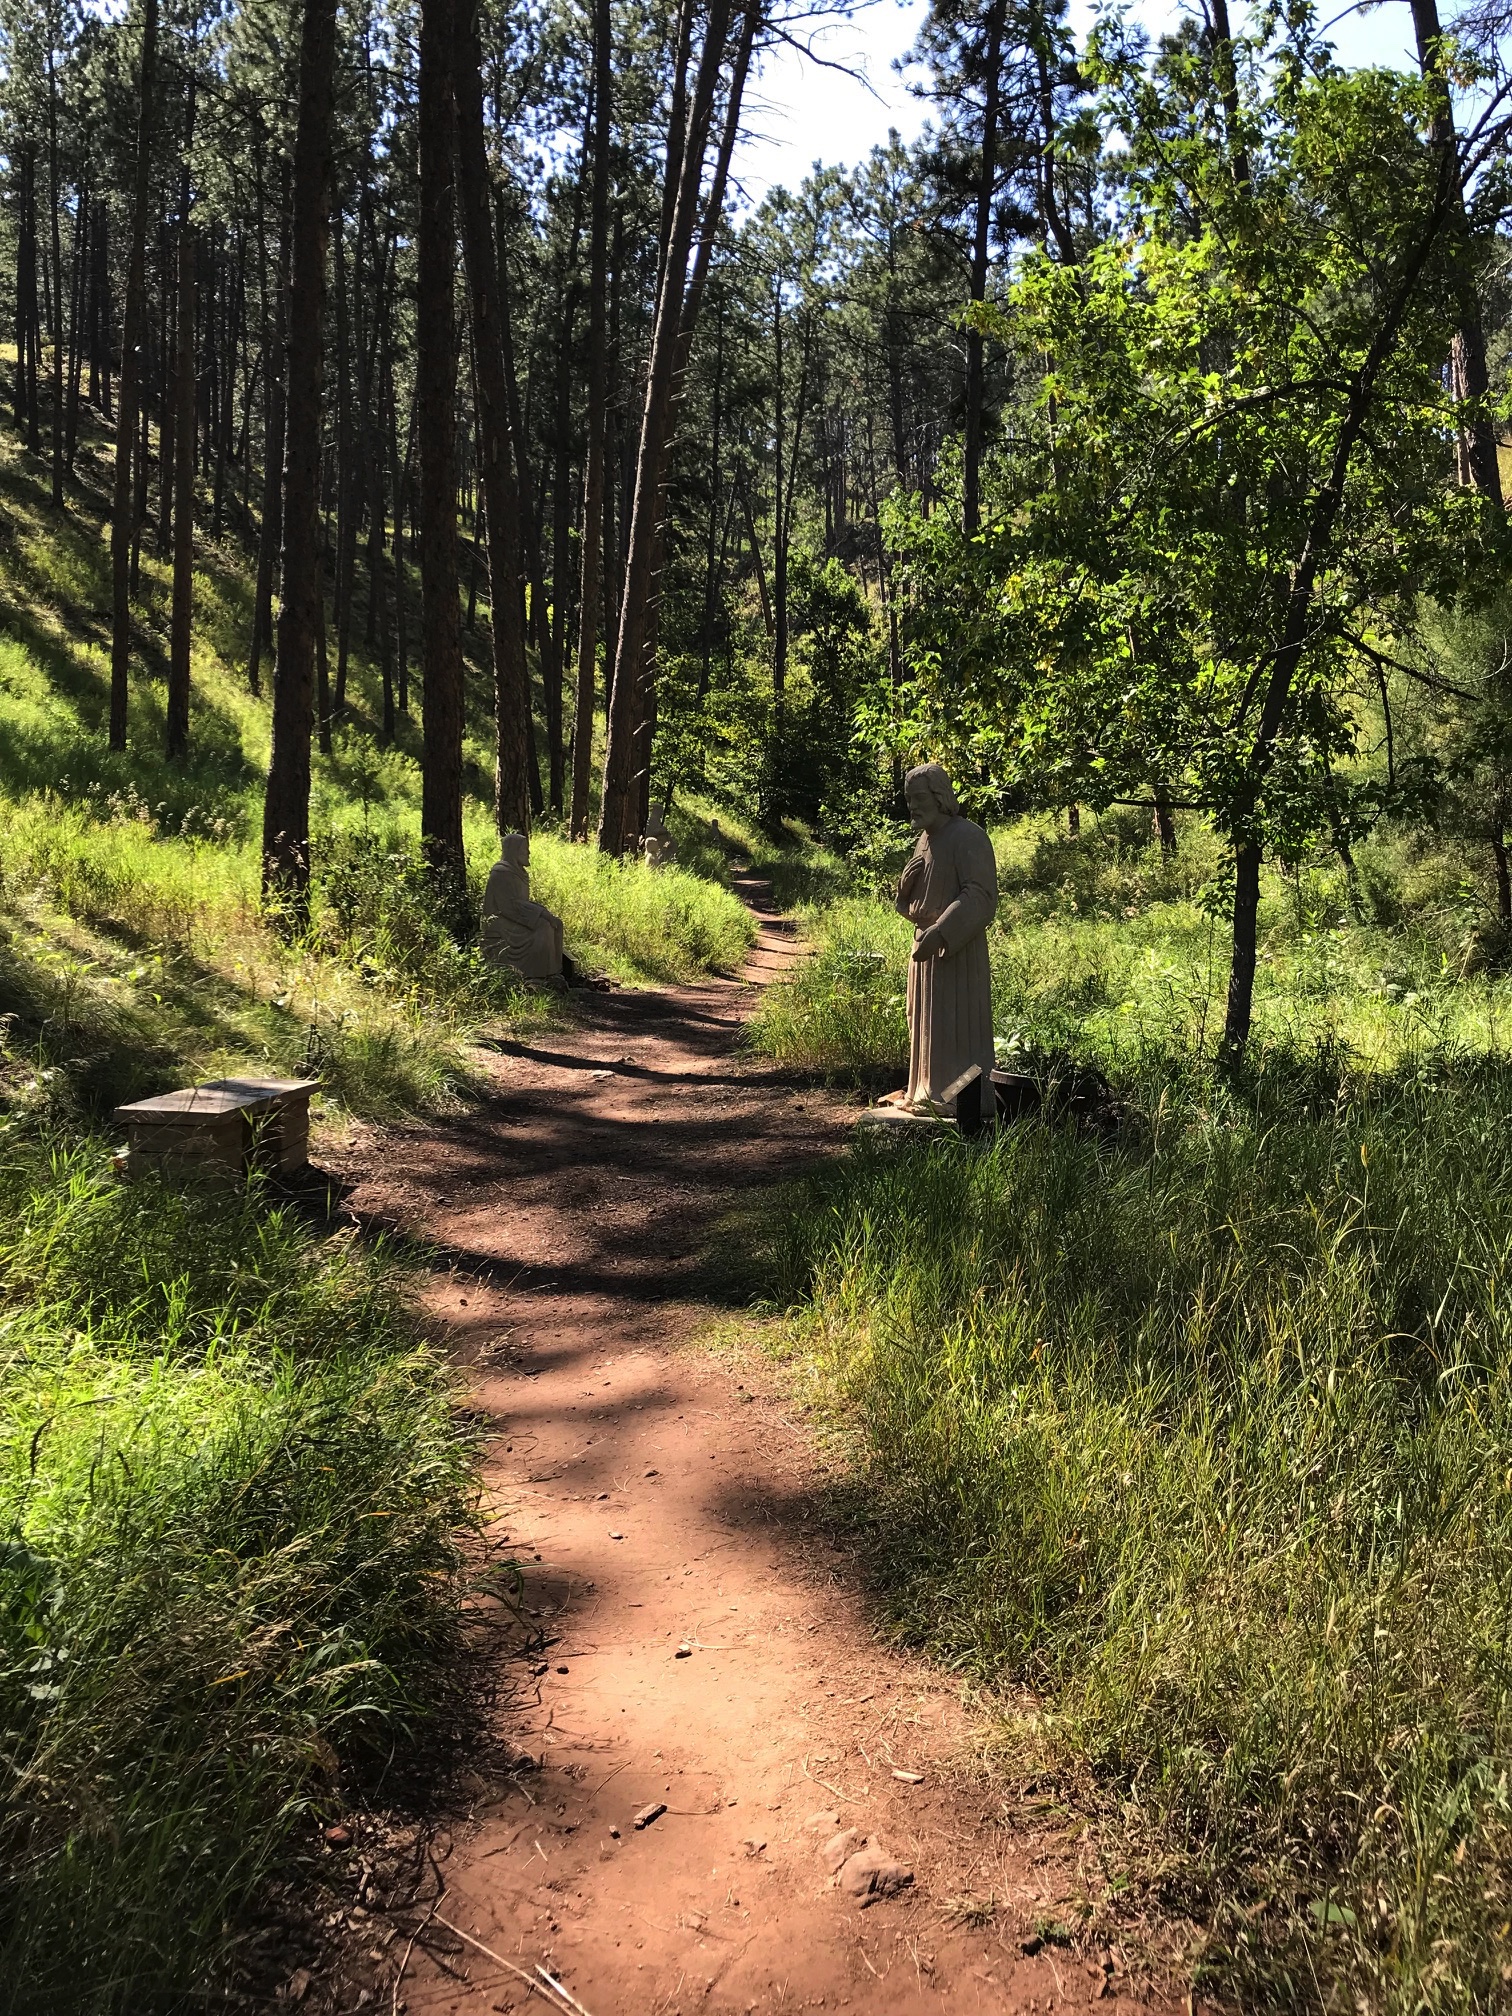
A short, peaceful, meditation/prayer path, complete with small, marble statues, traverses a ravine where towering slopes frame three of its sides in the forest behind the structure. I LOVE this place! It is so beautiful and peaceful! It makes for a perfect location to meditate, pray, or just relax. For someone who is spiritual but also delights in nature, it makes for the perfect fusion between the two. It’s an incredibly tranquil, mystical experience. Here, my soul is at peace!
The prayer/meditation path
More pics of the Chapel in the Hills are below:
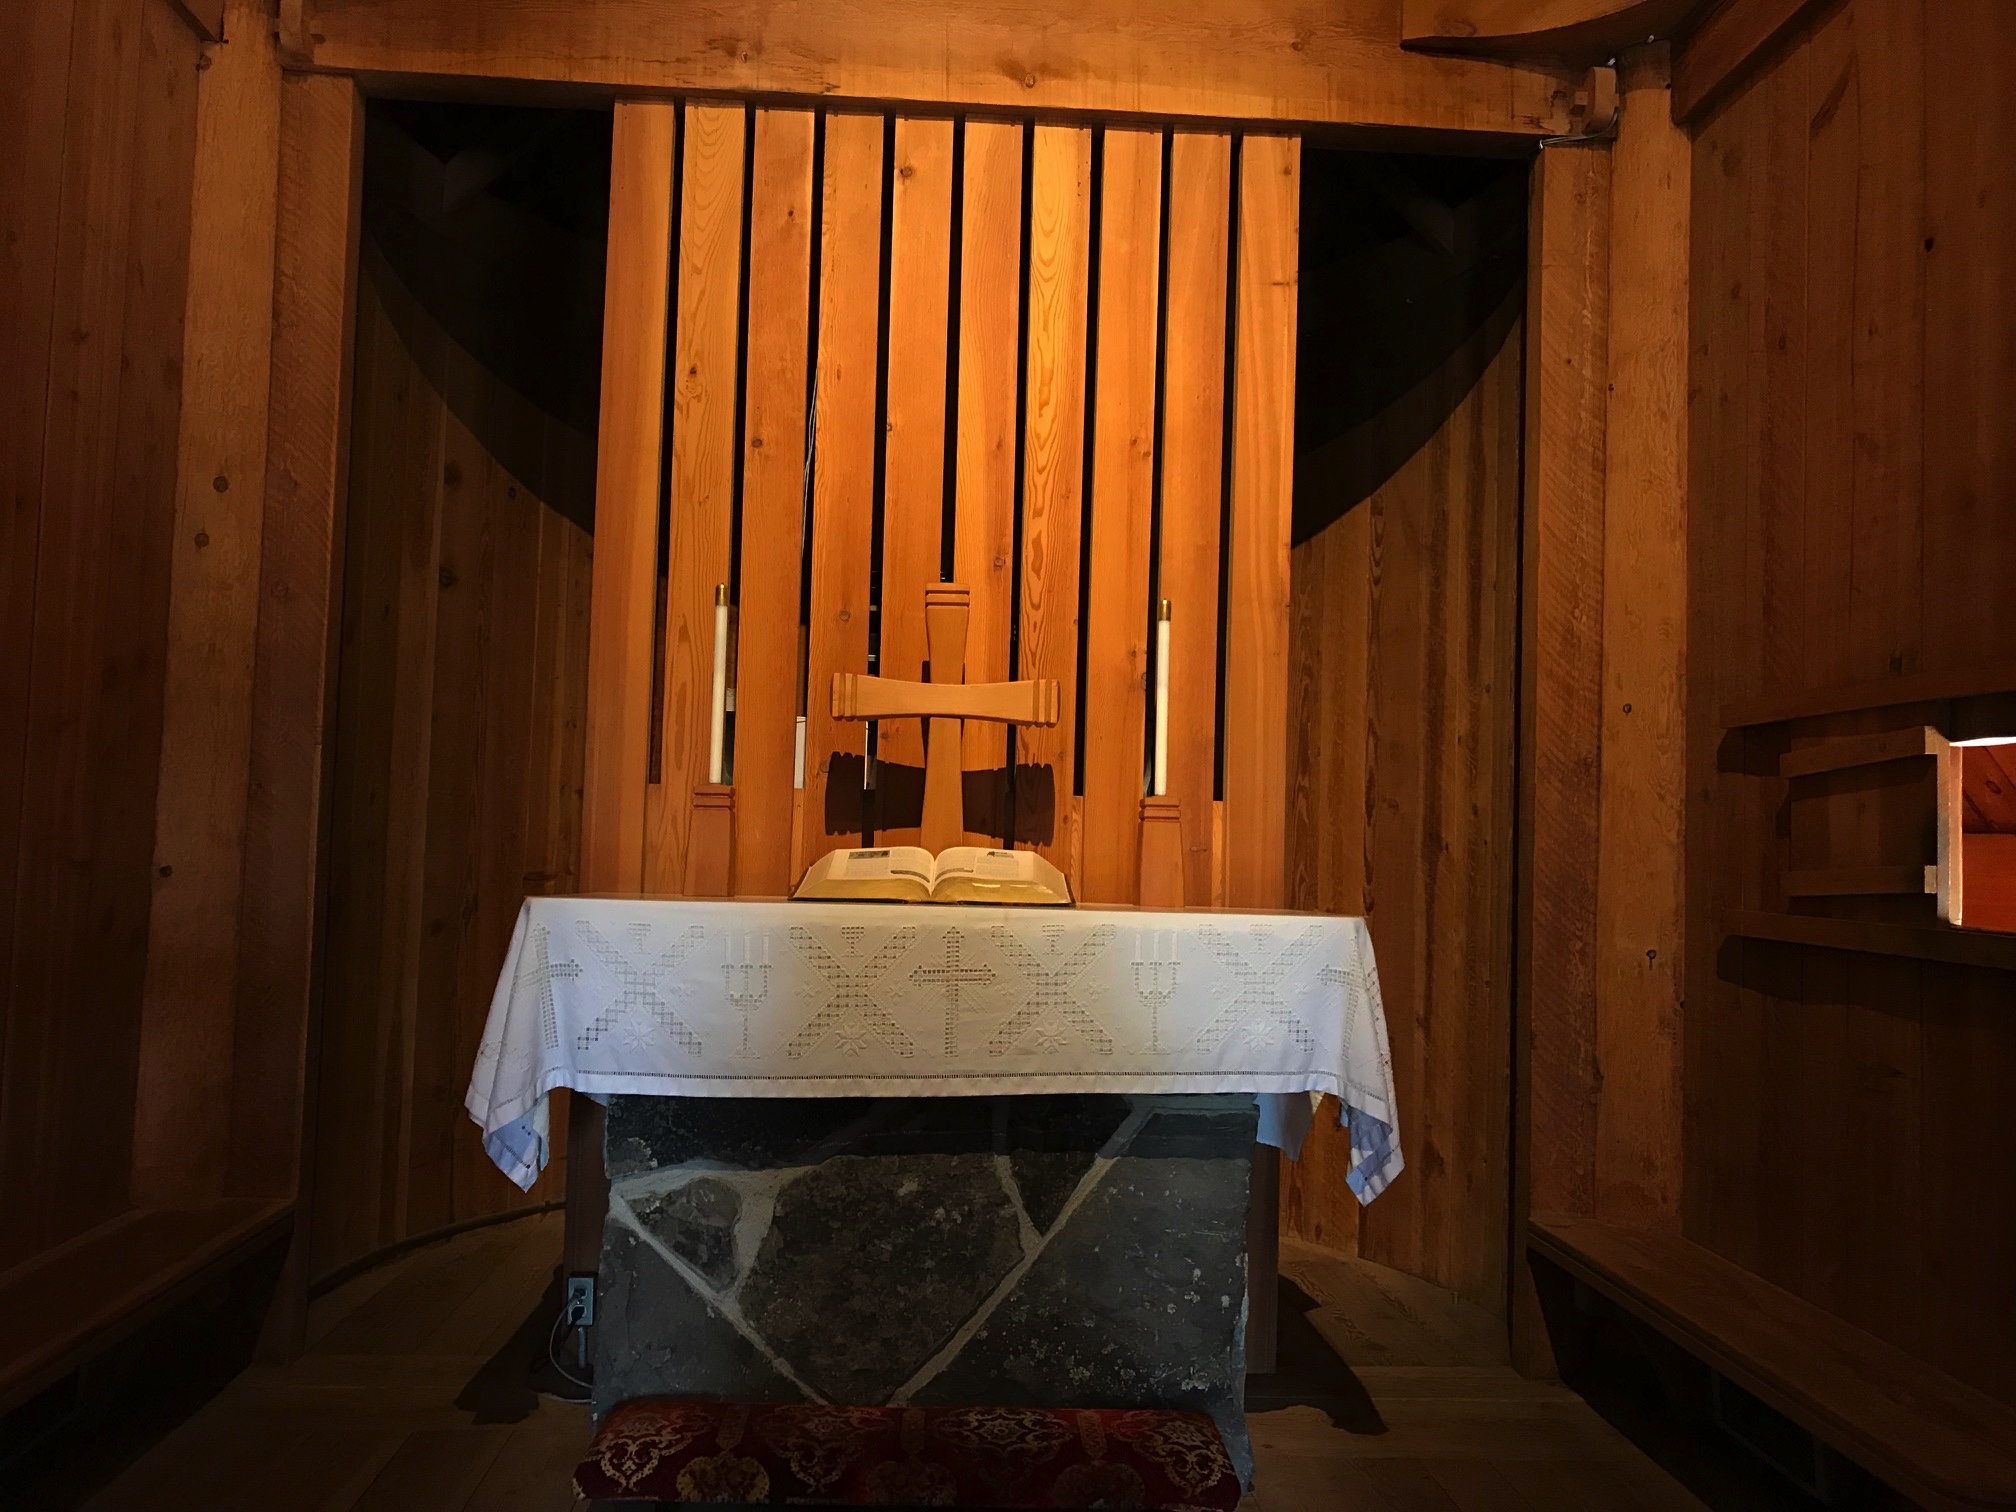
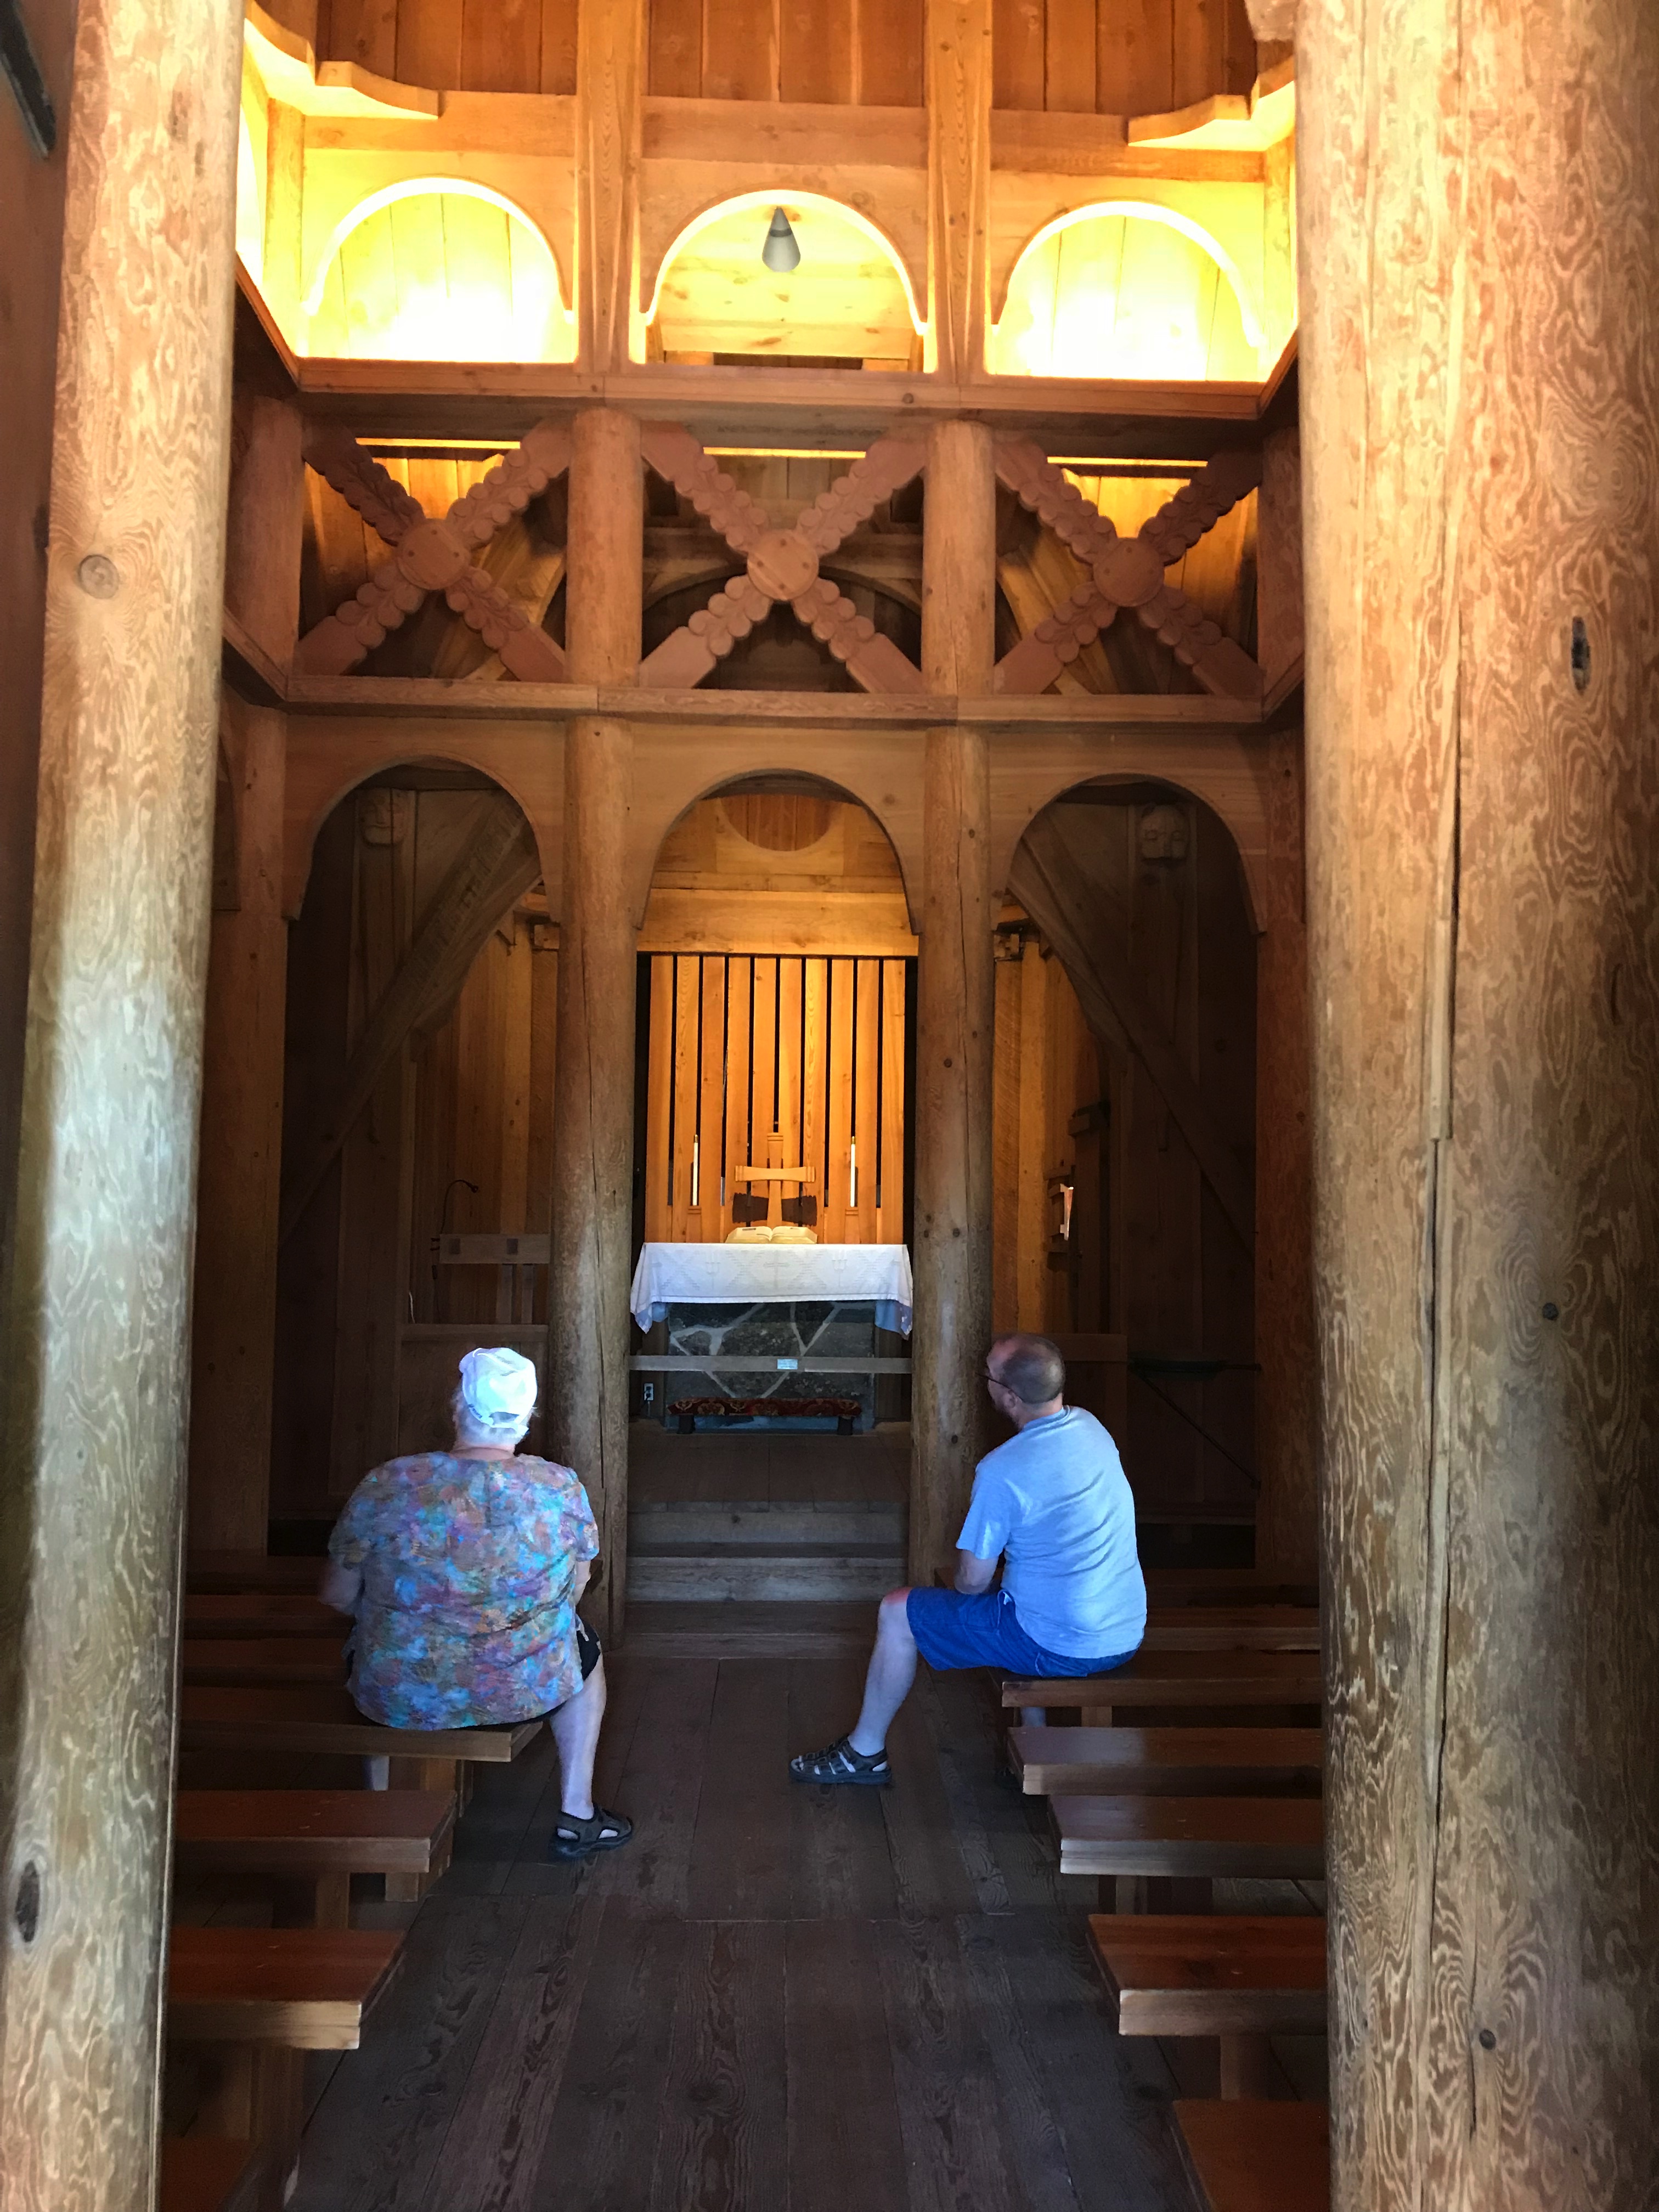
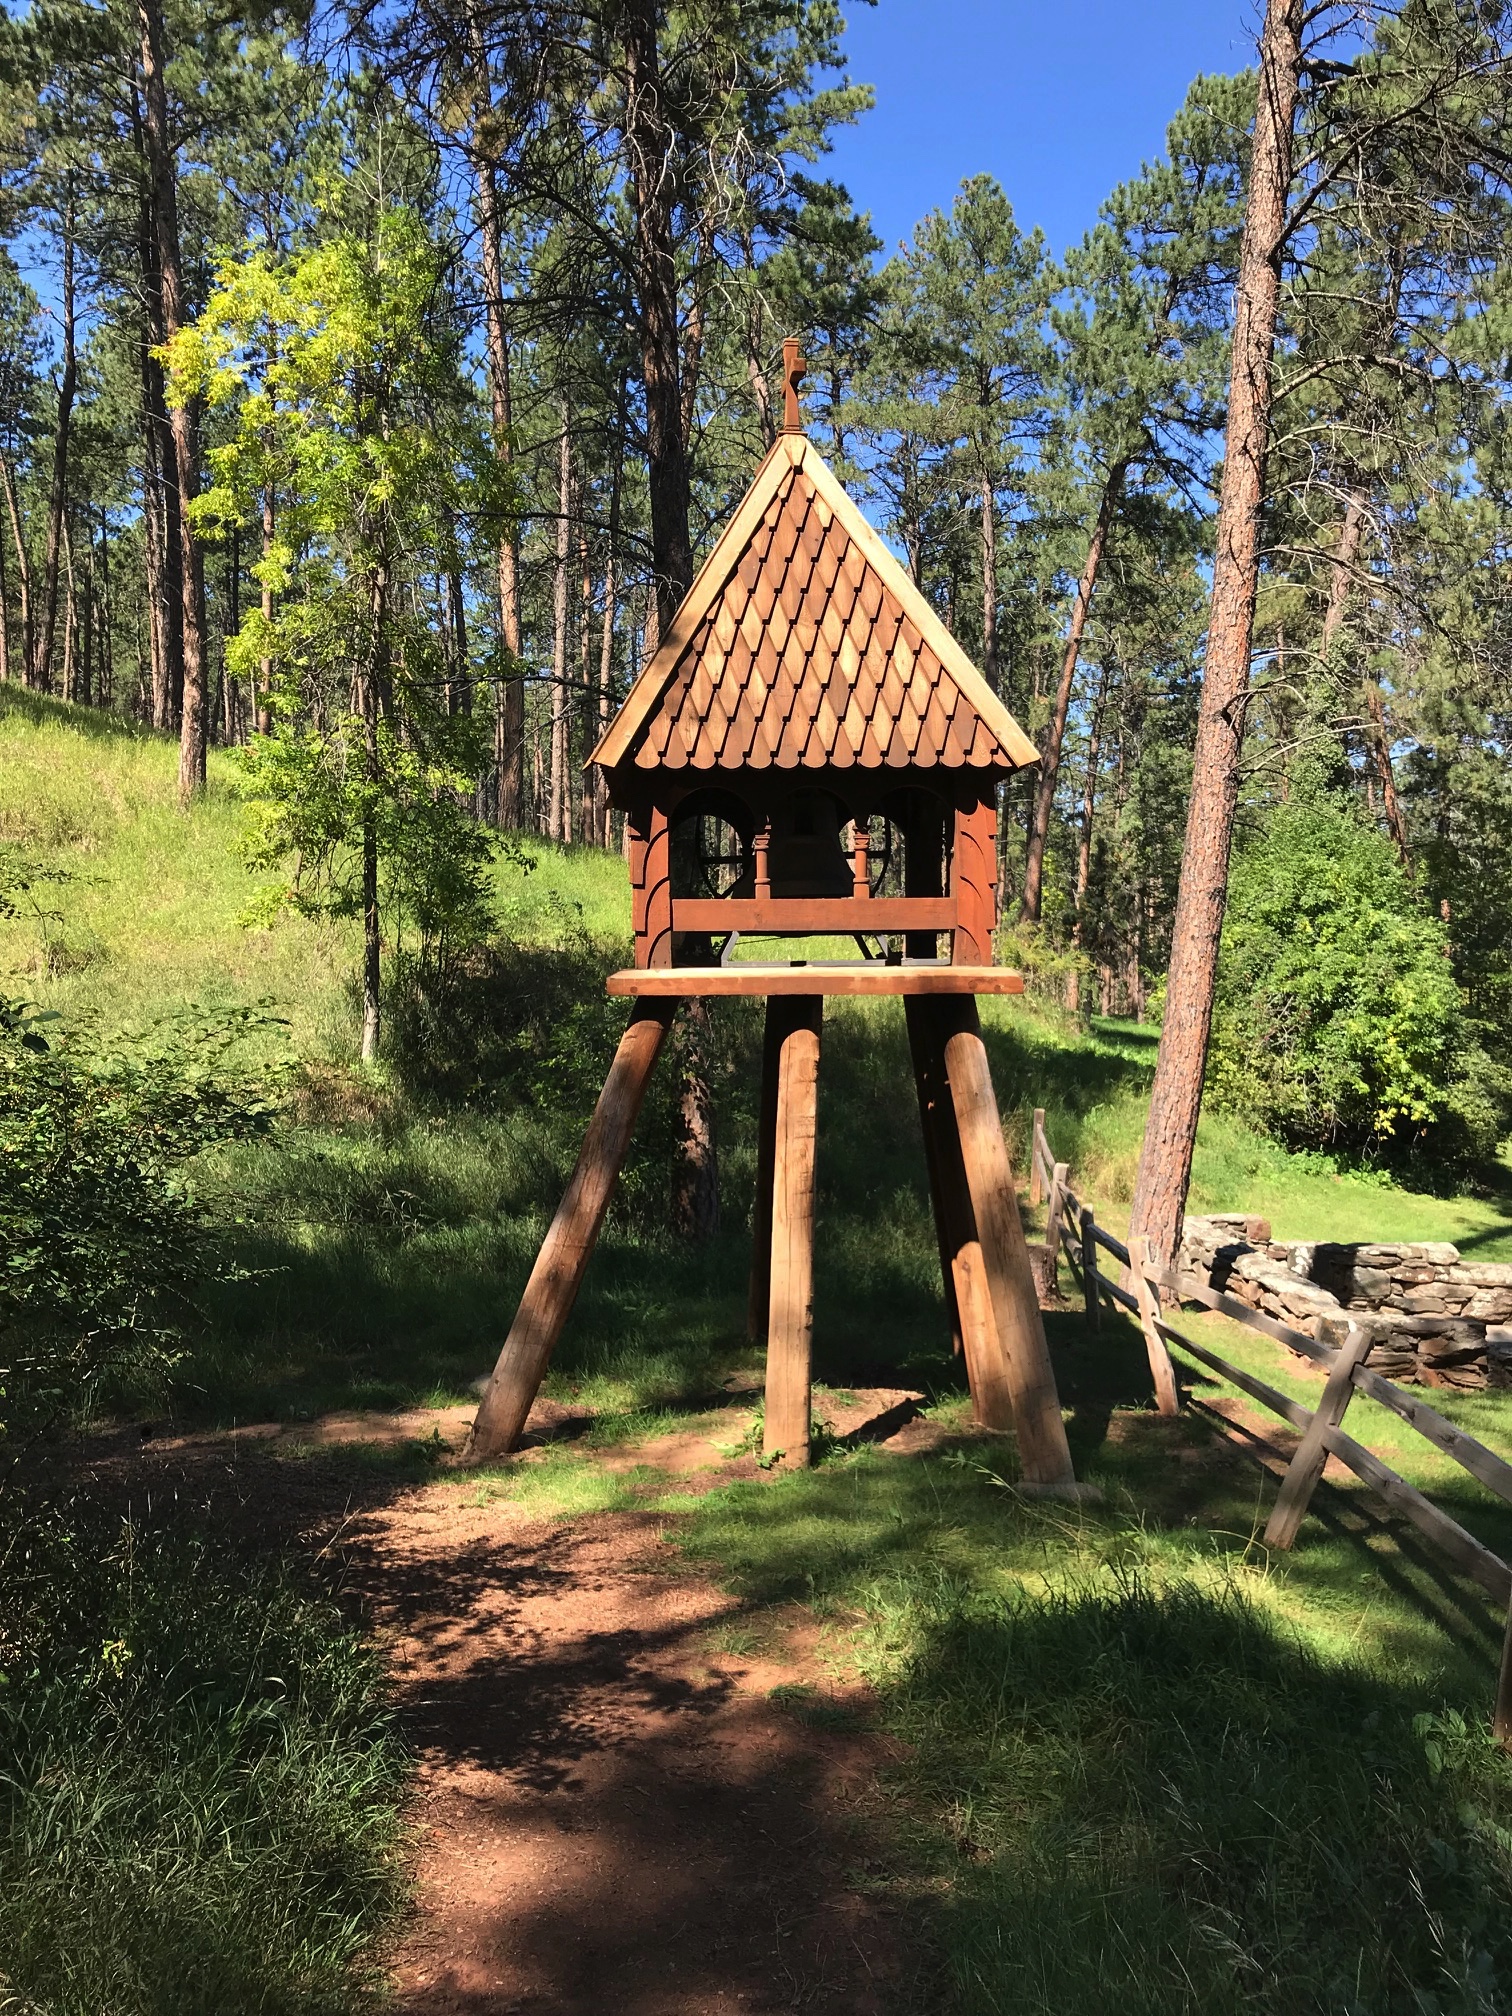
The Chapel’s commanding front doorIntricate carvings on one of the Chapel’s pillarsThe Chapel altarMy parents, appreciating the interior of the ChapelA bell tower
If you’re looking for a unique, family activity, close to Rapid City, check this location out, I know I’ll be returning!
Have you ever visited the Chapel in the Hills? What did you think? Tell me about it in the comments!
Did you enjoy this post? Pin it!
Like what you read here today? Please feel free to leave a comment, like or share this post! Add your email at the bottom of the page, or the sidebar to the right, to be notified when a new post is published. By signing up for the email list, you will also receive a free copy of the Tranquil Trekker’s Top 10 Tips of Trekking Do’s and Don’ts!
You can also follow the blog on social media by clicking the links below!
I review several ghost towns we toured around the Colorado High Country as well as our drive up Independence Pass.
The Trekkers LOVE visiting ghost towns! We try to include them whenever possible on our trips. During our 2018 road trip, we got to check out several awesome ghost towns in Colorado.
Ghost towns give you a true, visual understanding of how people lived “back in the day”. I’m a very visual person so this helps me fully appreciate what the lives of the inhabitants of these towns must have been like. I prefer the towns that are restored, with at least several buildings remaining that you can view. Sometimes, however, the places that are comprised mostly of ruins allow you to use your own imagination of how they must have appeared in their heyday.
Click here for a list of ALL the ghost towns the Trekker’s have visited around the country!
Below is a list of seven ghost towns we visited in central and western Colorado…
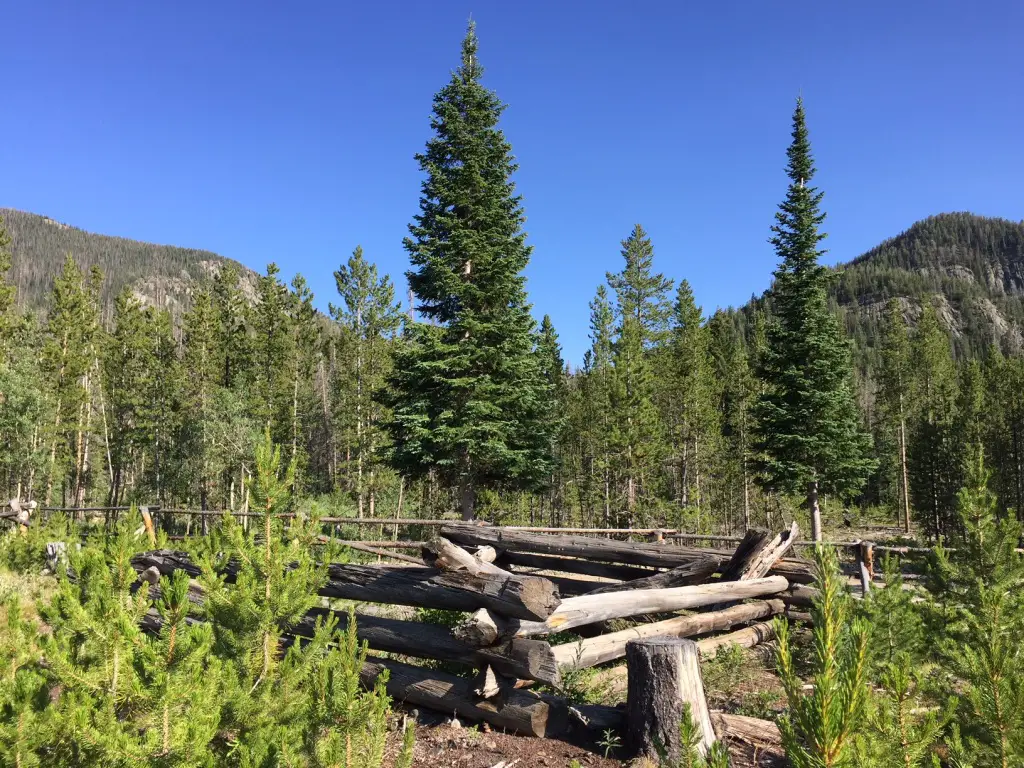
Teller City Ghost Town:
This was the first ghost town we visited and the one that required the most effort to access. The townsite is near State Forest State Park, in far northern Colorado, around nine miles south of Gould, on Route 740 (Baker Pass Road). You reach it by driving on a, somewhat rough, 4WD shelf road. (TheGuide to Colorado Backroads† book that I mentioned in a previous post, rates this road as “easy”. I would rate it as “moderate”. A high clearance, 4WD vehicle should be all you’d need to access this site in good conditions).
We didn’t actually complete the 4×4 road all the way to Baker Pass, though we spoke with a local who said it was worth the drive. Alas, daylight was waning (and the mosquitoes were starting to bite!) 😝
The way was fairly well-marked and obvious, but be watchful. The road branched off several times and the correct route was only marked with orange, snowmobile trail markers (this is a snowmachine trail in the winter months).
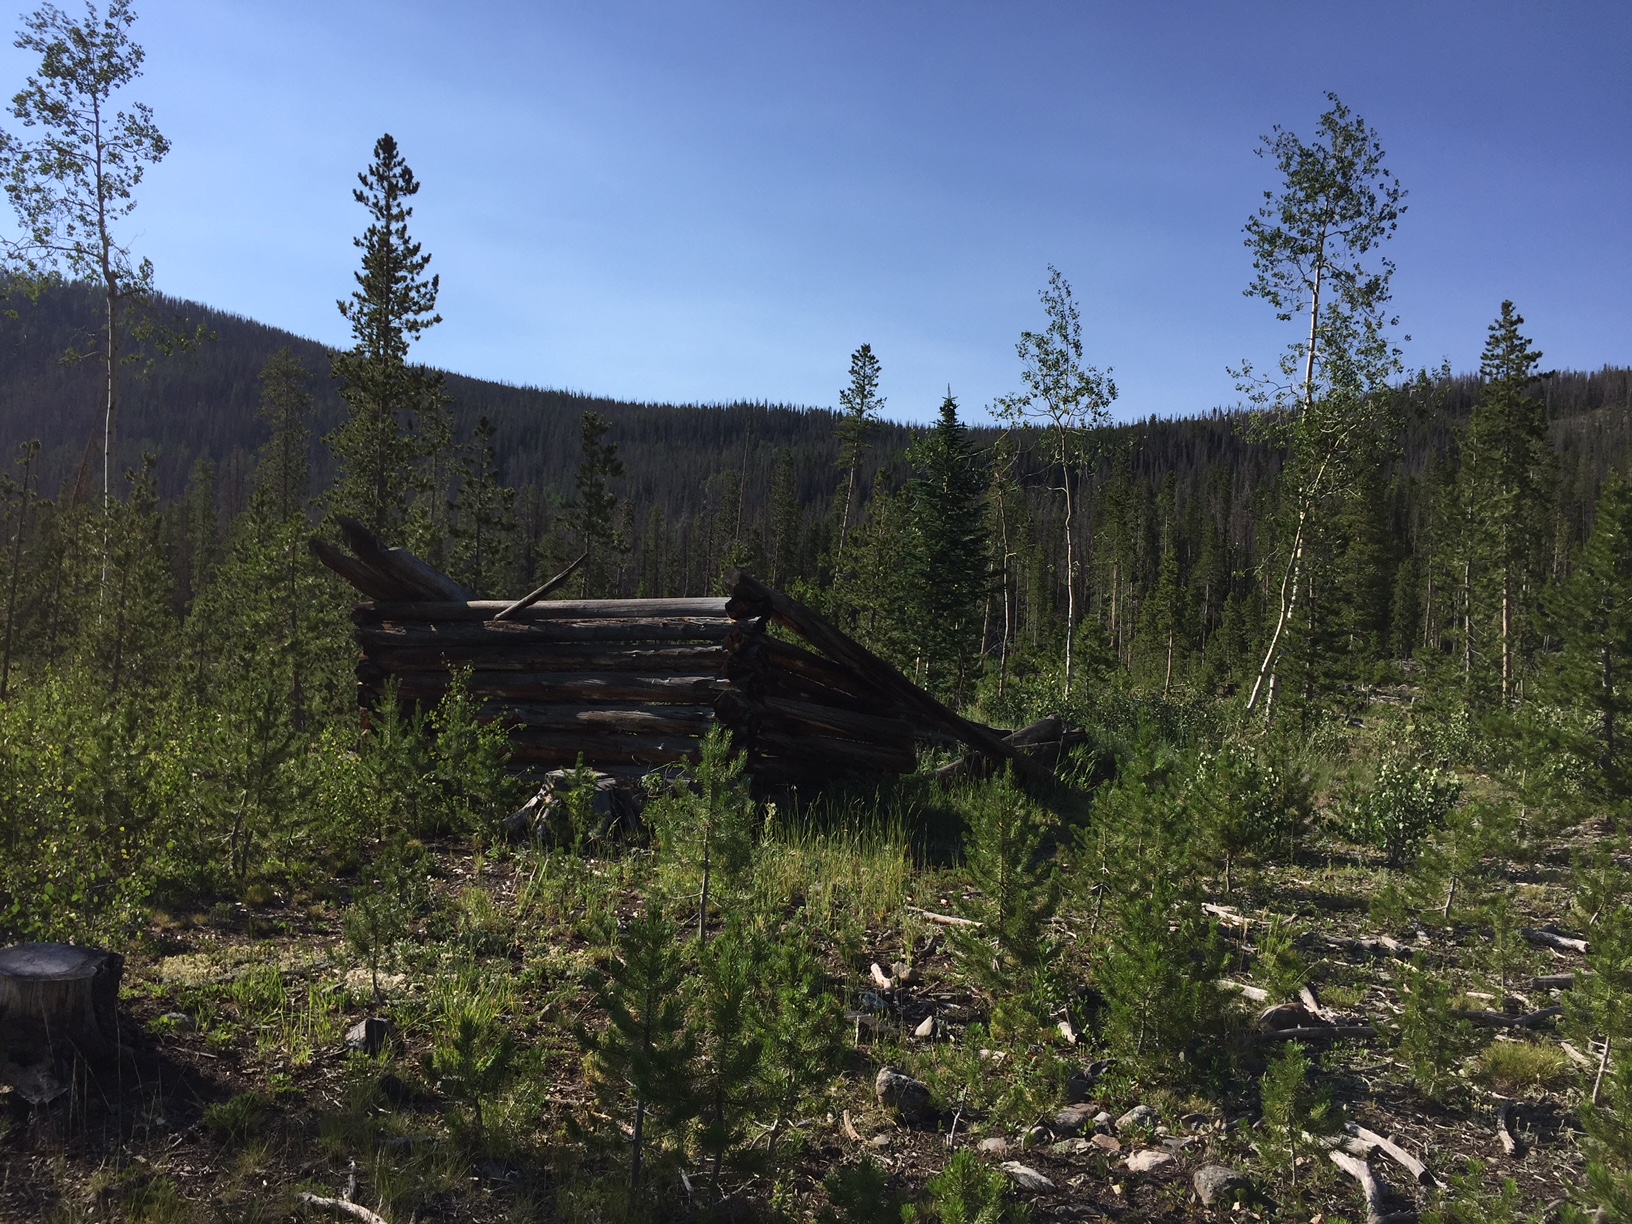
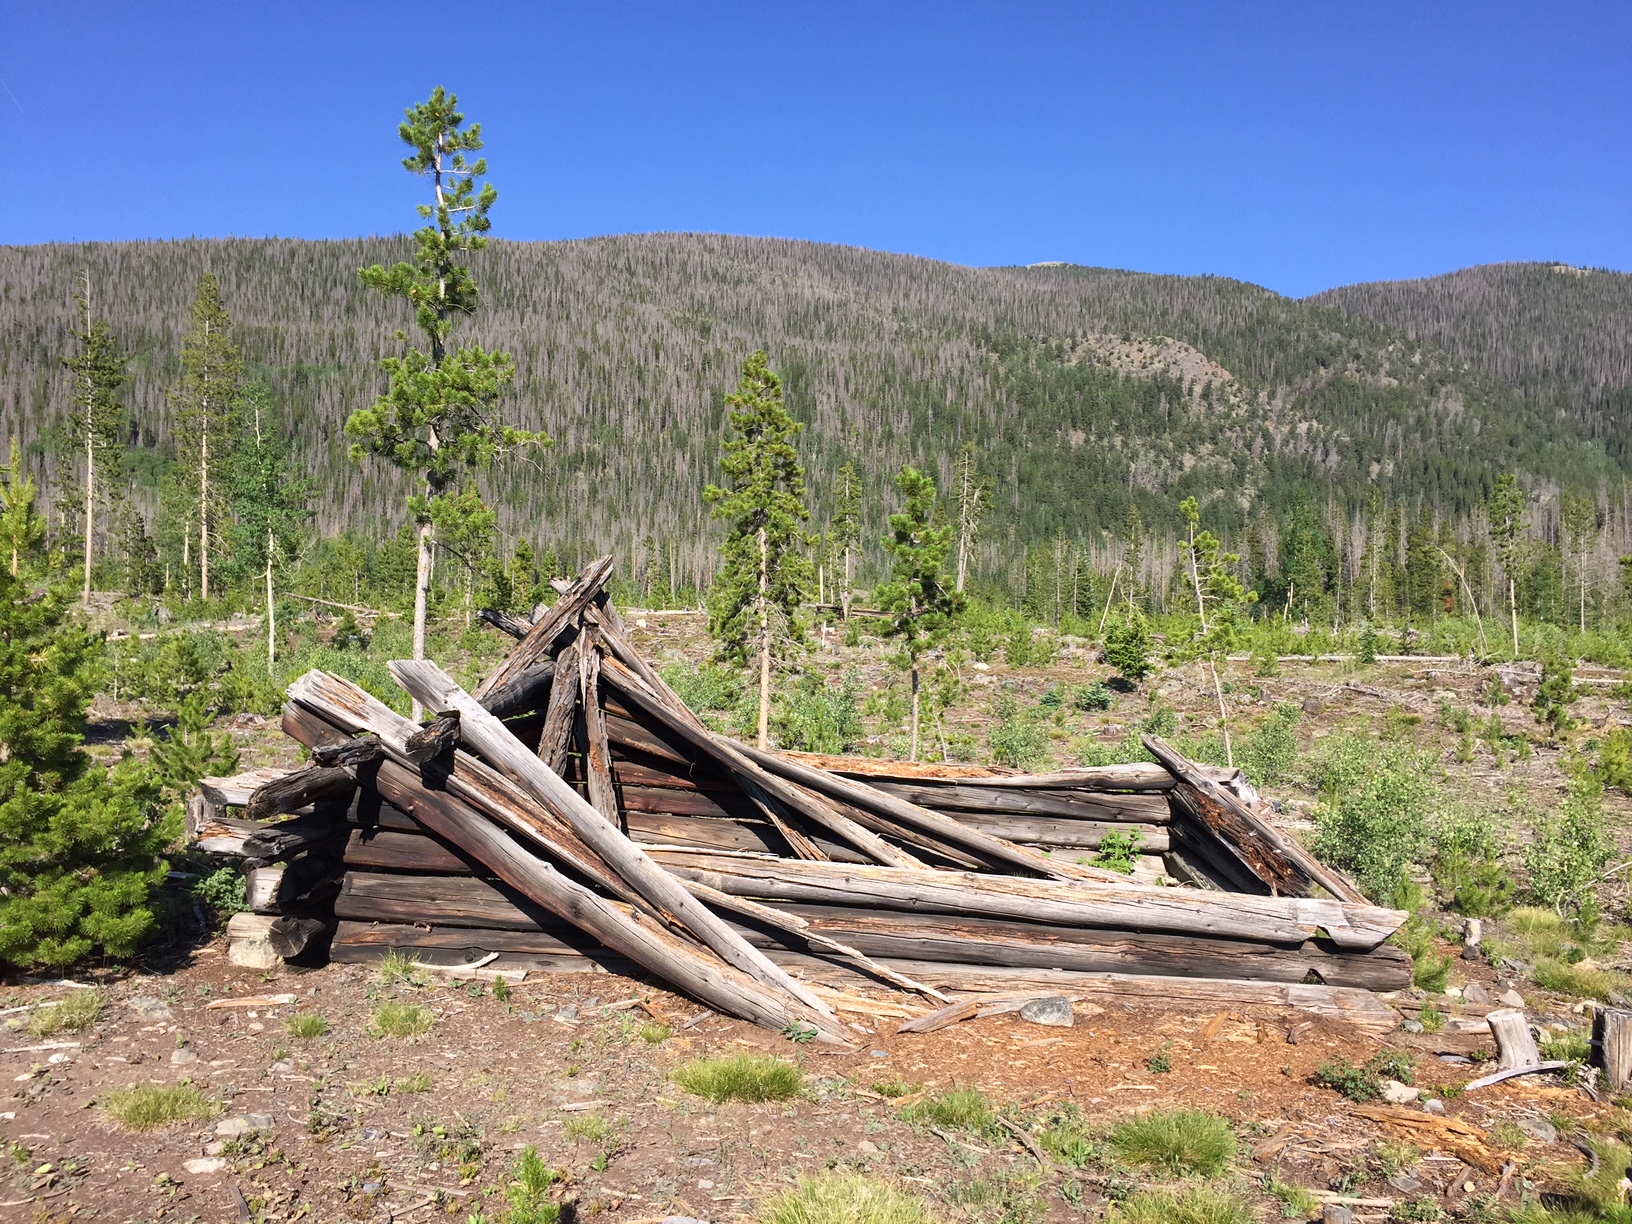
One plus with this site is that there’s a designated parking area and then you hike a Nature Trail loop to view the remains of the town. Not much is left, but you could almost hear the voices of the patrons visiting the busy shops, and smell the dust kicked up by the wagons as they rolled along–what used to be–a bustling Main Street.
At various places along the trail, markers describe the history of that home or business. At one of the stops, the words of a young girl who came into town one winter night, via the pass, were noted. Her description of the twinkling town lights flickering through the evening shadows was incredible.
Below are a few more pics of the ruins at Teller City (as usual, thanks to Mr. Trekker for several of these):
An old well pit
Coalmont, Colorado:
After leaving State Forest State Park, we visited Coalmont on our way to the Flattop Wilderness area. Only the schoolhouse remains of this dusty hamlet, but from what we could see through the grime-spattered window, it appears to have been restored inside. It would have been neat to be able to view it in more detail!
The townsite is located off of Route 14, southwest of Walden, Colorado and can be reached via either Route 24 or Route 26 (they form a half-moon-shaped loop here). The site is directly off of Route 26.
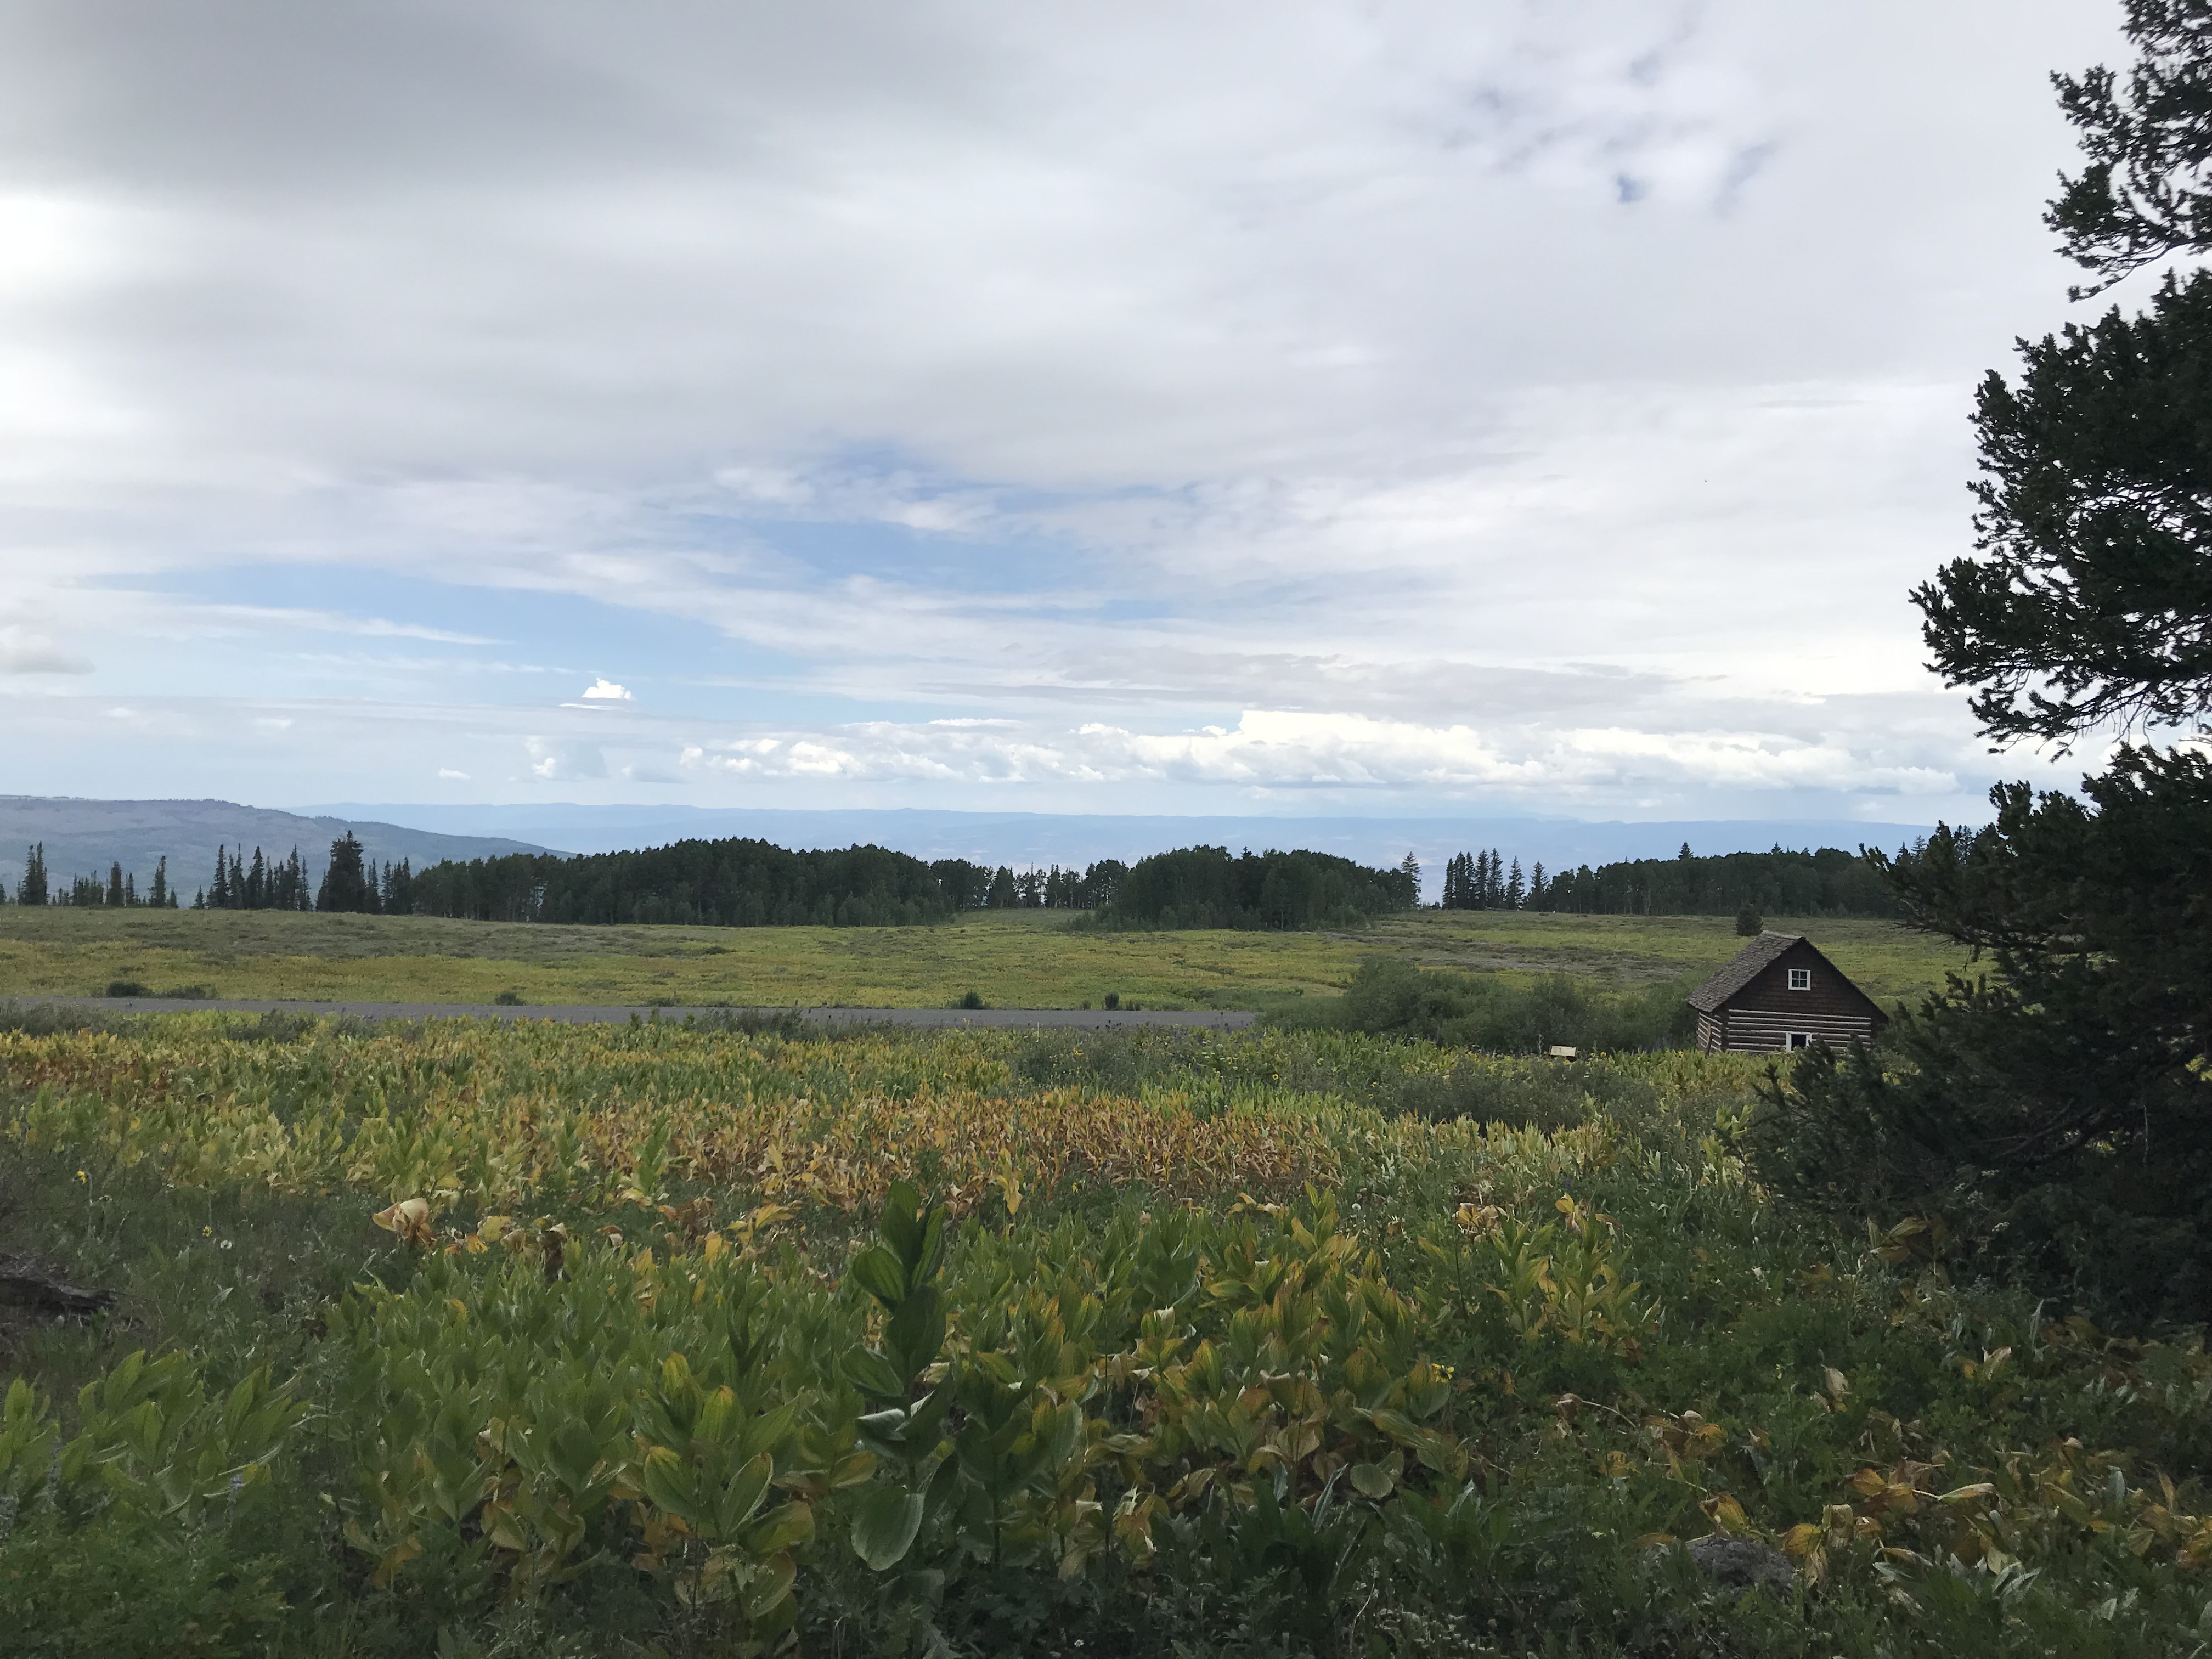
Remains of an old ranch at Grand Mesa National Forest:
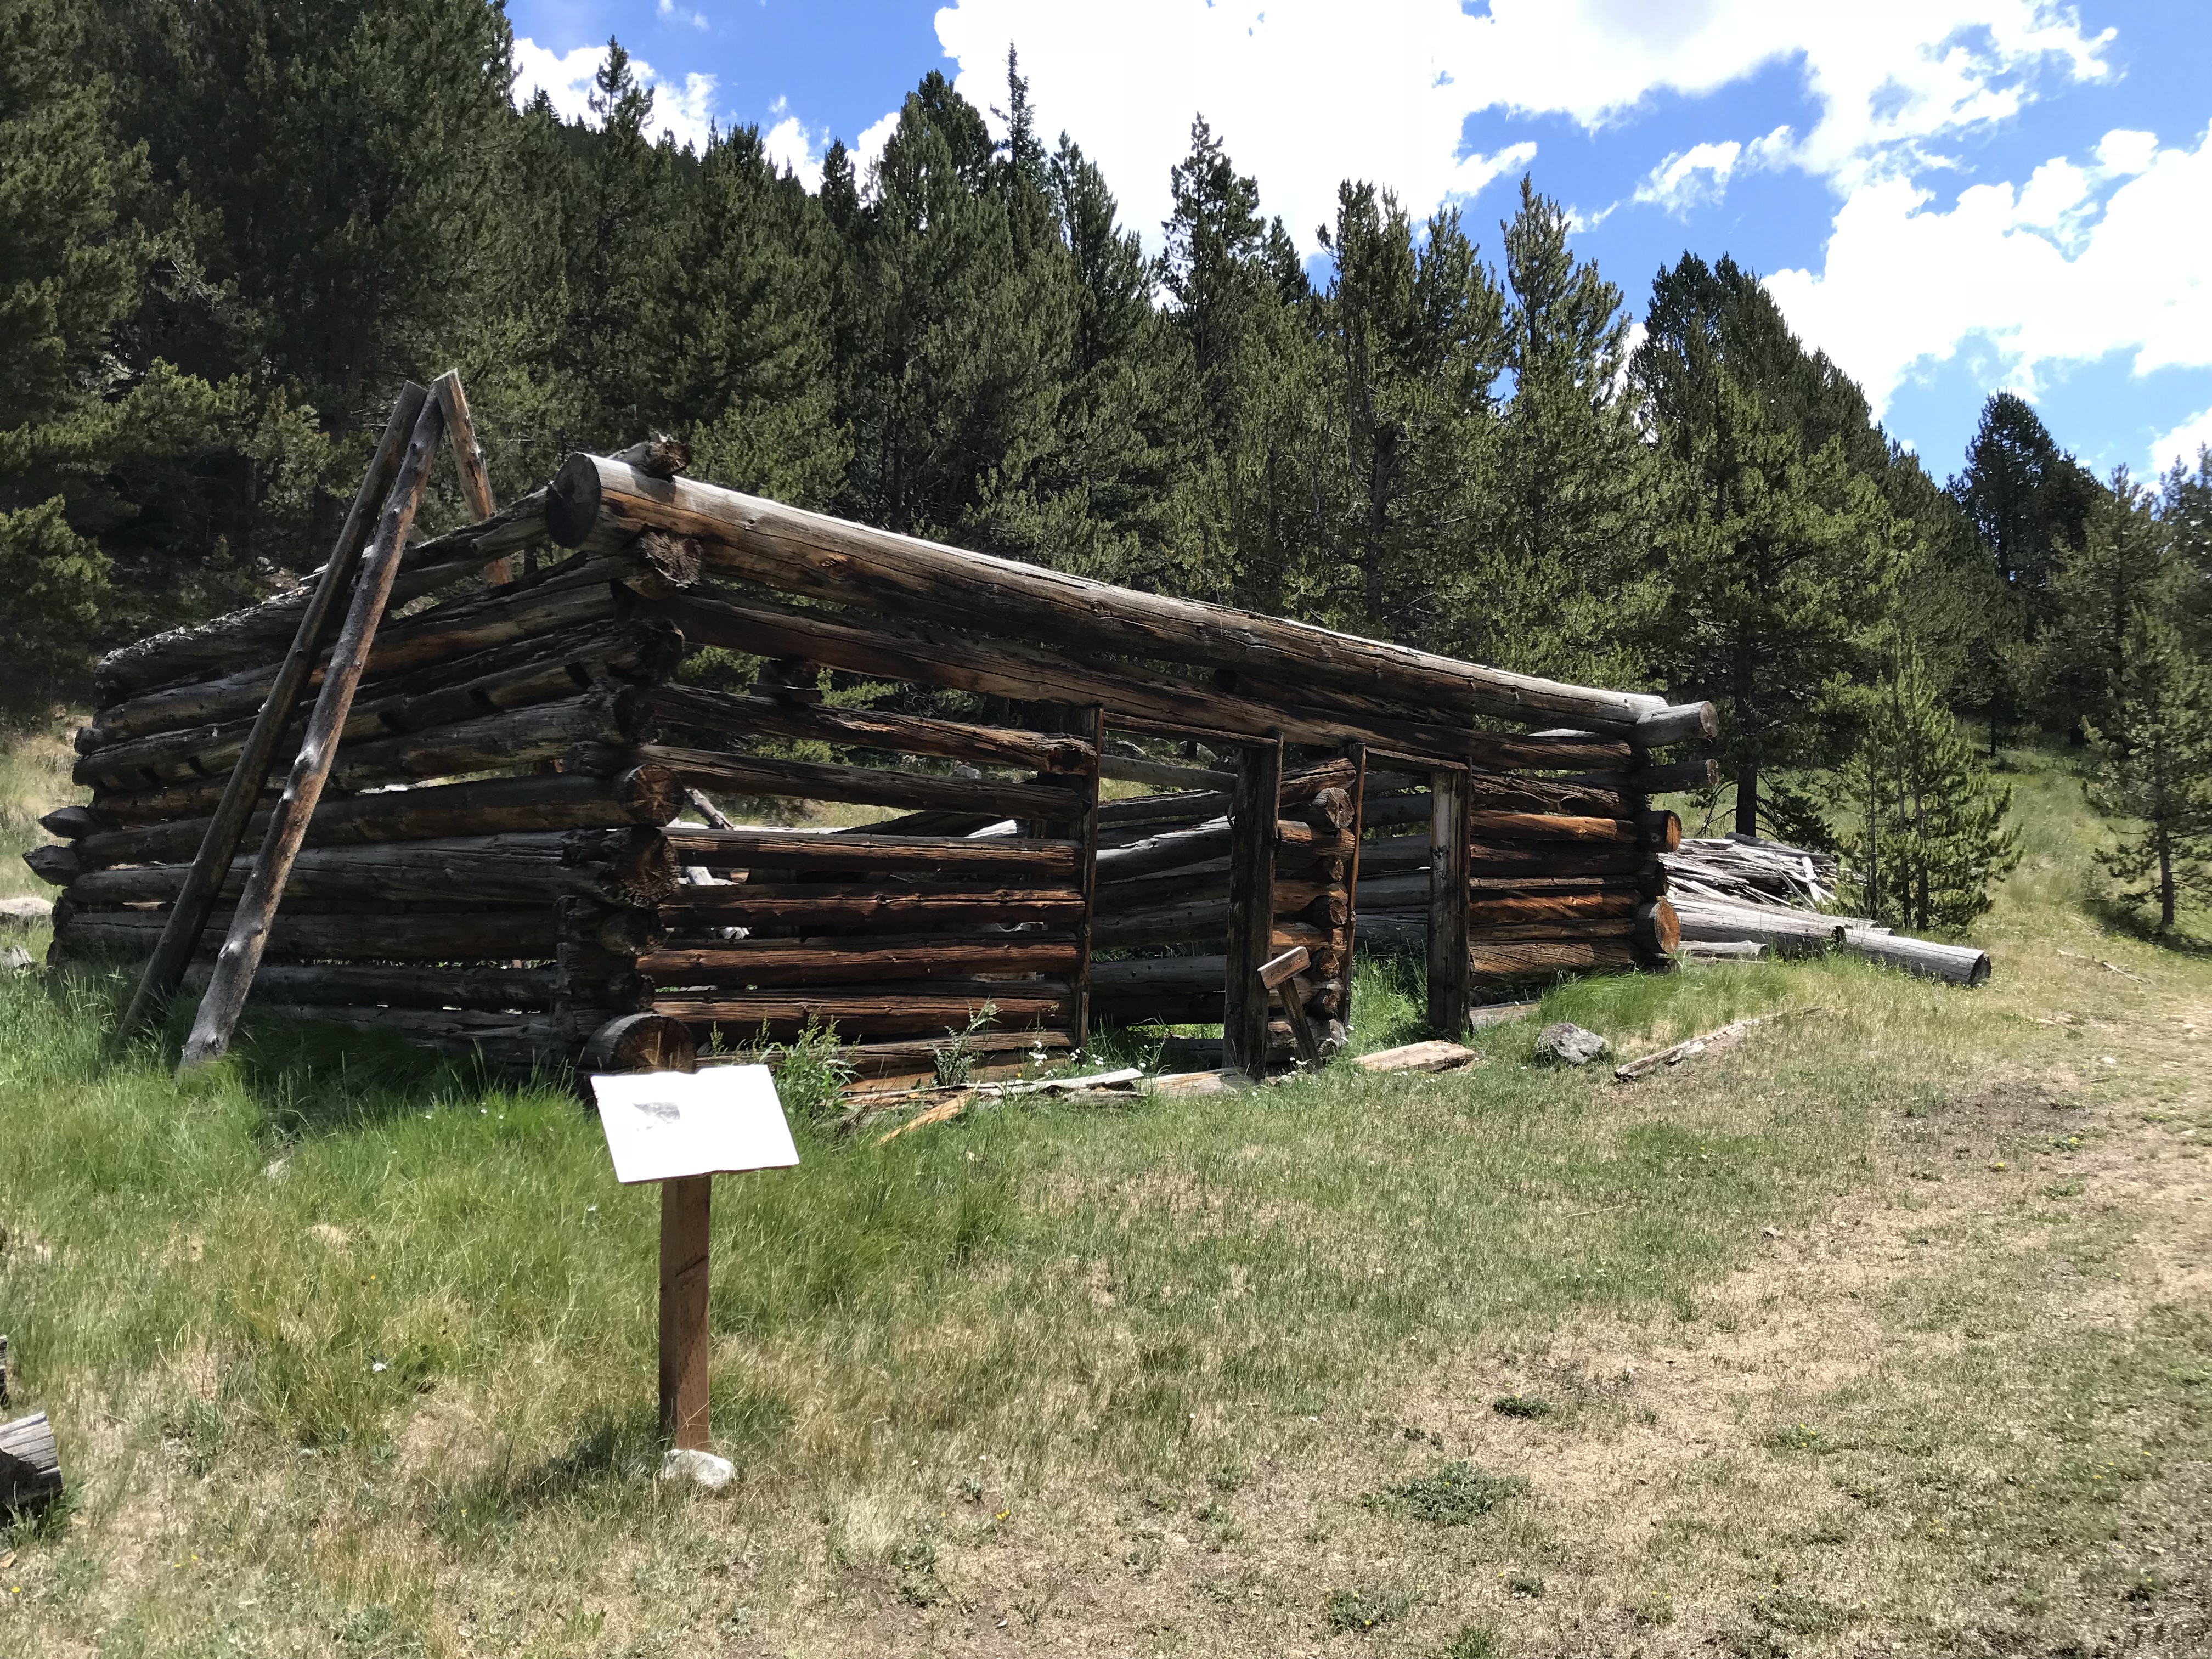
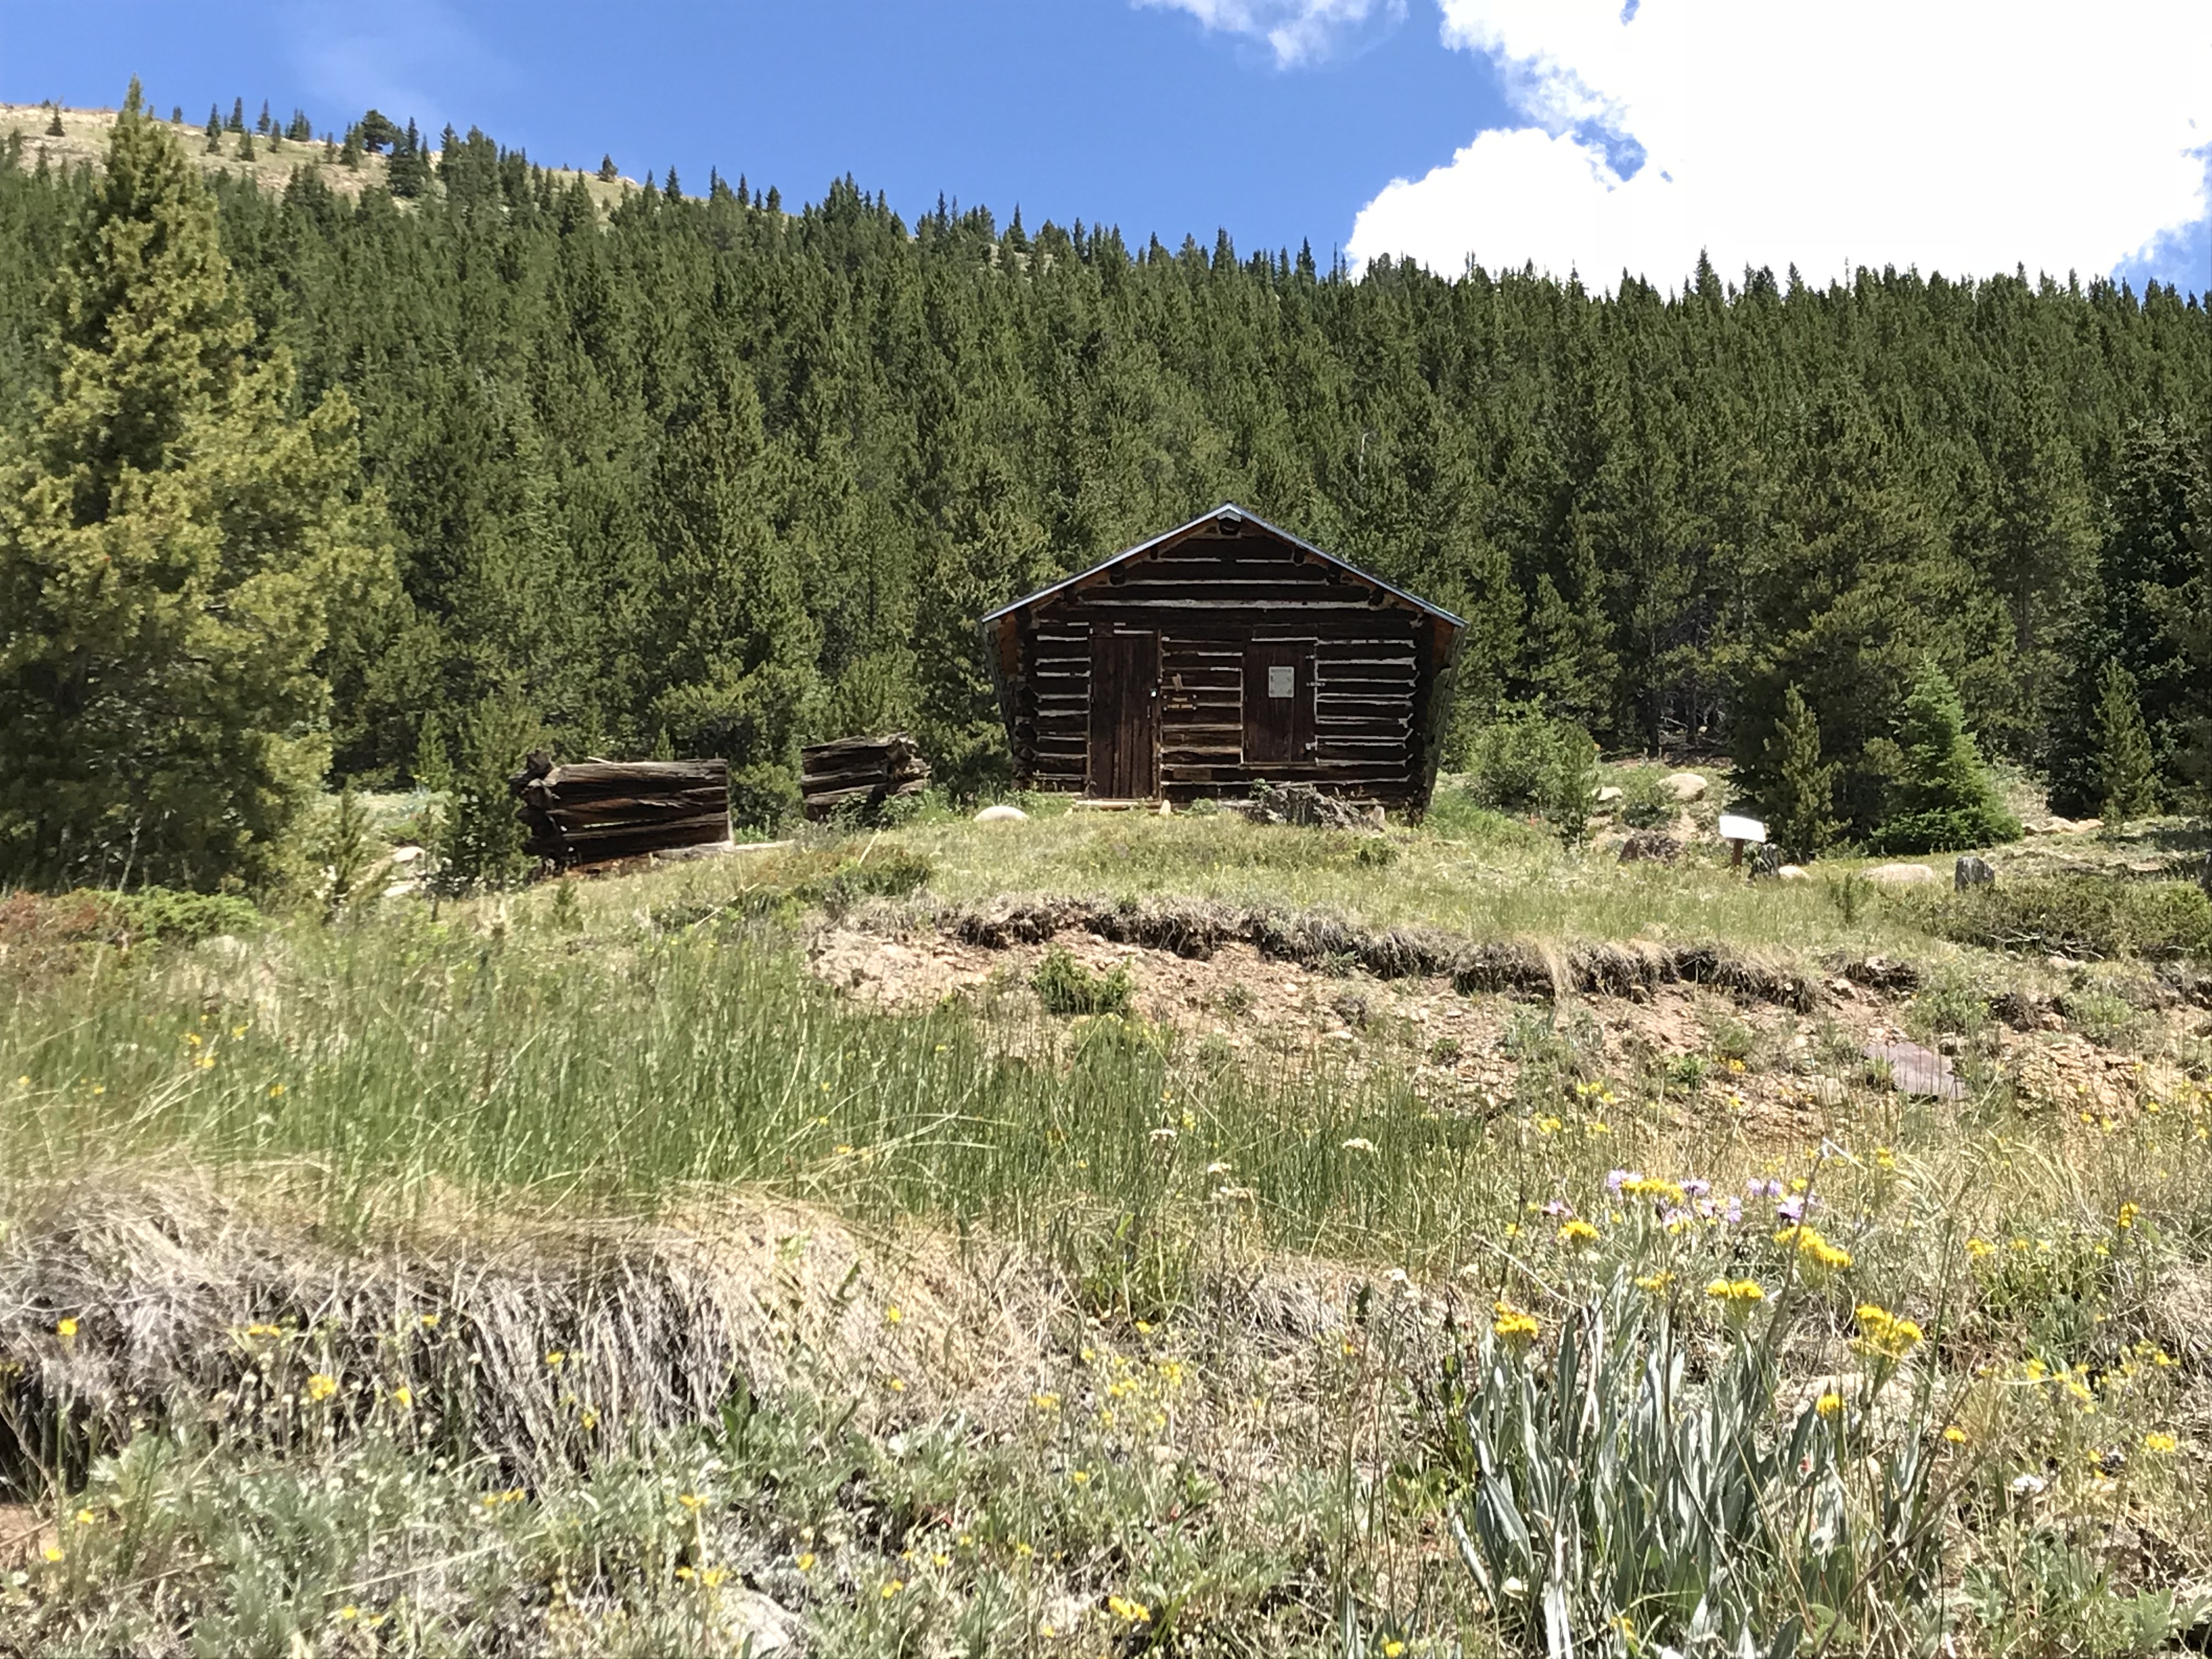
This site is located on top of the mesa, off the Land’s End Road. It is the remains of a ranch that operated in this area long ago. Several cabins, one of which you can walk inside, and an old livestock corral, have been restored. They can be viewed on a Nature Trail loop (it is part of a cross-country ski trail in the snowy months).
The old corral
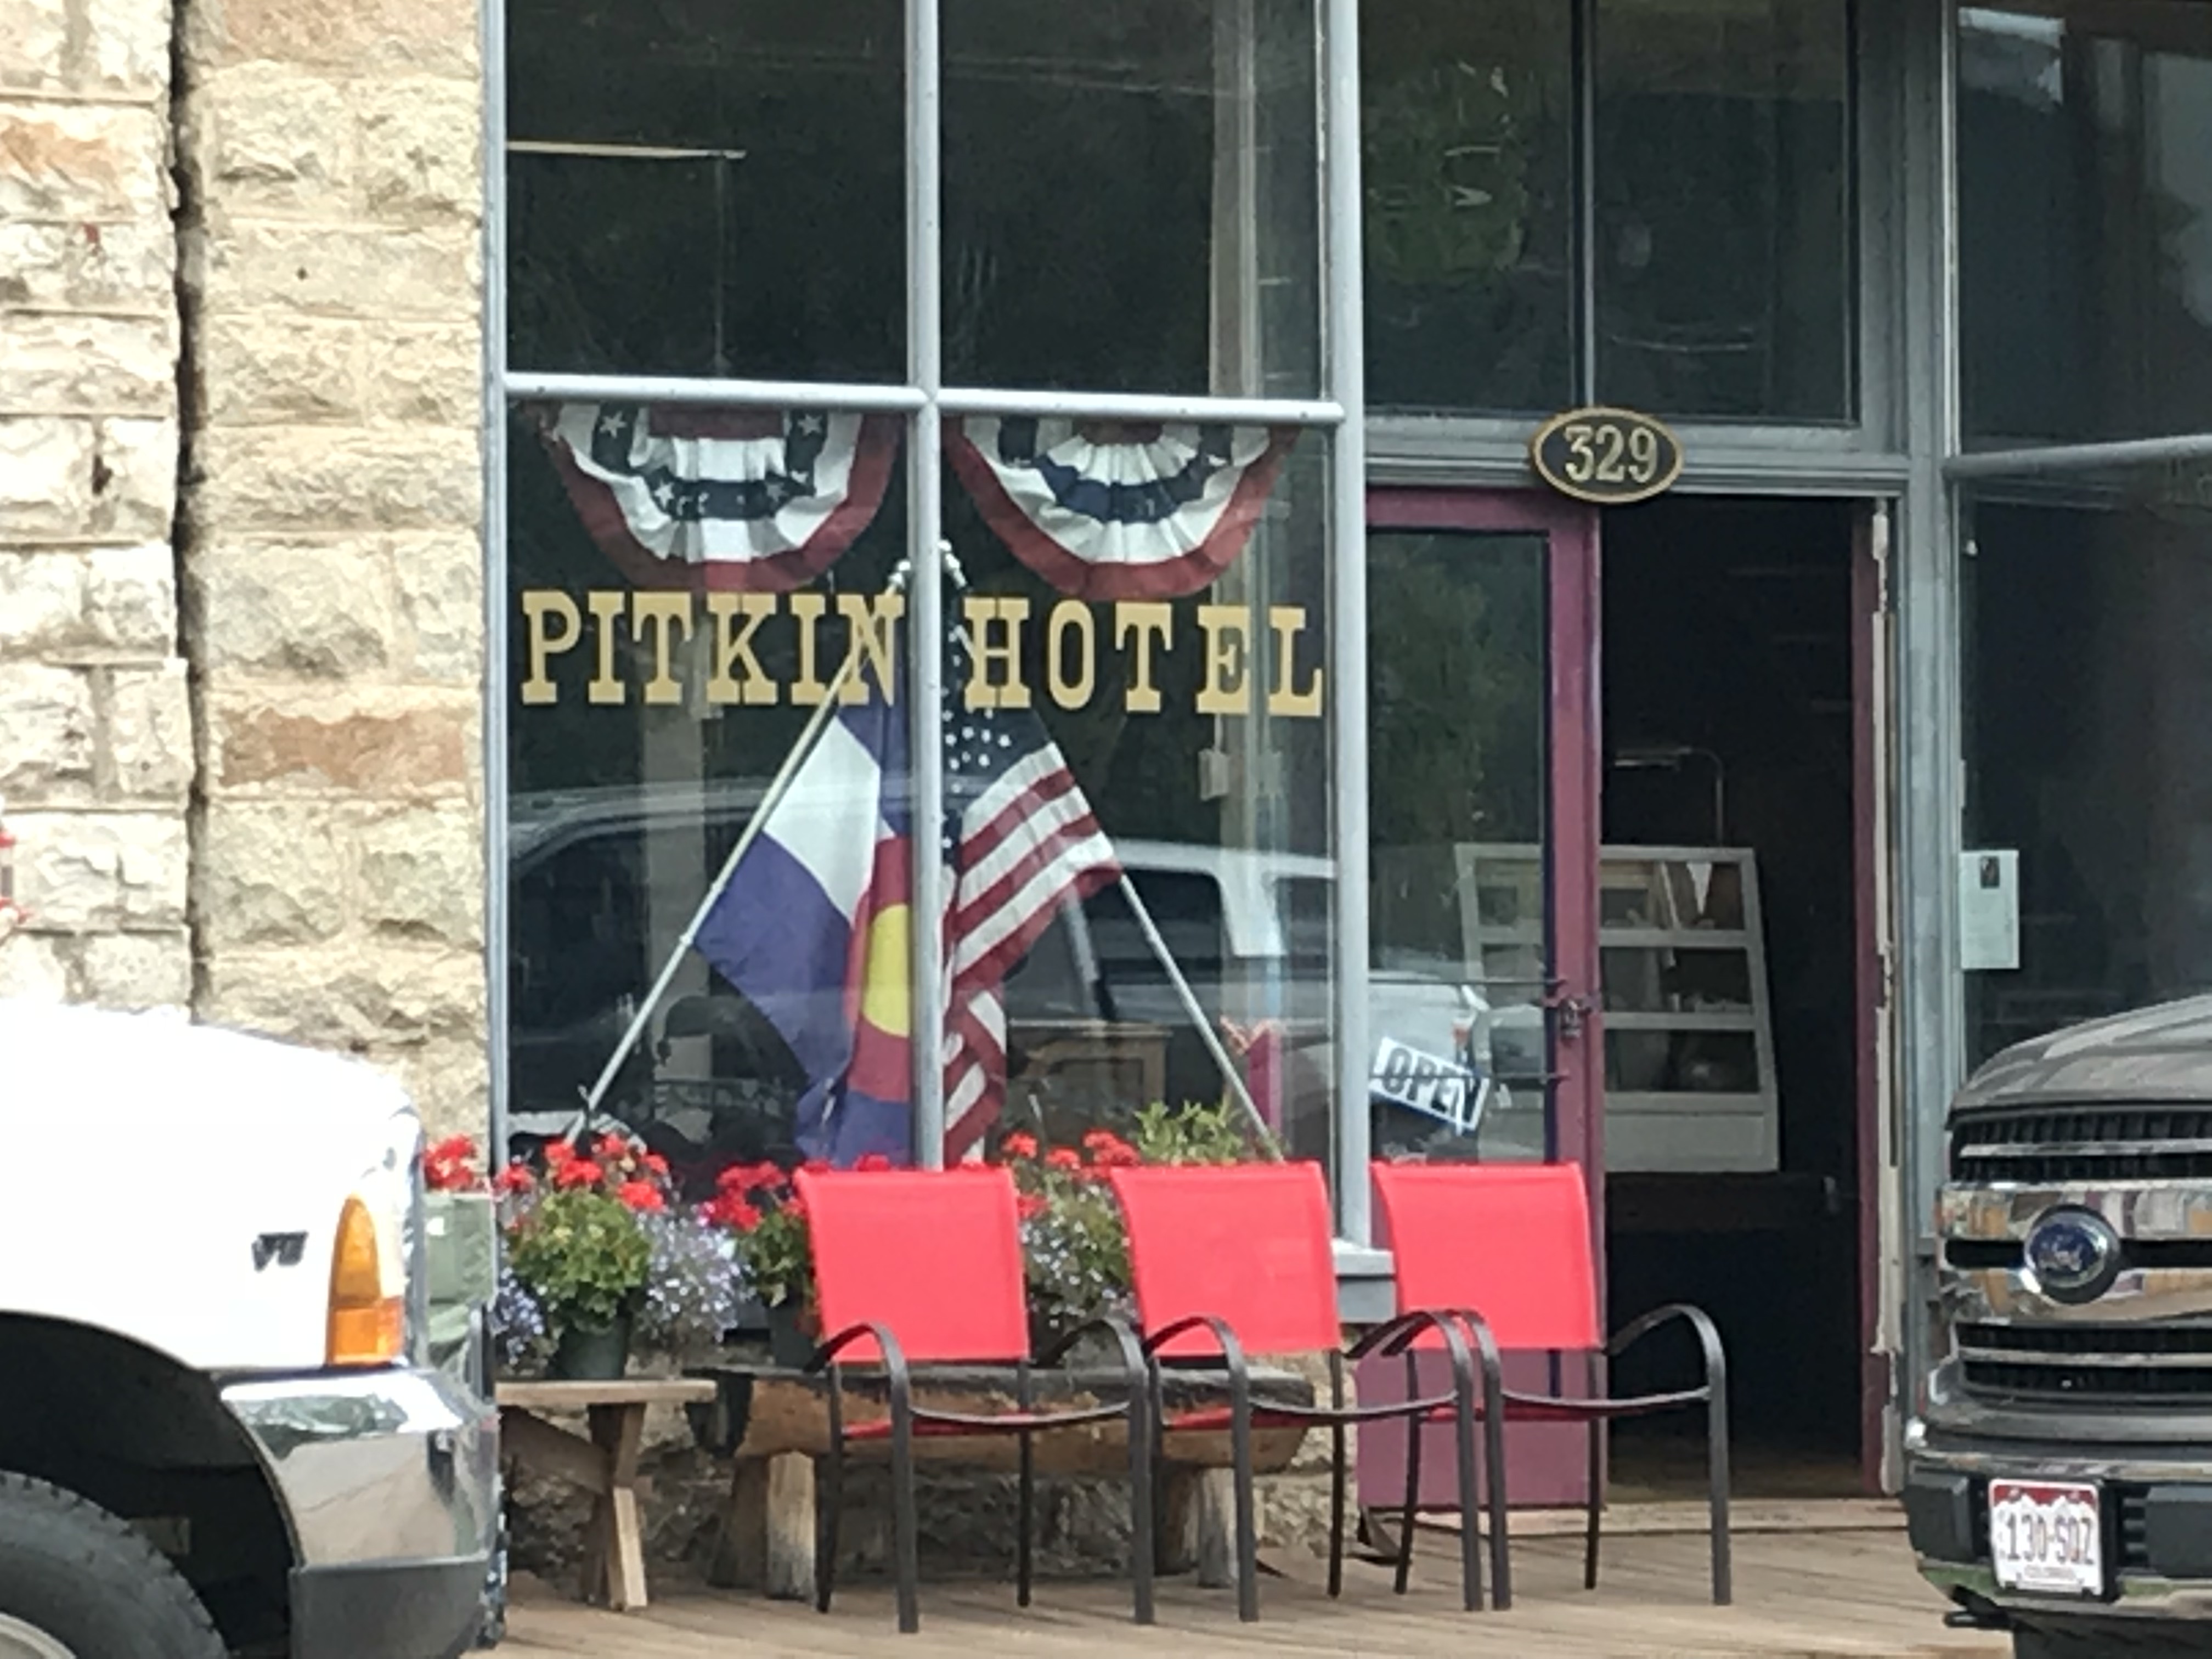
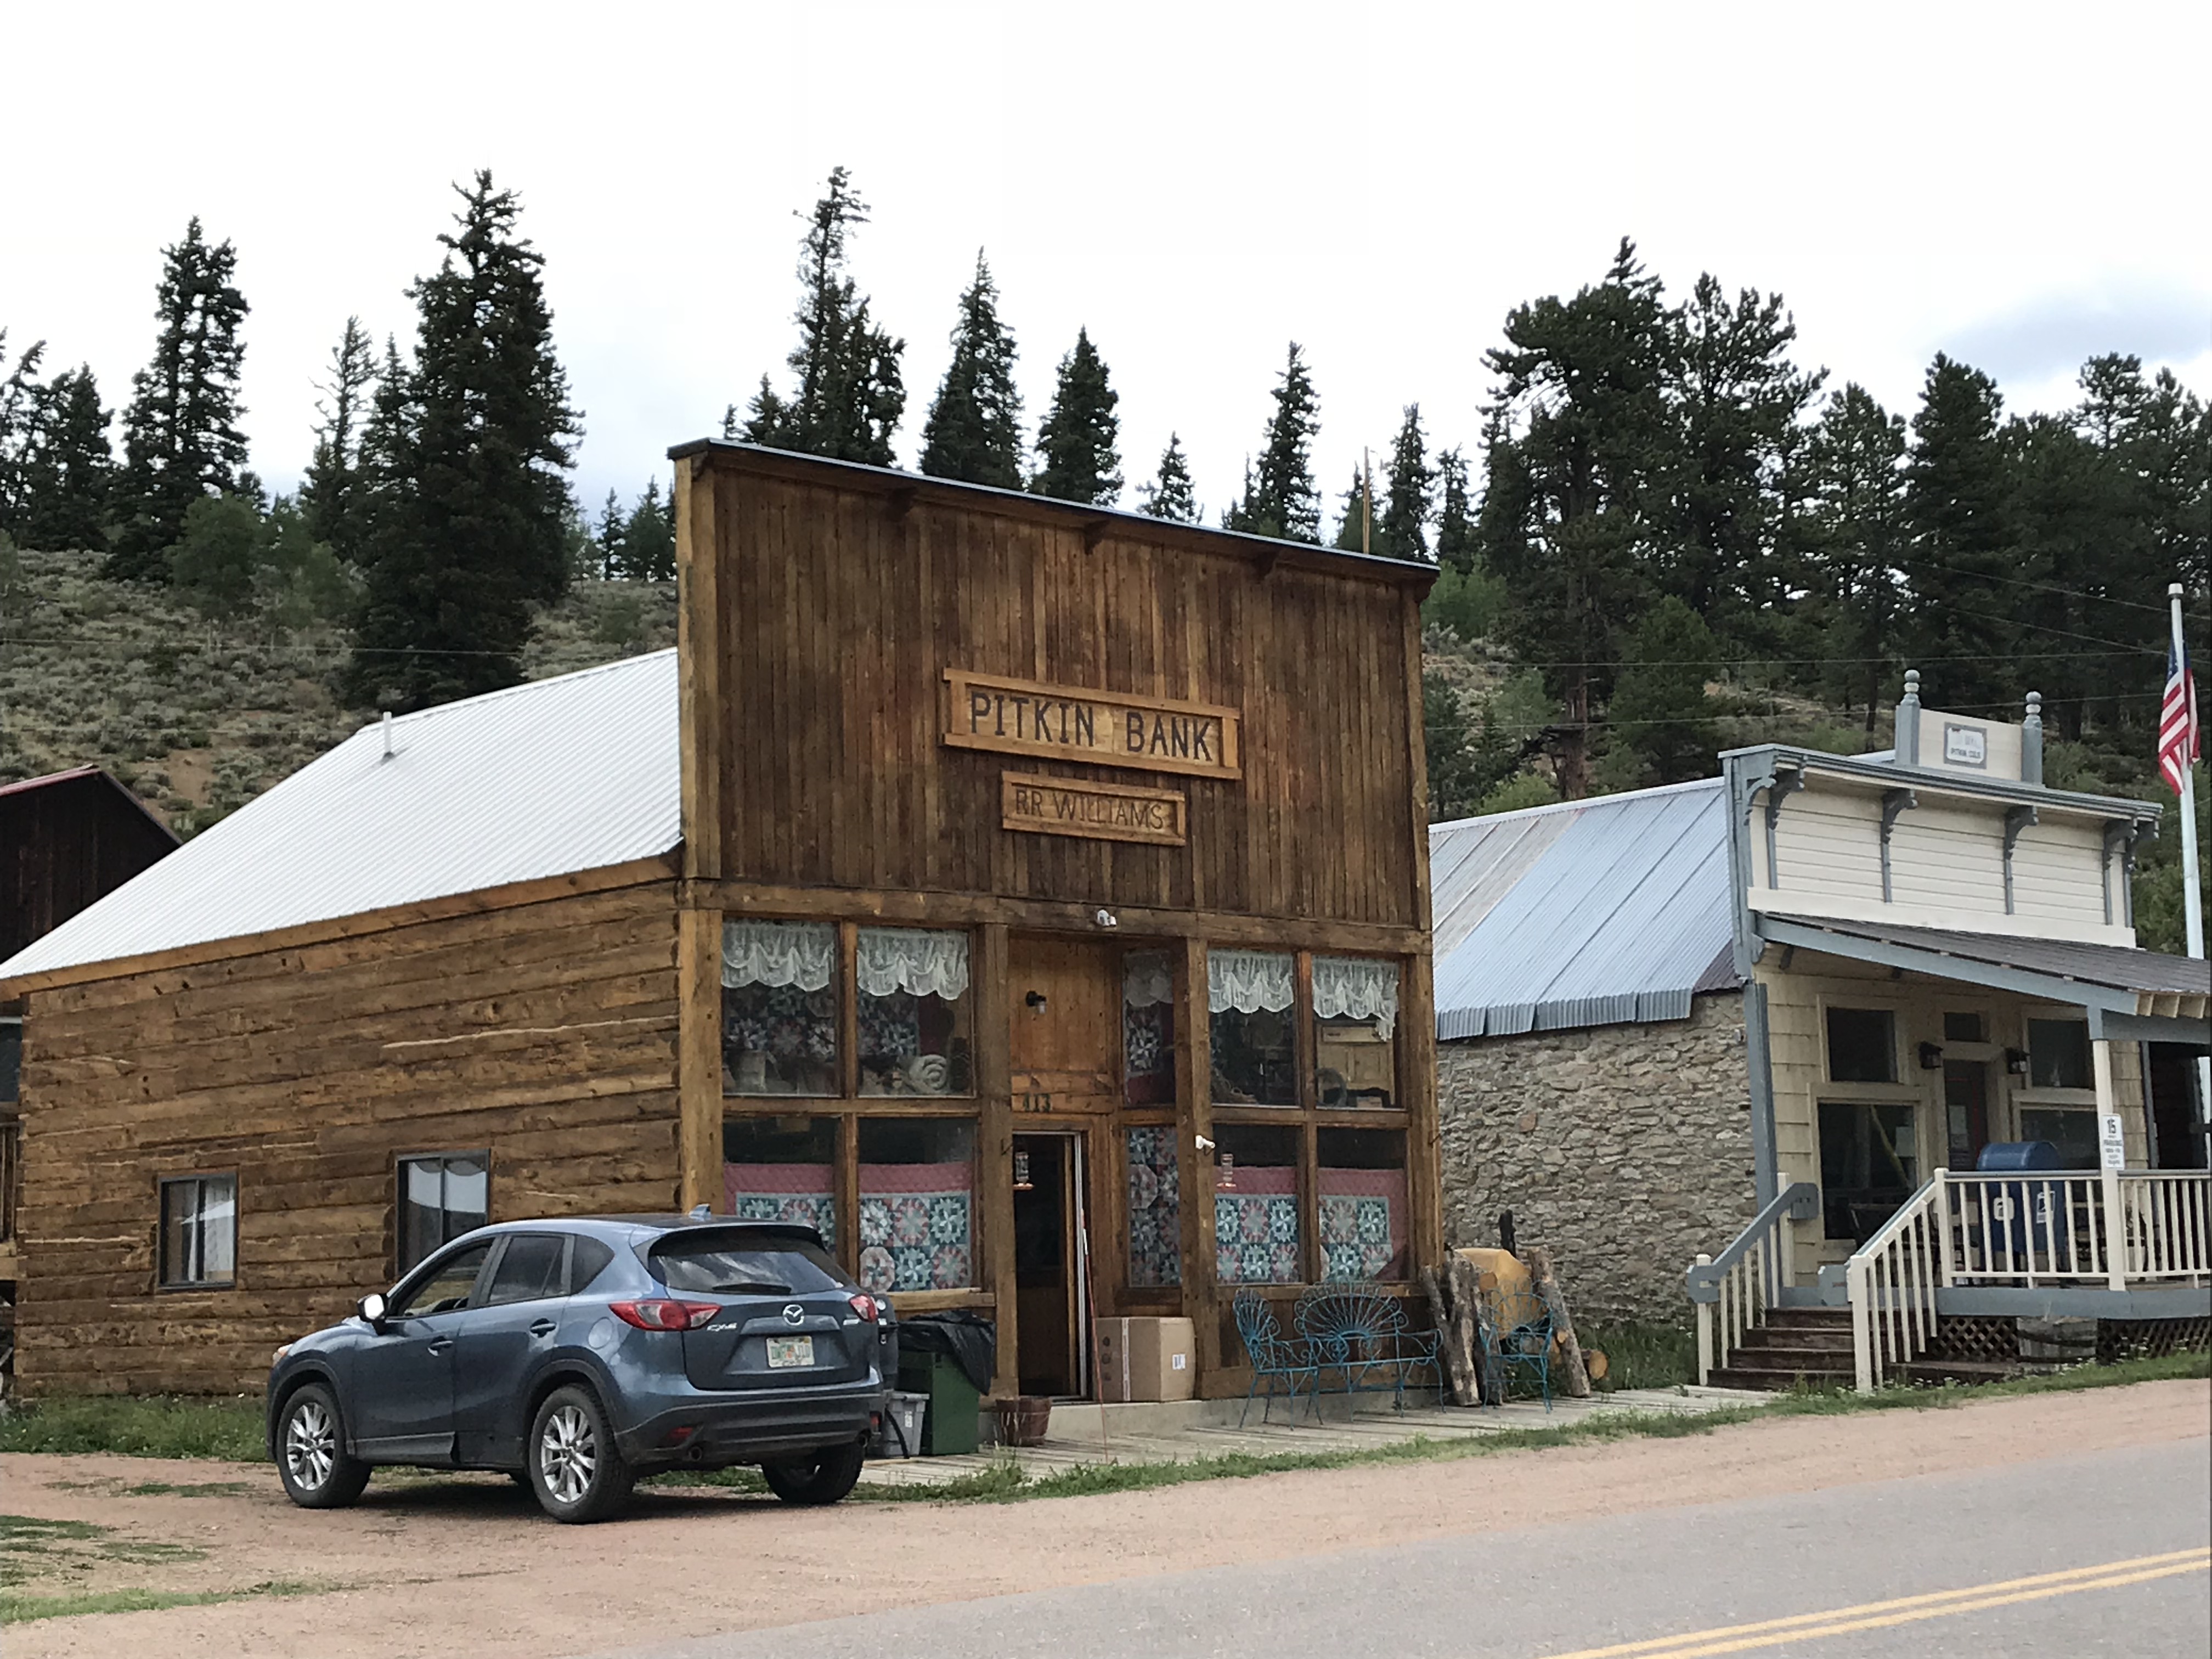
Pitkin Ghost Town:
This “living” ghost town is located about 27 miles east of Gunnison Colorado. Take US 50, east, from Gunnison, then turn left onto Route 76 in Parlin.
As an aside, we enjoyed several good meals in Gunnison. We had a wonderful breakfast at the W. Café, and, I can attest that the High Alpine Brewing Company makes great pizza!
At about the halfway point on Route 76, you will pass the “living” ghost town of Ohio City. (I call them “living” because some hearty souls are still living in both of these locations!)
The rain was falling fairly heavily as we passed through Ohio City, so we chose not to stop, but Pitkin should definitely be on your list of places to visit! It was one of the more “real-feel” ghost towns we toured as it wasn’t crowded with visitors, and enough of the old buildings have been restored that you felt as though you were actually walking down the town’s Main Street.
The Silver Plume General Store, located on the east side of town at the corner of 9th and State Streets, is a great place to stop for lunch. We certainly enjoyed our burgers from the outdoor grille! Note: Pitkin is the last chance at civilization if you’re venturing onward to Tincup, Cottonwood Pass, the Alpine Tunnel, or St. Elmo ghost town via Tincup Pass.
We didn’t make it to Tincup on this trip, being that Cottonwood Pass was closed for paving. We are hoping to, one day, try the Tincup Pass between Tincup and St. Elmo and hike to the Alpine Tunnel. Another journey for another time, I don’t worry that we’ll be back in Colorado soon! 😁
Below is a short video I took of the hummingbirds near the Pitkin Hotel. I’ve always liked hummingbirds, but I’ve never heard them make this noise outside of Colorado…
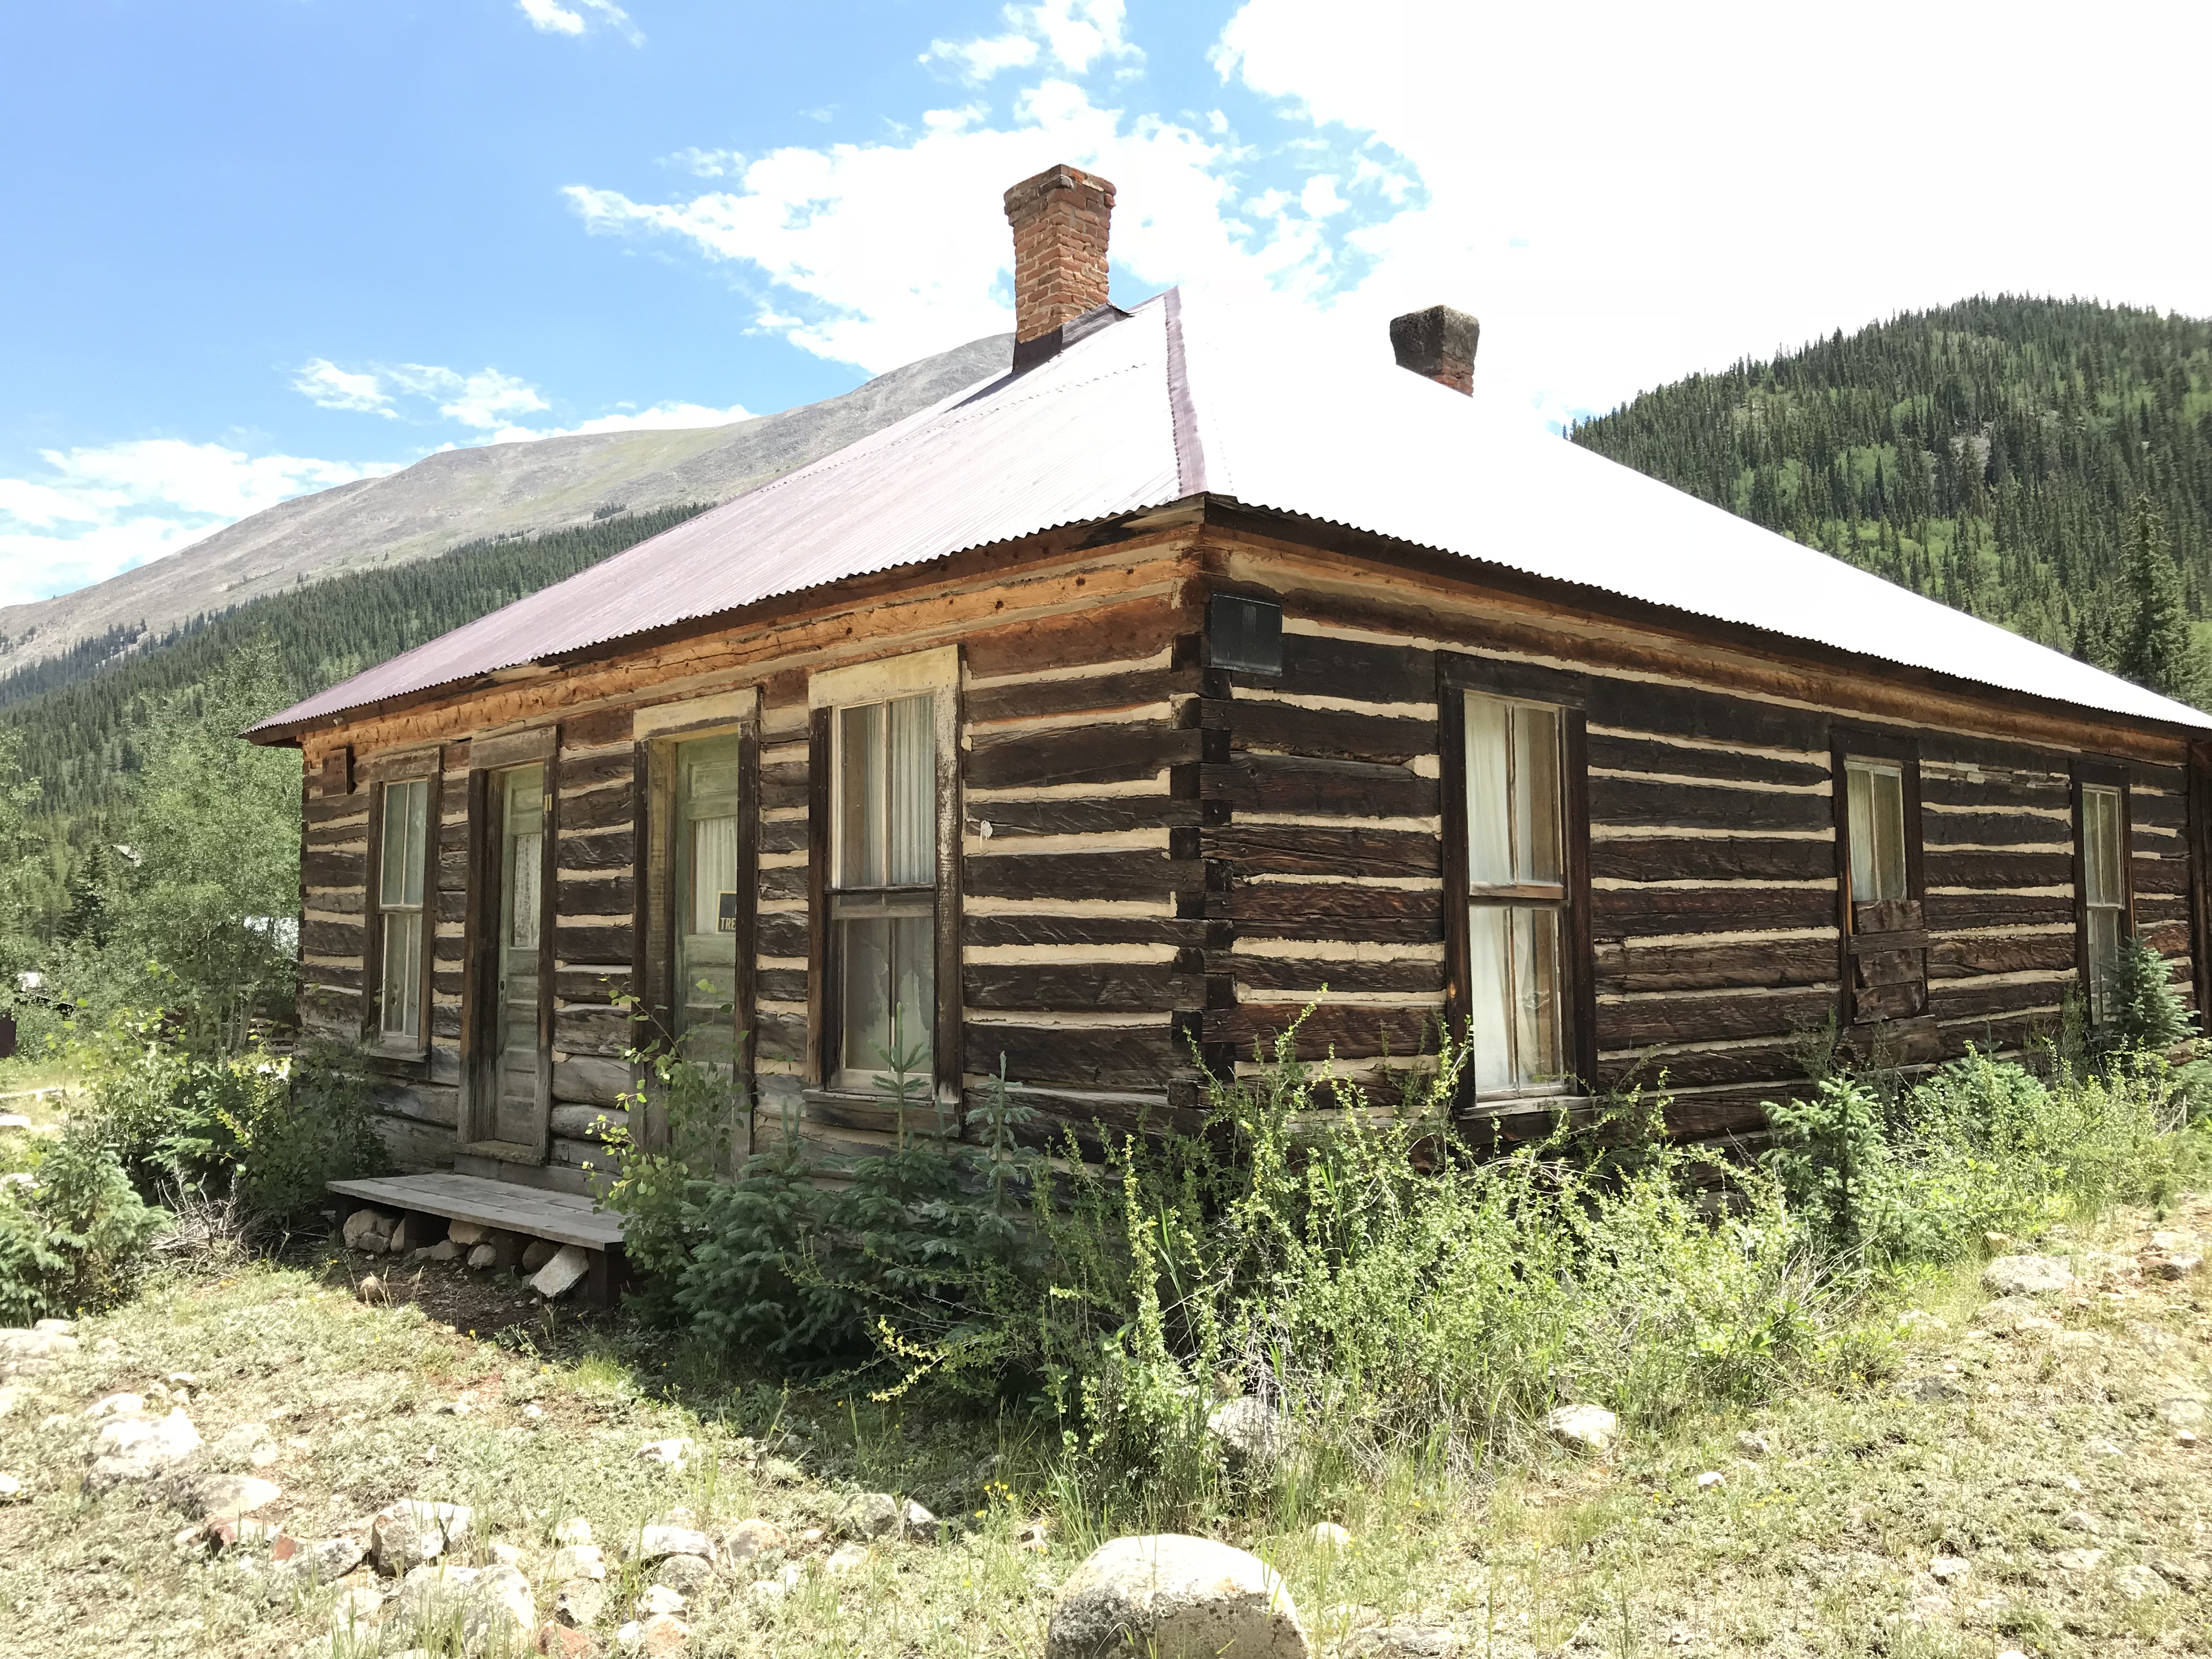
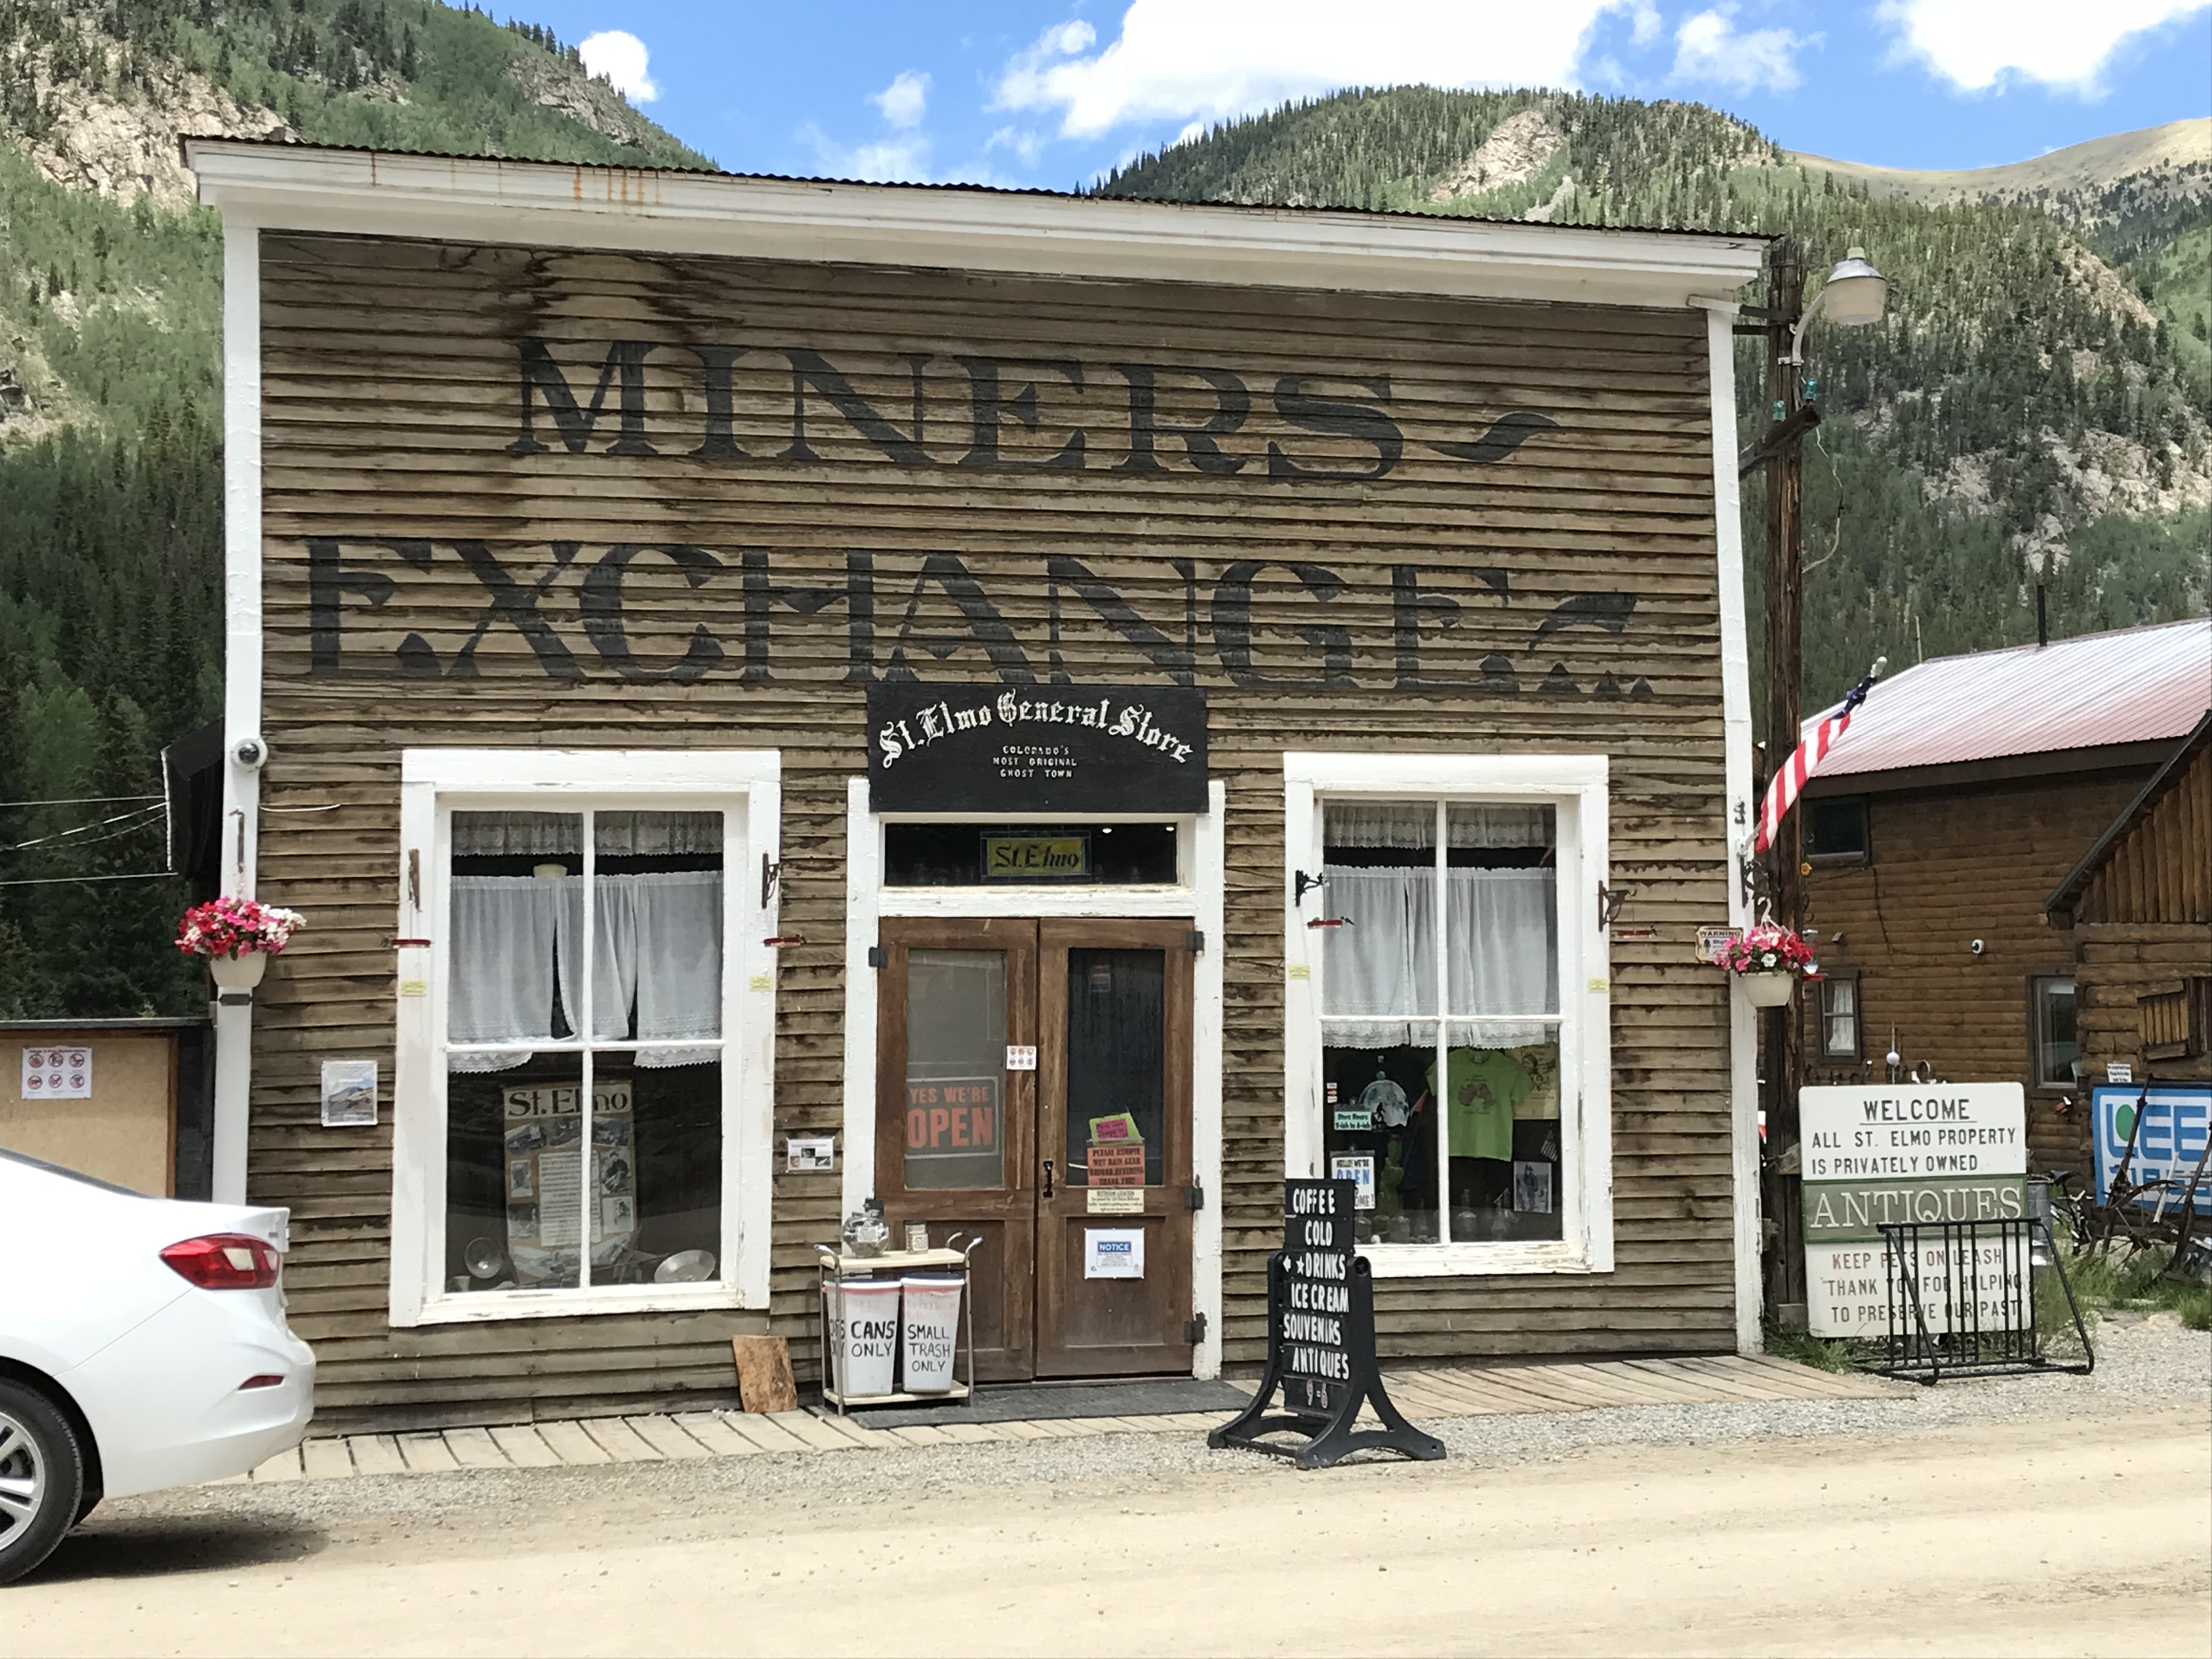
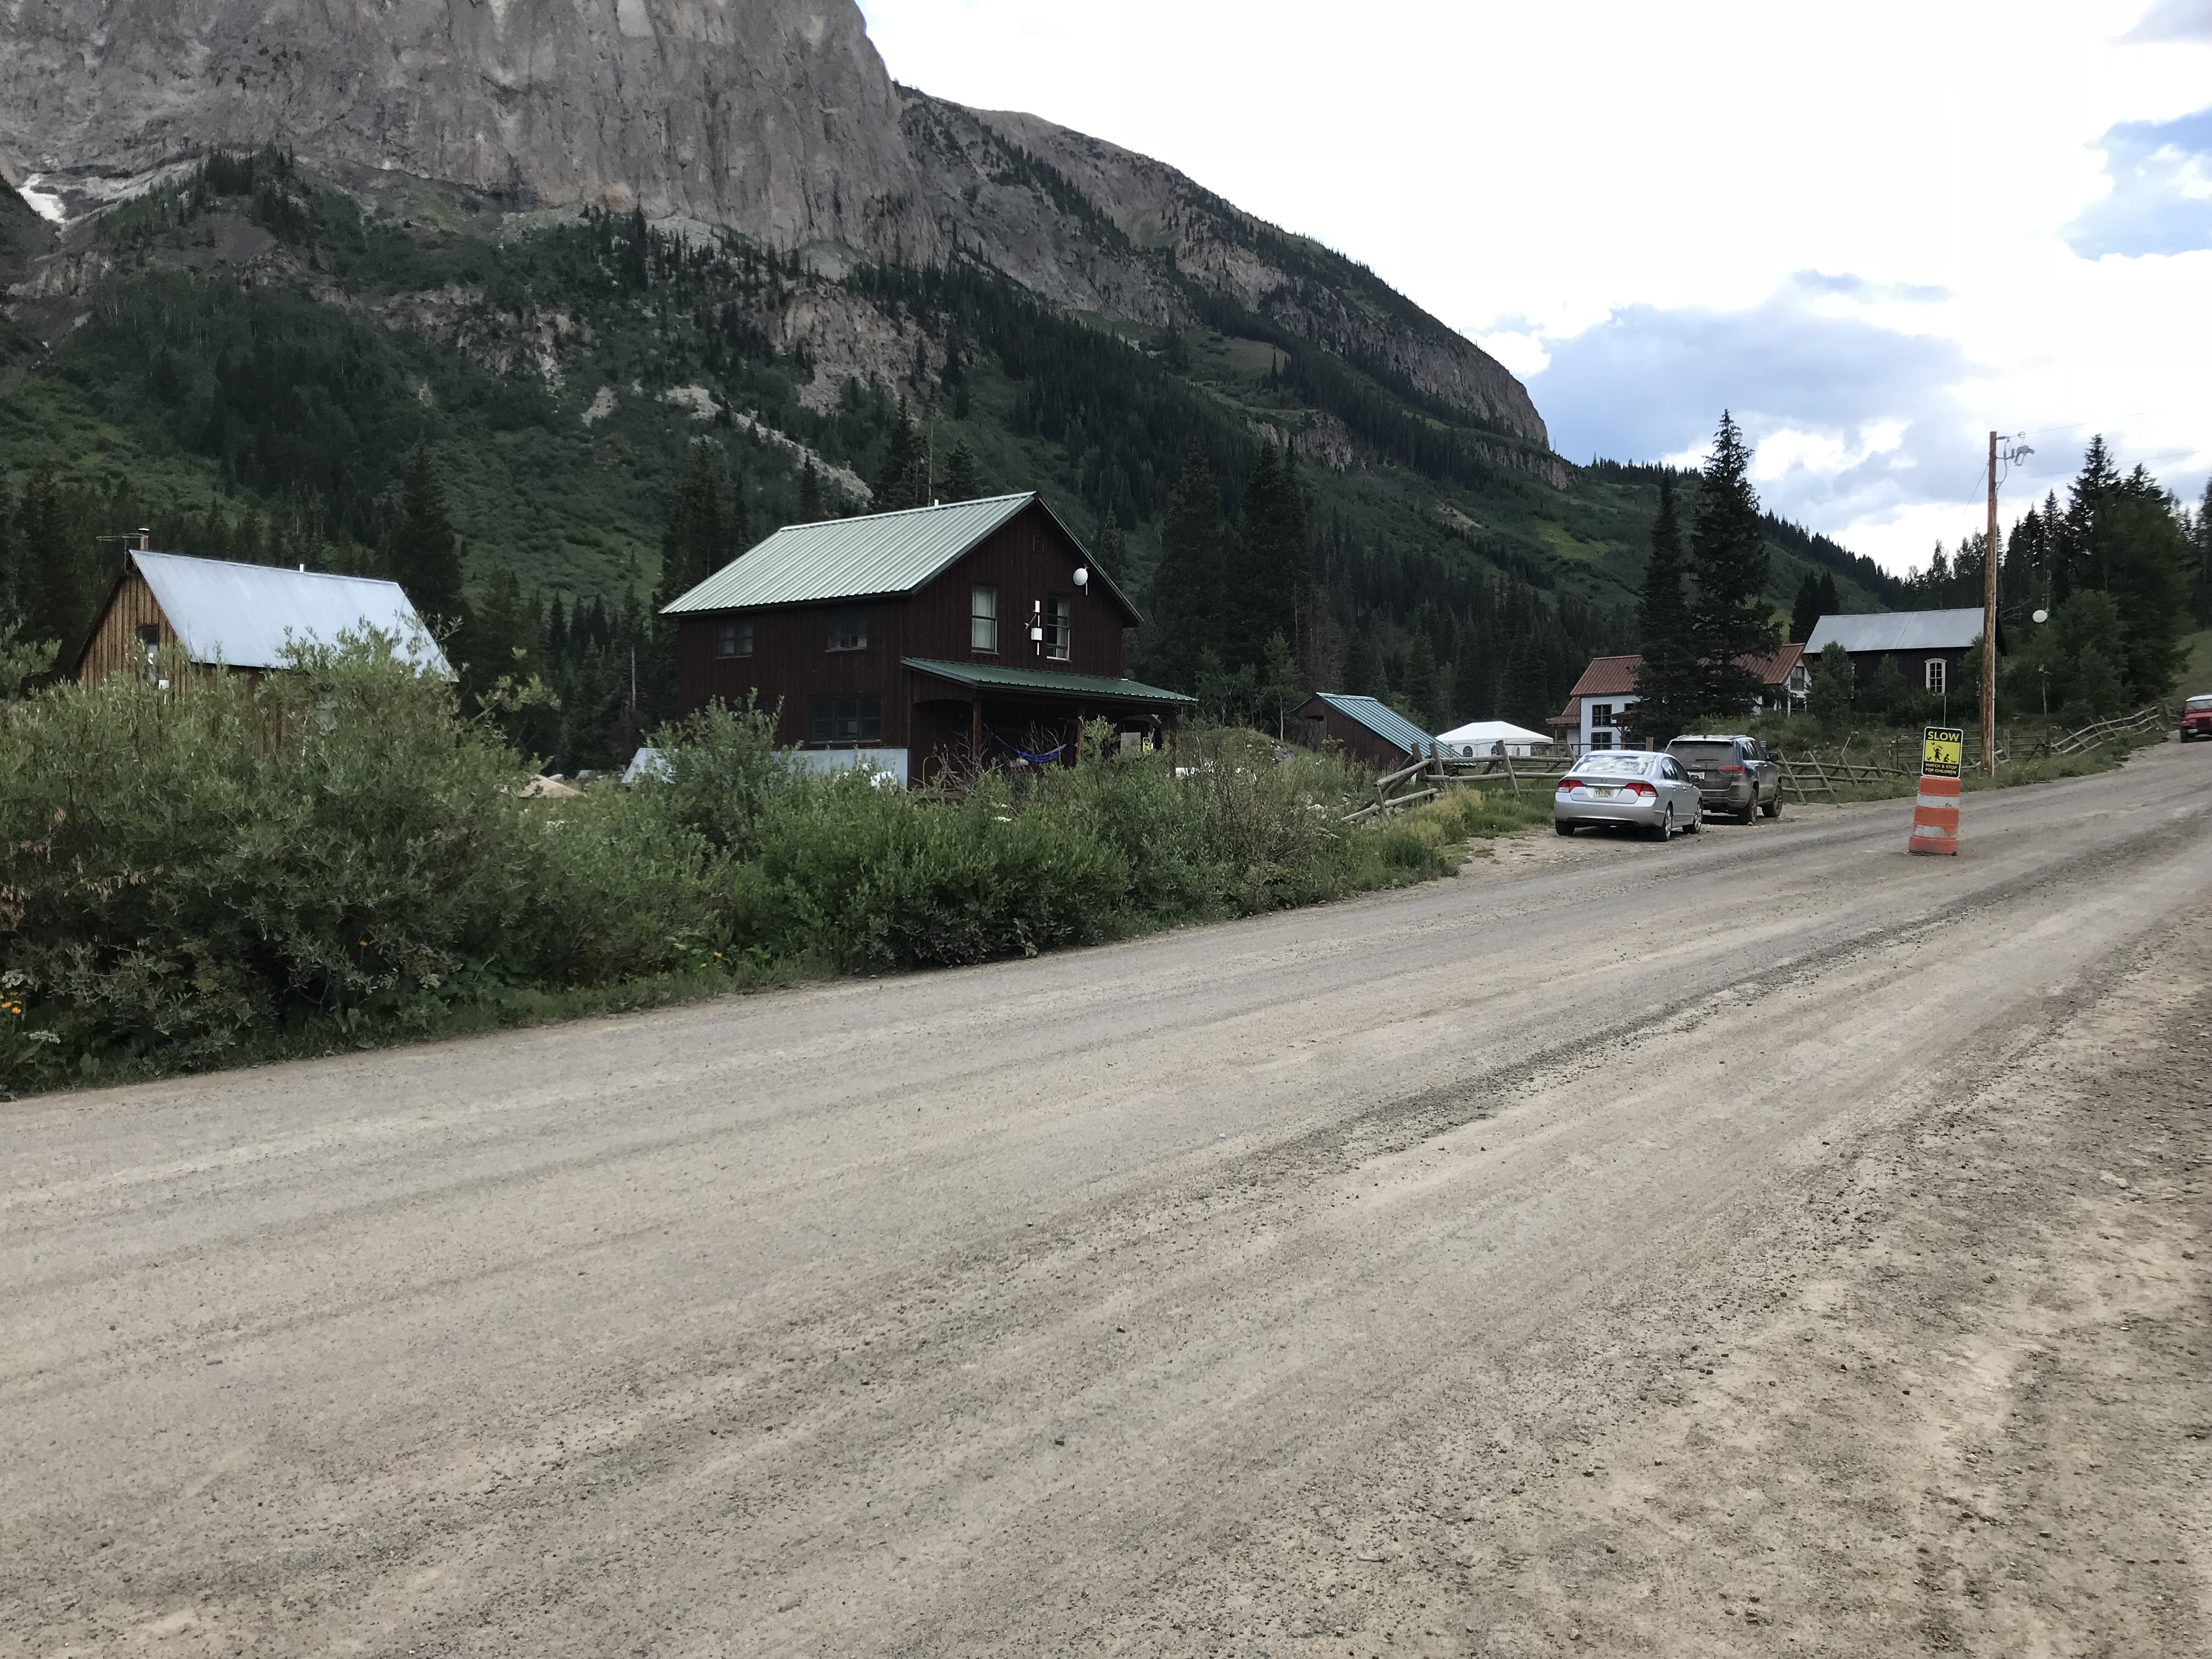
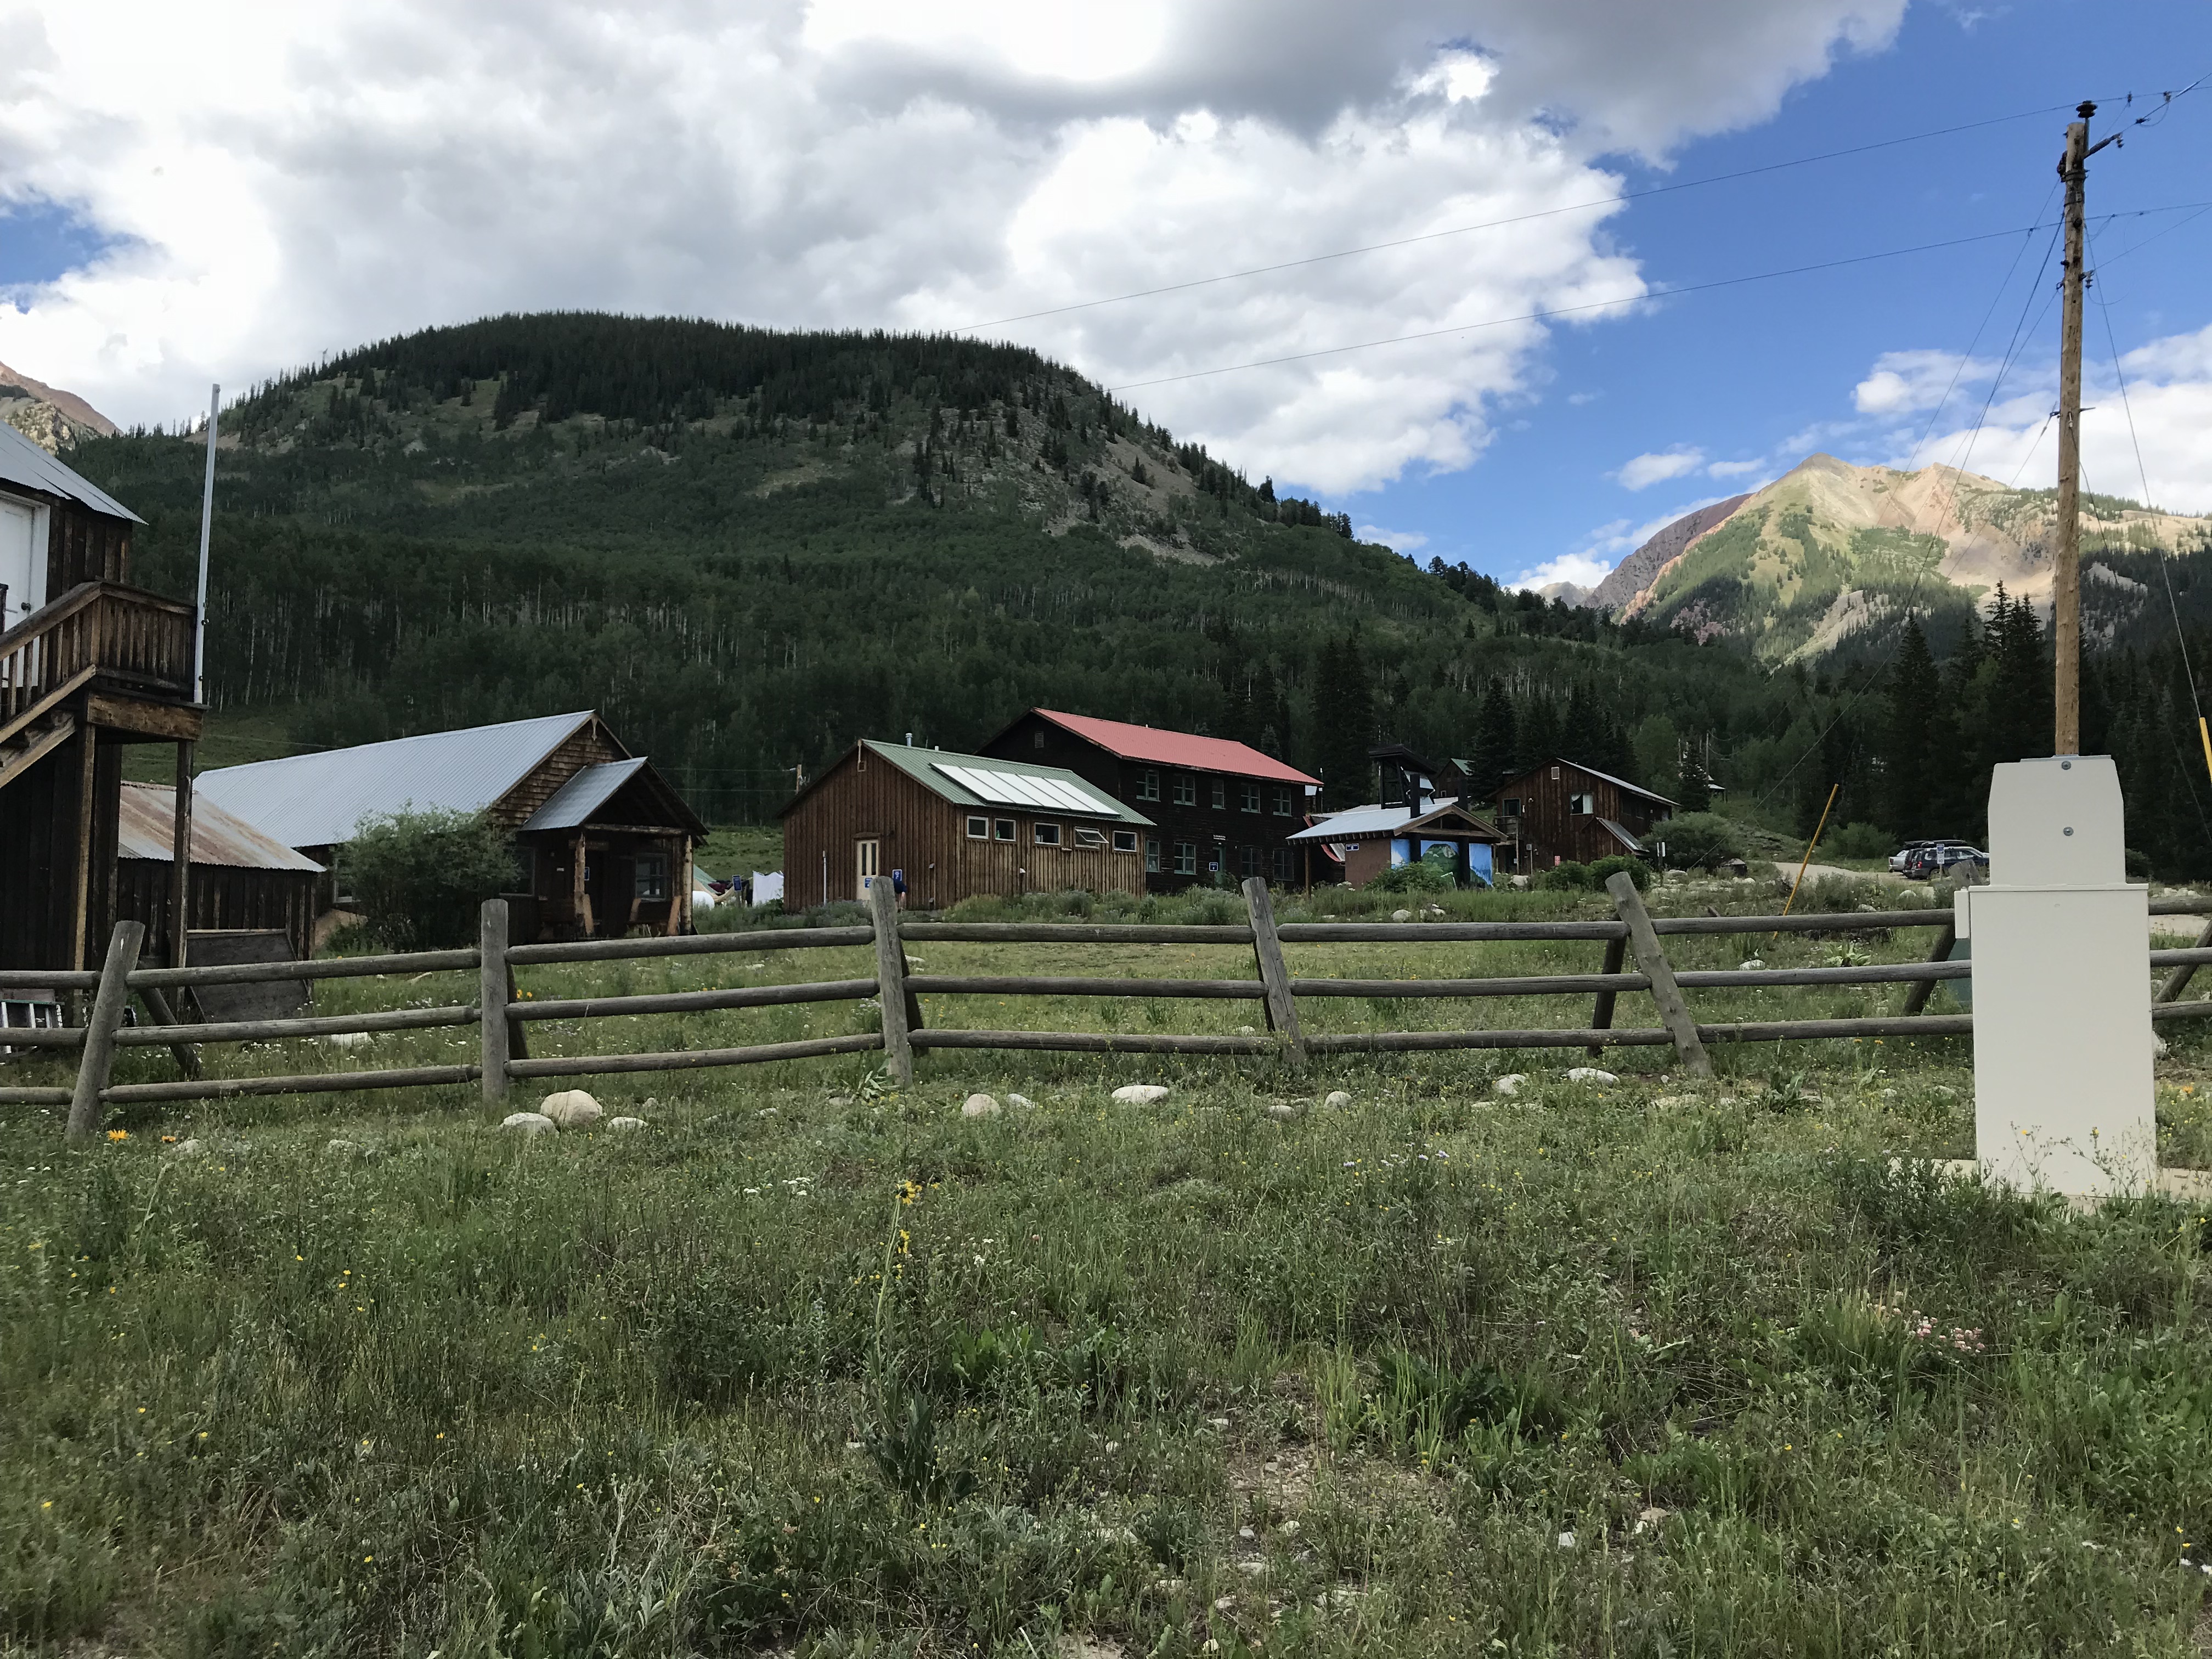
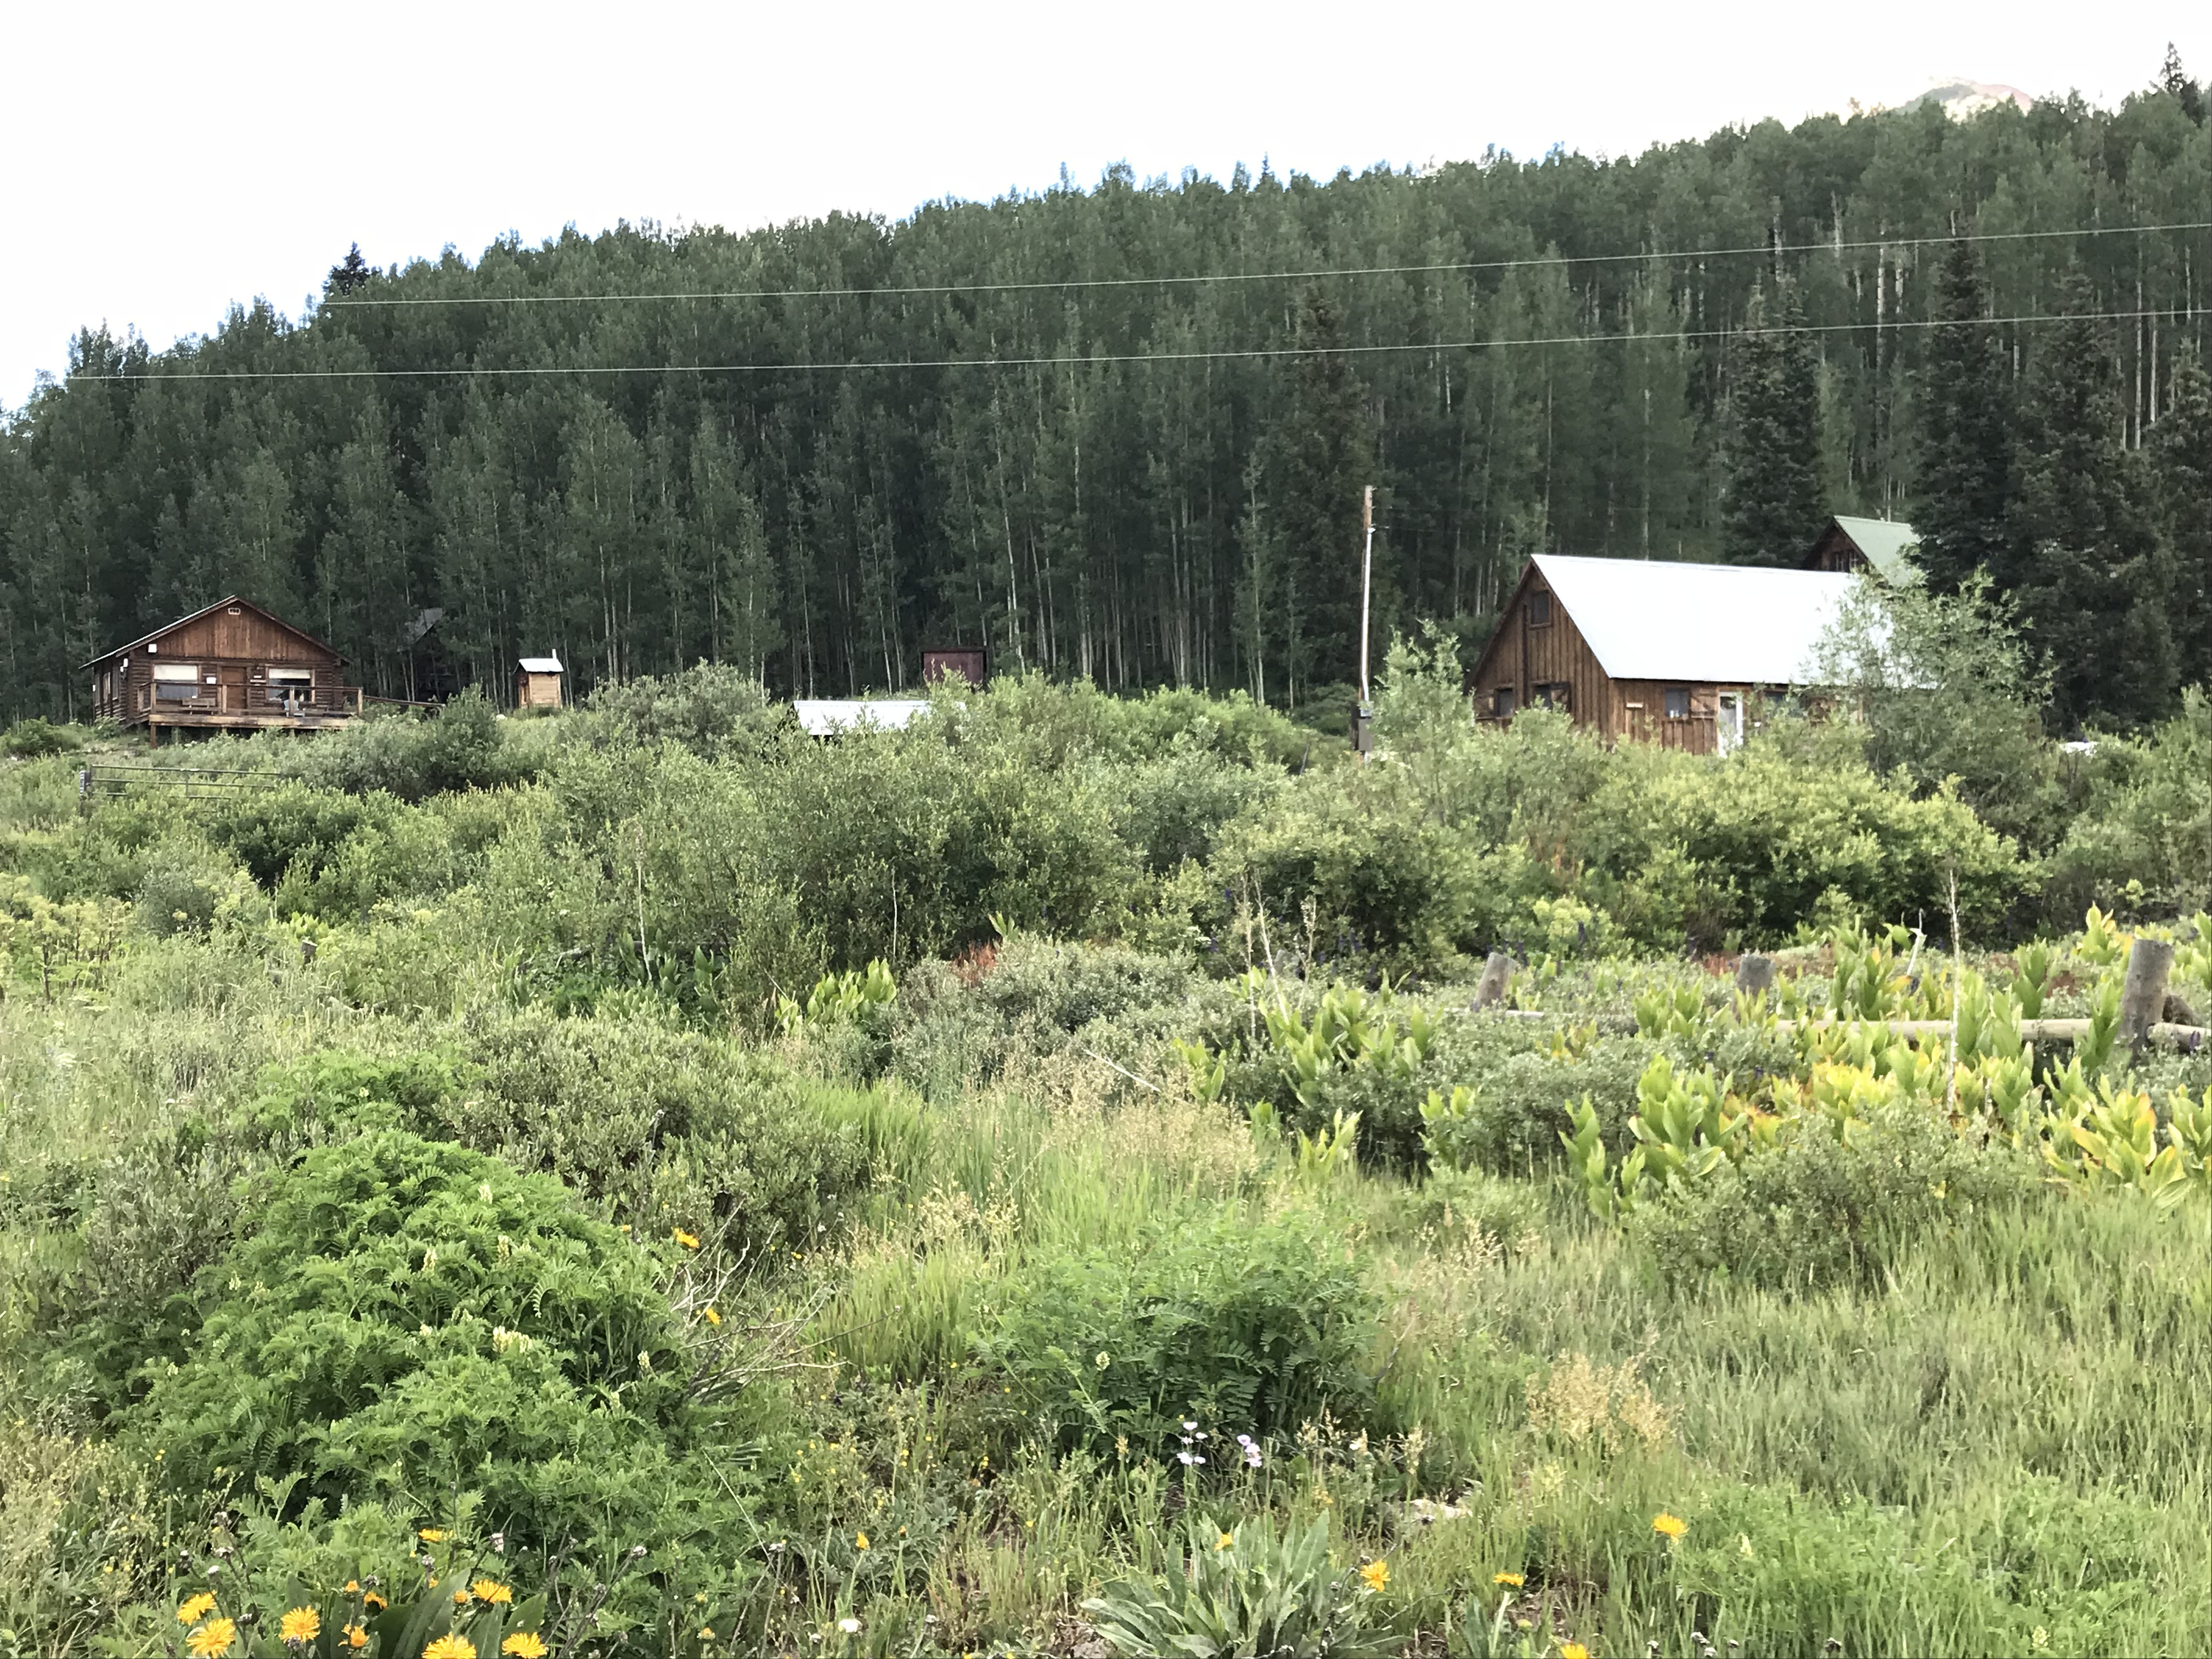
St. Elmo Ghost Town:
Everyone we talked to (and all the guide books we read) told us we HAD to visit St. Elmo, and it was, definitely, worth the visit!
The only disappointment I had with this site is that vehicles are allowed to park in the town itself. Its spirit seems to be somewhat ruined when there’s a modern Audi parked in front of Town Hall. 😝 Also, they were restoring several buildings while we were there—which I’m sure is necessary and will be wonderful when it’s completed—but it meant that construction equipment was parked along Main Street. *sigh* Guess we’ll have to visit another time! 😉
As I mentioned previously, if you’re daring, you can reach St. Elmo via Tincup Pass. If you’re looking for a tamer route, you can do what we did and take the long way. For this trek take Route 50 east of Gunnison through Monarch Pass (another great view) and turn north onto US 285 at Poncha Springs. Then take Route 162 west–an out-and-back road (for the less daring among us)–toward the Mt. Princeton Hot Springs resort and on to St. Elmo.
Near this area, there’s also a turnoff for Hagerman Pass Road to the site of another ghost town, Hancock. From there, you can hike to the Alpine Tunnel from the east, though it sounded as though the hike is longer and the view isn’t quite as good as hiking from the west side–we chose not to complete the hike at this time due to time constraints and the monsoon-fueled thunderheads that were threatening.
As I stated previously, since we missed a few ghostly spots this time around, we’ll be putting this area on our “must-visit” list for the future. It’s always a shame when you visit a location and find out you HAVE to come back to explore further (that happens to us regularly on trips, especially in Colorado…have I mentioned that I enjoy vacationing in this state? 😉)
Much to the Tranquil Trekker’s dismay (we DON’T feed wildlife) one unique feature of St. Elmo is that visitors are encouraged to feed the WAY-overly-friendly and almost-aggressive local chipmunks. You can buy food for them at the General Store. 😝
The Cascades Waterfall near Buena Vista, Colorado:
After leaving Saint Elmo, on our way east, back to US 285, we stopped at The Cascades. This is a lovely waterfall that’s just off the side of the road. It’s a beautiful, peaceful location where you can walk right up to the base of the river that creates a picturesque waterfall in this area as it cascades across boulders–hence the name. 😉
Gothic Ghost Town, Crested Butte, Colorado:
I was a bit disappointed by this town. The Rocky Mountain Biological Laboratory bought the town and did an exceptional job of restoring many of the old buildings which the lab uses for its work. This we knew going in… what I hadn’t realized is that the lab has taken over almost the entirety of the townsite. As it’s now, mostly, all private property, it’s almost impossible to tour around and browse the various buildings. 😒
I’m glad the town is being used for something, and I’m thankful to the lab for helping to save its structures, I just wish the historical features were easier to access. And a note to the general store in town: you close by four? In the middle of summer?? On a Saturday??? REALLY?! Afternoons are a good time for people to eat ice cream you know! 😝😳😉
Signs regarding the lab dotted the entire town 😕
You can reach Gothic by taking Gothic Road, Route 317, north of Crested Butte and the ski village. You can’t miss it, this is, literally, the only main road going north of town! 😉 This will also lead you to Schofield Pass that I discussed in this post.
Main Street in Gothic
The General Store with its questionable hours of operation 😝
Independence Ghost Town and Independence Pass:
Independence ghost town is located on Independence Pass (Route 82), around 16 miles east of Aspen, and around 21 miles west of Twin Lakes.
It’s just east of the peak of the Pass itself, and is, actually, easy to miss. It’s below the grade of the road and the two parking pullouts are small and not well-marked. There are, blue, “Places of Interest” signs, but you have to be watching for them. We actually saw the ruins of the mill, on the other side of the road, first.
The townsite is located in a valley, along the Roaring Fork River, framed by the towering Sawatch Range on both sides.
Independence Ghost Town:
This was my favorite ghost town of the entire trip! It’s easy to access as the site is located directly on Independence Pass. You actually park at a pullout on the Pass road and then hike out to the site, so no vehicles marred the view.
The walk into the town site is about one-mile in each direction, on an old, two-track, dirt road. (The hike is pretty easy as there is almost no elevation gain. Beware though, the town site still sits at about 10,000 feet in elevation.) You can see the town from quite a ways off, which helps you to imagine what it must have felt like riding a horse or wagon along that route during the height of the town’s life.
This would have been an incredibly beautiful place to live! (Had it not been so isolated and suffered such extreme weather.)
Colorado is one of my favorite places to visit. Click here for more posts on this awesome state!
The old mill in Independence, Colorado. (This is the first building we saw to clue us in that we were “there”.)
I don’t imagine this view was much different when the town was thriving
Independence Pass:
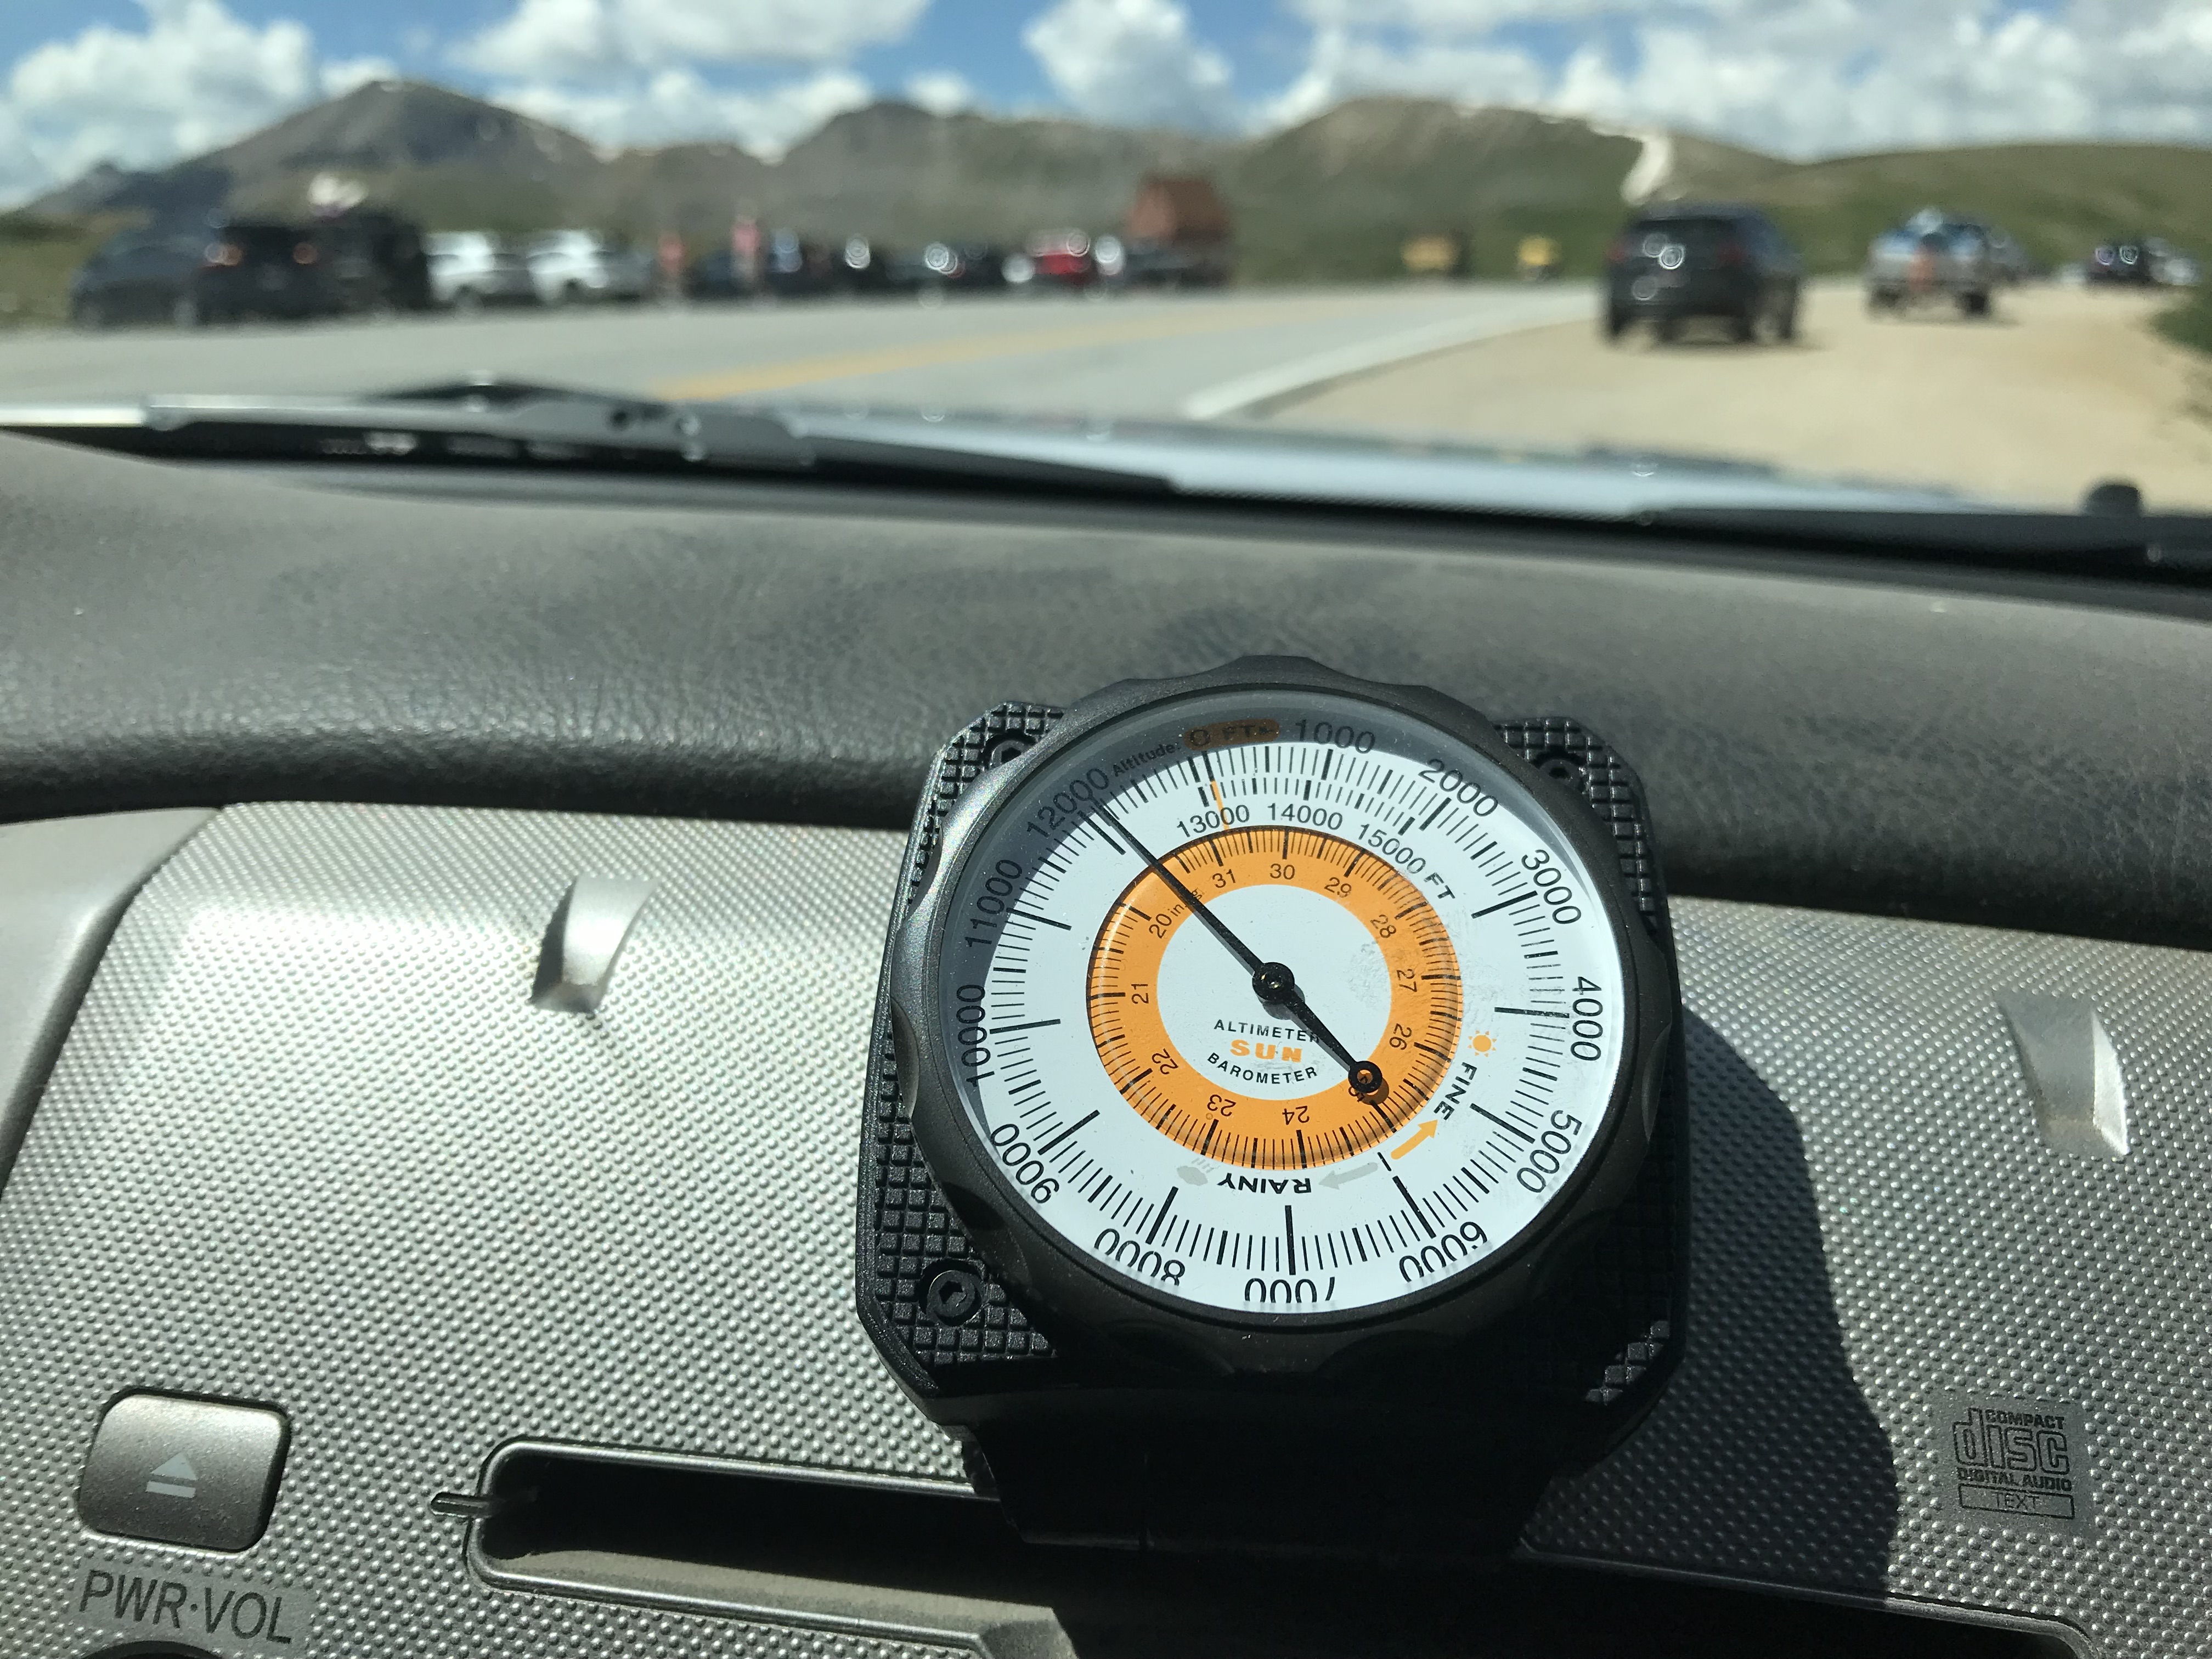
Independence Pass was incredibly beautiful, as well. This one has been on my Colorado Bucket List for some time and it did not disappoint! (It was also the highest altitude we reached on this trip, maxing out at, just over, 12,000 feet!) The scenic overlook and hiking area at the top of the Pass offer, almost, 360-degree views of the Continental Divide, which the Pass spans.
We finally topped 12,000 feet!
You may have noticed I’ve been enjoying using a Sun Company altimeter† in many of these posts. It responds to changes in barometric pressure caused by weather as well as air pressure at-elevation, so you may have to recalibrate it a little each day to maintain the most accurate readings. But, for amateur interest, it’s a fun, portable, way to keep track of changes in altitude–it connects to the vehicle using velcro so it can be easily removed and taken on a hike if you’re so inclined.
I made another videoof our drive up Independence Pass. I think my videographer skills got a “little” better with this one! 🤔
If you’re looking for something fun to do this summer, definitely check out the ghost towns of the Colorado High Country!
Have you visited any of these amazing places? Tell me about it in the comments!
Did you enjoy this post? Pin it!
†As an Amazon Associate I earn from qualifying purchases
Like what you read here today? Please feel free to leave a comment, like or share this post! Add your email at the bottom of the page, or the sidebar to the right, to be notified when a new post is published. By signing up for the email list, you will also receive a free copy of the Tranquil Trekker’s Top 10 Tips of Trekking Do’s and Don’ts!
You can also follow the blog on social media by clicking the links below!
We use cookies on our website to give you the most relevant experience by remembering your preferences and repeat visits. By clicking “Accept”, you consent to the use of ALL the cookies.
This website uses cookies to improve your experience while you navigate through the website. Out of these cookies, the cookies that are categorized as necessary are stored on your browser as they are as essential for the working of basic functionalities of the website. We also use third-party cookies that help us analyze and understand how you use this website. These cookies will be stored in your browser only with your consent. You also have the option to opt-out of these cookies. But opting out of some of these cookies may have an effect on your browsing experience.
Necessary cookies are absolutely essential for the website to function properly. This category only includes cookies that ensures basic functionalities and security features of the website. These cookies do not store any personal information.